Saturday, September 18, 2010

Combat Mission Afghanistan -Landing Zone from Hell: Forming Up in the Middle of an Enemy Kill Zone

This Combat Mission Scenario has me a bit puzzled.

Briefing says that I am in command of an airborne battalion (-) conducting an air assault on a fortified complex in some remote mountain area. When I saw the tactical map below I thought that somebody put the wrong picture in the briefing.

We are the red forces, right in the middle of the enemy. Are you sure this is not a Muji ambush?

 When I hit the OK button, I realized that the tactical map was correct. Whoah!

Our fearless battalion commander has skillfully landed us into an enemy kill zone. Click the picture for a better view.

Boy, that's a tough spot to have our desants!

First things first, I order massive suppressive fires on each hill top.

Combat Mission tip of the day: even when you can't see the enemy, area fire impacting nearby an enemy unit will have them suppressed. Click the image for a better view.

What to do next? Attack each hill simultaneously? I thought of extracting my troops from the kill zone, so I can attack the hills sequentially.

Would this work? Extract the battalion from the landing zone, move it into assault possition 1 and take Hill 2131. The leave some fire support detachments and FOs in Hill 2131 to support the attack from position 2. The third hill would fall by itself. Click the image for a better view.
Now, the stunner: this is a mini-version of an air assault that happened during the real war. During the early hours of April 12, 1987, the 1st Air Assault Battalion conducted this assault as part of a bigger operation by the Separate Air Assault Brigade. In real life, the Soviets succeeded attacked each hill simultaneously with one company and took all the real estate after a short firefight.


So, I better stop whining and keep it simple.

BTW, it has been a long time since I don't command a whole battalion in Combat Mission.

Wish me luck.

Cheers,


Thursday, September 16, 2010

Combat Mission Afghanistan Released

Battlefront has launched Combat Mission Afghanistan, a wargame based in the Combat Mission Shock Force engine  and developed in collaboration with a third party.

The setting is the Soviet-Afghan War and the game includes new 3D models, new weapon systems and new terrain tiles (snow and sorta-water).


There is a demo available. More impressions coming soon.

Cheers,

Battle- Flight-Worthy, At Last

Sorry for the lack of entries. I have been migrating all my gaming stuff to a new computer. Worst part was the HOTAS. I had old versions of the CH Products drivers and it drove me nuts to figure out what the hell was wrong. I'm not getting any wiser ...

Best part is that I finally got a serious look at TrackIR in ArmA2. During the weekend I played an online game in  some server (great group of tactically-minded guys BTW) and I noticed how much head swiveling was in place.  TrackIR is great for situational awareness and squad/fireteam command.

At last ... time to play.

Cheers,

Thursday, September 9, 2010

Attack Helicopter Units - Maneuver or Fire Support Units?

In an scenario from Decisive Action, a single US Division faces 3 Iraqi counterparts that are attempting to take control of Kuwait's capital and oil fields. The situation is dire for the US troops. Outnumbered, the only option for the US appears to be an operational defense.

I will post more details about this scenario at a later time. It's a lot of fun to scramble for every single nugget of firepower to stop the Iraqi tide.

Last night and for the first time I could use attack helicopters with moderate success. Please click the figure below to see a composite graphic of the attack that A/1-44 AHB brought into an Iraqi reconnaissance battalion.

Click the figure for a better view. The region inside the blue circle has been expanded for a better view. 
 In a typical Cold War scenario, this is exactly what AHBs would be doing: maneuvering independently and whacking the hell out of Soviet armored formations. However, it looks that in some US Army circles, the role of attack helicopters is being reconsidered from maneuver units to fire support units. Click the figure below to read an article that appeared in the Air Force Magazine. To fight an insurgency, it makes sense to have attack helicopters as fire support units. But in a high intensity conflict like Korea, China or Iran?

Click the figure to read the article.


Cheers,

Monday, September 6, 2010

Contact With the Enemy: More than a Plan Killer

You remember the famous phrase: "no plan survives contact with the enemy".

Well, the other thing that goes away, at least for a while if you are lucky, is command and control (C2).

Last night I was playing a sandbox, fictional scenario in Scourge of War. I was in command of a Union division and I had a hell of a time pulling a brigade out of contact. It can be done, but if the morale of the troops is slightly  less than super, the retreat quickly becomes a rout.

Maneuvering and avoiding deployment as the plague! Note the graphics glitch that makes the horses fly.

Troops embroiled in combat. These weapons have a maximum range of 160 yards and you may feel tempted to minimize the distance to the enemy. Be careful, the closer to the enemy, the easier your troops can rout during a retreat.

Having other regiments in the flanks will help morale and to break contact. However, deploying all units to the front will leave you reserve-less and anxious.

My troops get cold steel from their right flank. In the confusion of battle, for a good while  is difficult to figure out who is winning.

Cheers,

Sunday, September 5, 2010

Lenovo Split Screen - Finally I Can Run "Decisive Action" Without Changing My Screen Resolution!

Great as it is, Decisive Action has its quirks. For example, it can run only at certain specific screen resolutions. Modern monitors don't always render stuff decently when their resolution is set to something different than their native one. That's why "Decisive Action" was sort of a sore to watch in my desktop.

In my laptop, there is this Lenovo Split Screen gadget that allows you to set sorta multiple monitors. It is great to play a game in one split and watch something else in the other.

Waiting for somebody to show up at SimHQ while playing Decisive Action. I know it looks silly as Decisive Action is a game that plays inside a window. But this trick can be used for any other game that plays in full screen.

Cheers,

Throwing Books at Victoria 2

When I play a tactical or a grand-tactical game, I check a real life field manual. Color me a weirdo, but I'm THAT interested in warfare.

When it comes to strategy or grand-strategy games ... well, there are no field manuals.

I am playing Victoria 2 right now. Started a game as Argentina and I have this deer in the headlights look. All I can do (game and interface wise) is clear to me. The un-answered questions are: what, why, where, how, when and who?

The following book is being helpful to answer those questions.


It's a primer in military strategy and it is aimed to provide a framework rather than thorough analysis. It is very concise and has a no BS approach.

As for my questions above, chapter 2 has a brief description of national security interests. The author classifies them in universally and variably important. Universally important interests are valid for every country in every situation. The variable important interests are followed depending on the particular situation of the country.

Universally important national security interests

  • National Survival
  • Homeland Defense
  • Domestic Tranquility
  • Military Power
  • National Credibility
  • Freedom of Action
Variably important national security interests
  • Peace
  • Stability
  • Prosperity
  • Ideology
  • Geostrategic Position
  • Morality
The list above may sound obvious for some veteran armchair strategists here. But the above list is helping me a lot to have a framework for my strategic plan. The book also describes a six-step strategic planning process. I'm going to comment on that in a future entry.

Cheers,

Wednesday, September 1, 2010

British Forces Training Grounds - Afghanistan in the UK

And speaking about videos, this documentary is being shown at VBS.tv.


Cheers,

Prisoner of the Caucasus - Good Viewing/Reading Material About A Region In Eternal Conflict

I have the good luck of chatting and e-mailing with one of the readers of this blog, Olav. He always surprises me with his insight and with reading/viewing material about almost anything.

A few days ago, when I posted about the book on the Russo-Georgian war of 2008, he commented and linked to a conference about the conflicts in Abkhazia.

One of the best links Olav provided me was the one to a video entitled "Immortal Fortress", which is about the conflict in Chechnya. There is some great combat footage that is worth seeing. Neither Olav or me are making any political points with this video. Just see it as an insight into combat in so-called "low intensity conflicts".


The whole region is a continuous source of insurgency and counter-insurgency. Past month, I read this article in the print edition of Foreign Affairs, and I was amazed at the history of revolt that the region holds (see the "Mountains Beyond Mountains" section of the article).

Why am I interested in this region and its military history? Well, I'm interested in ANY type of military history. But these type of fights can be simulated in both ArmA2, LOMAC and DCS Black Shark!

Cheers,

Command Ops: Battles from the Bulge - Tutorial Scenario - Day 1

With the new patch for Battles from the Bulge, I have no more excuses to not continue with the tutorial scenario.

This is a continuation of a series of entries I made quite a while ago. After a long digression, I settled for a  (sorta) plan.

During the first day  I want to secure the Steinebruck bridge and extend the bridgehead towards Lommerweiler.

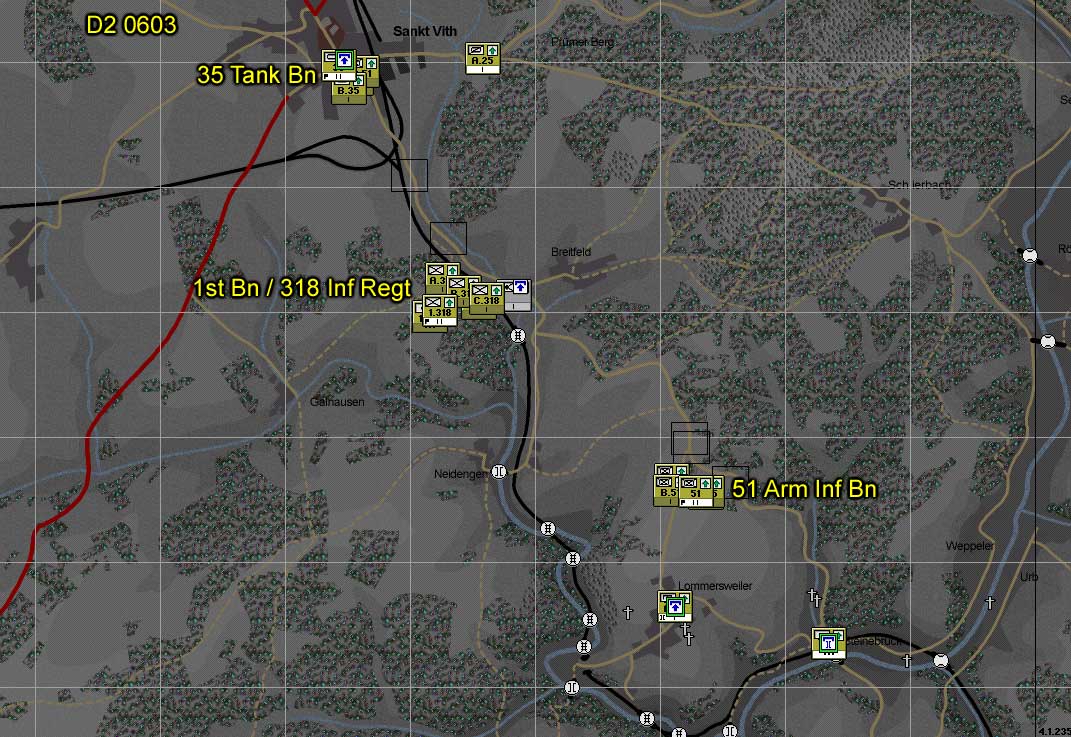
The brigade I have available for the first day has one infantry battalion, one armored infantry battalion and one tank battalion. The troops on foot are useless for any assault on the Steinebruck bridge. The enemy occupying the heights of Lommerweiler would have a hay day if I move my foot infantry through the low terrain surrounding the bridge. I decided to use the 51st Armored Infantry Battalion and 35th Tank Battalion for an assault on the bridge. The 1st Battalion-318th Infantry Regiment is of better use if they cross the river where wheeled/tracked vehicles can't and try to attack from some sort of concealment. See tactical plan below.

Opening moves. Click the image to expand it.

Did you know that you can combine both the 51st and the 35th Bns in a single coordinated attack by clicking on one Bn HQ, pressing the Ctrl key, clicking the other Bn HQ and then issuing an attack order? The most senior HQ unit will then be in operational control (OPCON) of both battalions and will guide them through the attack. Only caveat is the increased command load for the HQ unit in control (watch for those in the Cmd tab, listed as "capacity" [how much the HQ unit can handle without too much trouble] and "load" [how much the HQ unit is handling at the moment]). If "load" exceeds "capacity", the two-battalion task force may suffer some extra orders delay. I'm kinda milking the system here, because during the first hour of the scenario there are no orders delays.

 After hours of hard fighting, at 1100 of day 1, my forces finally cross the river. I have detached a cavalry troop for reconnaissance missions. By now I need a larger bridgehead.

It was about time! We have crossed the river.

As soon as some space is gained across the river, the two-battalion task force (51 Arm Inf Bn and 35 Tank Bn) is ordered to pivot west and continue their attack towards Lommerweiler. By this time the foot infantry is in position to attack Lommerweiler in the opposite direction. With the combined firepower of an entire brigade, the enemy breaks down easily. Lommerweiler falls in our hands by mid afternoon.

The gods that wield swords and hold shields have been good with us so far, but the gods that ride horses have been more generous. That cavalry troop that I detached was ordered to conduct a reconnaissance mission towards St. Vith using the east flank of the enemy. The troopers reached St. Vith unopposed and found no signs of the enemy so far. By now the time is 1524 (day 1) and this is a pivotal moment in today's fight. This opportunity needs to be exploited with no delay. See map below for the new set of orders.

Onto St. Vith!

After some 40 minutes of nervous waiting (are orders delay fun or what?) the 35 Tank Bn moves towards St. Vith. The tanks reach St. Vith around 1730 PM with not enemy to shoot at. I feel like I sucker-punched the Germans and I wish I could preserve the battlefield as it is until the next day, when my reinforcements arrive. As the night falls, the enemy continues to attack towards the Steinebruck bridge and to put pressure in my foot infantry near Breitfeld. My troops hold their positions through a long night.

We are ready to be reinforced!

To be continued, stay tunned.

Cheers,