Sunday, March 27, 2011

Thursday, March 24, 2011

Combat Command, The Matrix Edition - Now Available

I remember some years ago -back when a previous version of this game was being sold by Shrapnel Games- playing the demo and trying to make my mind about buying it or not. When I decided to buy it, it was discontinued! Doh!

Now it is being published by Matrix and it was released today.

Combat Command is an hexes, turn based (IGOUGO) war game with a variety of scenarios set during WWII. The scale of the game is tactical/grand-tactical, with scenarios big and small putting you in command of three or four divisions at a time. Each hex represents 500 meters and each turn corresponds to two hours of action during day time and four hours during night time. Smallest units are companies.

For this re-release, there are new scenarios (Western, Eastern, Southern and Pacific Fronts, I will post a complete list of scenarios in a future entry) and revamped tiles' graphics.

The screenshots below are clickeable.


And no, I didn't buy this game for its looks ... :)

Cheers,

Tuesday, March 22, 2011

Combat Mission Battle for Normandy - Quick Battle: Bil Hardenberger's vs. Warren Miron - Four Minutes In, The Fog of War is Still Thick

A couple of days after this video left me scratching my head, I read about Bil's wonderfully illustrated and explained battle report of a quick battle with the upcoming Combat Mission Battle for Normandy.

Bil has worked with Battlefront in the past as a consultant (he served in the US Army) and animator for the pixel soldiers in Combat Mission Shock Force. Now he is listed as a beta tester but I bet his work with Battlefront goes beyond that role. :)

Besides showcasing the new installment of Combat Mission, this report is excellent reading material because it covers both the "what" and "why" of the tactical actions. 

Given the size of the map, it is no surprise that contact was achieved shortly after the scenario start. Bil has lost a tank that he was using in the combat patrol role. Despite the heavy smoke that now covers the US tanks he had eyes on before, he knows that the contact so far has been with a fraction of the enemy force. An M-10 tank has showed up at other avenue of approach and it looks like Bil wants to engage it sooner than later. It looks as if he wants to blunt the enemy spear as much as he can before committing his main force for the final blow. It is a risky premise and the cautious in me would wait until Warren commit his forces instead. We will see ...

Cheers,

Monday, March 21, 2011

Steel Beasts ProPE - Match Offensive Tactical Tasks to Terrain

This Steel Beasts ProPE scenario still haunts me.


A US tank and mechanized infantry company team (1 platoon of M1 Abrams and two platoons of M114 AFVs) must attack and seize a town located some 6 kilometers northwest of the tactical assembly area. Rolling hills, plenty of wooded terrain crossed by some deep ravines. A Russian reinforced mechanized rifle company is defending. Time allowed for this mission: 30 minutes!

I lean my axis of attack on one of my flanks to avoid the pesky Russian infantry outposts. Otherwise I will get pummeled by enemy artillery. We are moving to contact and everything works fine so far.

Movement to contact. Contact is likely now and the tanks are overwatching the movement of the infantry.
To reach the objective, I chose a questionable approach route. A single road in the middle of heavy woods.

A two tank section leads the way as a sort of advance guard. The other tank section is now behind us,intermingled with the infantry. Very stupid train of tactical thought I was into ...

The wooded terrain ends 1.5 km short of the objective. Once the woods clear, contact will be unavoidable. My two-tank section will make contact first, but I will not be able to maneuver other units based on that contact because there is only one road and the terrain surrounding it is un-passable, at least for the tanks.

Contact! The two tank section just emerged from the woods (left) and is immediately engaged by Russian armor. Note the red rod in the M1 tank in the left. It is an enemy shot that resulted in a catastrophic loss. I am in the tank in the right, trying to maneuver.
Once contact is made, the commander should engage his team into the so-called "offensive tactical tasks". One of those (and the one I intended to push my team into) is "advance in contact" (maneuvering your team into an advantage position to destroy or assault and enemy position). Didn't work out very well in this case: lost one tank right  and thus fire superiority over the enemy off the bat, my main body will arrive in a narrow column. Aaaggghhh!

The infantry arrives through the road. My other two-tank section should be next, I hope (?). Caught in the open, these guys have little hope to survive.

The Russian tanks rush to put a cork on my attack. It's now a knife fight (I am the guy in the background).

Advance in contact is possible only when there are alternatives to maneuver. The little area I had available was of no use for that.

Still puzzled on how to achieve the objective. I will keep trying!

Cheers,

Saturday, March 19, 2011

Understanding the Operation in One Game, Playing it in Another ...

I am a fan of the Panzer Campaigns series. However, I struggle to plan at the operational level in titles of this series where corps-sized formations are spread over 70 kilometers or more. I have no issues moving a thousand counters, but if I don't see the whole corps and its operational objective/s in one single snapshot, I just don't get it.

To be completely fair, Panzer Campaigns has a zoomed-out view, even a jump map that shows big chunks of terrain and troops at once. But the structure of armies and corps is difficult to grasp in those. The zoomed out view in Panzer Campaigns even obscures some roads in certain types of terrain.

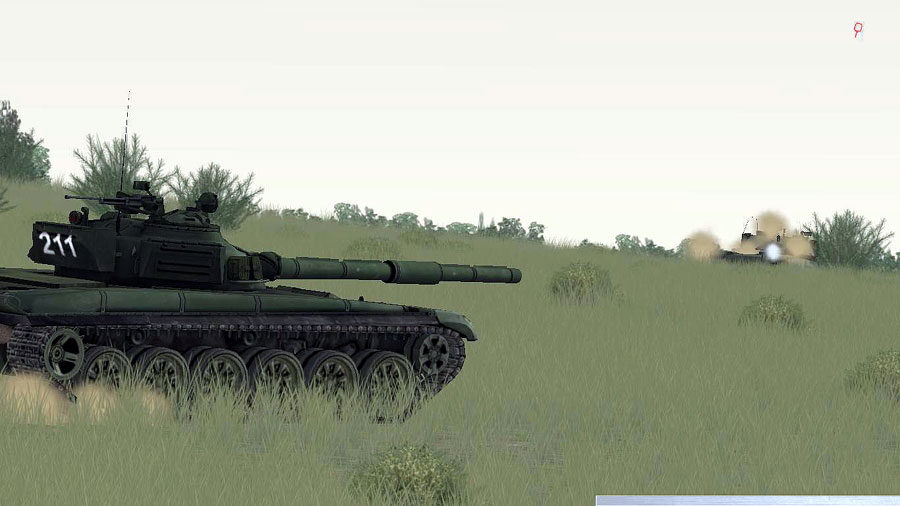
An scenario of Panzer Campaigns Tunisia '43. The 2D map view in the background is rich and detailed, but doesn't allow you to see too much of the road ahead for the British brigade seen in the map. The Jump Dialog map offers the whole picture view, but details like place names are gone.
For playing other titles of the Panzer Campaign series I was in better shape to circumvent the above mentioned shortcomings. I read about the operations and I mimicked the real life operation. In the case of Tunisia '43 I'm ill-prepared and un-read. Books are on order and my interest on this campaign is now very high. On the meantime, I'm reading whatever I can find and consulting The West Point Atlas of War for a quick reference on operational movement during the battle. 


Another thing that is helping me a lot to understand the "big picture" is other game from John Tiller, War on the Southern Front. This game is at the pure operational level, and the units are regiments/brigades (compared to companies and battalions in Panzer Campaigns) and above. Also each terrain hex corresponds to 10 km (compared to 1 km in Panzer Campaigns).

The War in the Southern Front scenario counterpart to the one shown above.
So, I'm going back and forward between both games now and this is helping me quite a bit to understand the operation from the top-bottom, the bottom-up and anything in between ...

Cheers,

Friday, March 18, 2011

Pride of Nations - An Homeopathic Preview - Dose One

Disclaimer: images and comments below are from a preview copy of the upcoming Pride of Nations grand strategy game from AGEOD/Paradox. These images and content may not reflect what we will get in the final release version.

This is a game that I have been aching to play.


I got a preview copy and after a couple of hours of playing through the tutorials, it looks like a great game. I'm going to take it easy in my posts, because Pride of Nations appears to be a couple of notches more involved than the latest Revolution Under Siege. Thus, if you don't mind the homeopathic delivery of content ...

Right off the bat, I noticed some stuff that may have been in other AGEOD releases (I apologize if so), but that is new to me. I thought of sharing some screenies with you.

Those merchant ships are animated. They keep running while you plot your turn's moves.

The military situation in Europe at the beginning of the game. Note the forces icons ... they have NATO size symbols now!
When zoomed out, the maps offers a great, un-cluttered view of the main military units. 
Military Mode tutorial. On the job training: crush the rebels!
Cheers,

Maneuver Warfare: OODA Cycles - The Most Important One is Yours - Part 3

This series of blog entries are about the so-called "maneuver warfare" as explained by William Lind. The writings of Robert Leonhard will also be included. I claim neither expertise in the subject nor devotion to this way of waging wars and thus I am not trying to convert you into anything. This series is not an analysis or a review of all ideas about maneuver warfare but rather some explorations about the topic based on computer war games and simulations. Future entries will be delivered based in readership.


Continued from part 2.


Mi right (south) flank is retreating. Very slowly through the forest southeast of their previous position. At least they are out of sight of the enemy.


The Soviets don't waste time pushing towards my rear, where everything left are tactical headquarters and fire support units. I order these units not to contest the enemy's advance, but to keep an eye on them. All I hope is to have enough time to reorganize my fighting units after their march through the woods ...


Aerial support shows up. First in the form of a two-ship flight of A-10s, but it has started raining and they pull out of our sector. Fortunately the storm clears half an hour later and two more A-10s are tasked with a CAS mission right where the main Soviet body is located. I receive reports of 5 Soviet main battle tanks killed.


My maneuver units have not cleared the woods yet.


Two hunter-killer teams of Kiowa-Apache helicopters make their arrival and turn hold the red tide. I keep the helicopters engaging at maximum distance and for two hours they fight with gallantry. The Soviets stop on their tracks. 


Encouraged by the performance of the attack helicopters, I decided to send one flight towards the enemy's rear. During all the debacle on the north, my extreme south flank was screened by three two-M3 Bradley teams. Eventually they pushed through the river and towards the enemy's rear and detected enemy activity. Great opportunity to deprive the enemy of their command and fire support. 


A hunter-killer helicopter team taking care of a SAM unit. This team later destroyed a self-propelled artillery battery and two HQ units. Note my units moving through the woods.

It's 1700 and I still can't reorganize my remaining forces. Maneuver units stuck in the woods. Command structure is paralyzed and jammed. The only fires delivered onto the enemy come from off-map artillery and the helicopters.


Suddenly, the game stops because I achieved victory (!?)


Whaat? Move aside officer, I have units behind your window ...
Pyrrhic victory, I've lost 60% of my units. But the enemy has lost 80% of his ...


Sectors control and number of individual vehicles left.


Take home lesson from this battle is to keep a mean and lean OODA cycle. I screwed mine by not understanding the time needed to reinforce the front line. When I realized my mistake it was too late and after that I had virtually no command over anything other than a sluggish retreat through no-tank country and directing air support units towards hot spots.


Cheers,

Tuesday, March 15, 2011

Maneuver Warfare: OODA Cycles - The Most Important One is Yours - Part 2

This series of blog entries are about the so-called "maneuver warfare" as explained by William Lind. The writings of Robert Leonhard will also be included. I claim neither expertise in the subject nor devotion to this way of waging wars and thus I am not trying to convert you into anything. This series is not an analysis or a review of all ideas about maneuver warfare but rather some explorations about the topic based on computer war games and simulations. Future entries will be delivered based in readership.

At around 1330, although our casualties are very light, I can feel the worse is to come. I start moving the reserve company in penny packets towards the north and south defensive positions. They move too slow, or maybe the urgency of the situation makes it look so.

A second Soviet regiment arrives at the bridge, adamantly ignores the two previous hours of butchery and proceeds to attack my left (north) flank positions. Two of my tank platoons ran out of ammo and retreat, giving the Soviets the two microliters of tactical oxygen needed to ignite the Lanchesterian inferno I feared the most.

The Soviets have broken through my north position (yellow icon). Note how the US tank platoons in the left (north flank) are pulling back from their original position.
The few tanks and IFVs that I sent from the reserve company towards the left (northern) flank make little difference. They are caught moving up the hill and end up joining their brother retreating units in a knife fight against the Soviets, who by this time have totally cleared the northern defensive position. Some exhausted and low in ammo, others eager to enter the fight, a mess of retreating and reinforcing Iron Dukes fight the good fight at point blank ranges. Correctly planned, this would have been an elegant reverse slope defense. As it turns out, it is a sloppily planned reinforcement mission from which the only claims I can make are blunting the Soviet spearhead and buying one hour of time. It was a somber spectacle to witness the collapse of my left flank.

The company in my right (south) flank makes some hill-to-hill shots towards the north. But acquiring targets gets increasingly difficult now that the Soviets can move with impunity in my left (north) flank. My units spot some Soviet tanks well west of my previous line of defense. I am being turned and I order a hasty pull back of the remaining forces.

When it rains, it pours. My staff is unable to process my orders! Just in time for the most dangerous time in the fight. Note how the Soviets (red icons) are approaching the road that runs northwest-southwest. Also, below the message window, note the yellow lines for the move orders to my remaining forces.
 To be continued ...


(Sorry for the short entry. I am very tired after a long day at work. I hope it doesn't show too much in what I wrote). :)

Cheers,

Monday, March 14, 2011

Pride of Nations - The Next Grand Strategy Game from Paradox is Revving Up

Take a look a this interview with Philippe Thibaut, head honcho of AGEOD.


All the recent buzz means one thing and you know it ... Release is close!

Box art looks fantastic, BTW. You don't mess with this guy!


Cheers,

Maneuver Warfare: OODA Cycles - The Most Important One is Yours - Part 1

This series of blog entries are about the so-called "maneuver warfare" as explained by William Lind. The writings of Robert Leonhard will also be included. I claim neither expertise in the subject nor devotion to this way of waging wars and thus I am not trying to convert you into anything. This series is not an analysis or a review of all ideas about maneuver warfare but rather some explorations about the topic based on computer war games and simulations. Future entries will be delivered based in readership.


It is just another day in World War III and I am in command of the 2 Battalion 67th Armor with orders to defend in sector, some 3 km northwest of Norderfurt.


It is 1100 and intel of what to expect coming our way is sketchy at best. But for sure nothing less than a Soviet Motorized Regiment.


My sector is west of a river, and the decision of placing two full tank companies in two hills over watching a bridge was a no brainer.


Aggressive patrolling south of these positions by 6 M3 Bradleys revealed nothing of interest and when the Soviet advance guards showed up in the bridge, it was hard to believe how lucky I was to have two full tank companies with gun tubes aiming just there.


The bridge created a choke point and the vehicle-killing fest was on


Click the image for a better view. US forces' icons are green and Soviet forces' are red. West of the river, I have two companies in the hills north and south of the road that runs west from the bridge. It's a pity that this game doesn't have icons for destroyed vehicles so you could see how my forces destroyed almost a full Soviet battalion as it tried to establish a bridgehead. The green line represents fire from one M1 Abrams platoon targeting a Soviet mechanized infantry company trying to ford the river.
When the tide of battle is favoring him the mostest, the commander should be thinking hardest ...


In the screenshot above, note the company that I have in reserve west of the two hills where all the shooting is happening.


It was around 1300 and with all the butchery of enemy metal at the bridge I was in full pompous ass mode. If I can stop the Soviets so easily at the bridge, where should I commit my reserve for the final blow against the enemy? How can I mess the OODA cycle of the Soviets? I envisioned the most daring maneuver warfare fantasies, like keeping the enemy futily engaged in the "A" (action, cross the bridge) of the OODA cycle, while counter attacking from a flank so to give him another headache in his "Os" (observation and orientation of a new threat).


Then I started to notice my front units' fire slackening ...


Click the image for a better view. Clicking on the icon of one tank platoon revealed what it was a widespread issue with the units I have in contact: after 2 hours of continuous combat, they are tired and low in ammo. Enemy units are obscured by the smoke of artillery fire.


Troops need ammo and rest, I've learned. I have not planned for this and it is obvious that by the time the second wave of Soviet forces arrives, the tide of battle will likely brush aside my front line if I don't do something.


Whose OODA cycle is messed up now?


To be continued ...


Cheers,