Saturday, October 16, 2010

Scourge of War Gettysburg - The 1st US Cavalry Division at McPherson's Ridge

If ordering the first shots of a meeting engagement that turned the tides of a war marred by indecisive battles doesn't move your inner generalissimo, nothing will.

Much has been written about the battle of Gettysburg and about the delaying action that the 1st US Cavalry Division  fought during July 1st of 1863 under the command of the iconic General Buford. As usual, you are better off reading elsewhere about the American Civil War and the Battle of Gettysburg. If you are really into it, let me recommend you David Pfanz's trilogy on Gettysburg. These books are the best tactical accounts of the battle.

Scourge of War is currently the only and best serious 3D tactical wargame about the Battle of Gettysburg. The past weekend I started playing the game's canned scenarios and I thought of sharing some of my misadventures here.

This scenario starts at 9:45 a.m. on July 1st 1863. In real life, after a couple of days of taunting between Confederate and Federal cavalry patrols, actions were just starting to shape into a battle. The Confederates started pushing towards Gettysburg with Maj. Gen. Heth's Division. The US Cav. Gen. Buford understood that the high ground around the McPherson's farm was crucial real estate to be held until the federal infantry arrived. In the game scenario, I'm playing as Gen. Buford and I am in command of the 1st US Cav. Division. My troopers are spread thin and for this battle I have only one brigade and a tiny 6-gun artillery battery.

Our mission: block the enemy forces attempting to seize McPherson's ridge until friendly infantry arrives.
A quick glance at the battlefield above makes you wish you any other force than cavalry for this battle. The enemy will come to us walking down a slope, crossing the Willoughby run and then climbing up towards the McPherson's ridge. Is there a better kill zone than this? Tactical advantage is in the muzzle of the gun holder, though, and with the forces available, this is not going to be pretty.

For starters, there is the issue of weapons range. Back in the American Civil War, the troopers were armed with carbines that, despite being able to deliver higher firing rates than the infantry muskets, had shorter ranges and less stopping power. Second, there is the issue of limited numbers: cavalry formations were in the receiving end of the attrition equation. If there is an advantage that the US troopers have in this scenario, that is mobility.

Deviating my tactics from the ones used in the historical battle, and eager to catch the enemy infantry with their pants down while they cross the Willoughby run, I deploy my line of defense between the McPherson ridge and the run. I count on my troopers mobility to disengage and rapidly fall back towards the ridge. I even move my artillery battery forward.

I will go through my line of defense from left to right flank. Please refer to the above birds eye view of the battlefield to follow.

In the extreme left flank the 12th Illinois Cav. Regt. deployed within the McPherson's woods. This terrain is ideal for a cavalry-based defense as the woods provide cover to fire and concealment to withdraw. Note that the "8th New York Cavalry" text in the info panel actually refers to another unit I have clicked but moved away from to take this screenshot.
The 8th Illinois and the  8th New York Cav. Regts.are deployed in the center along a worm fence, overwatching the Willoughby run. In a thin skirmish line, they cover from the Mc Pherson's woods to the right of the Chambersburg pike.

In the center, the only artillery available, deployed right in the Chambersburg pike. In the real battle, Gen. Buford ordered the commander of this battery (2nd Lt. Calef) to deploy his guns in a wide front so to deceive the enemy into thinking the federals have fielded a stronger force. The game shows this very well, and I had to scramble to gather 4 of the actual six guns available.
To the right of the railroad cut, the 3rd Indiana Cav. Regt.covers a wheat field.

The 6th New York Cav. Regt. is the unit located at the right extreme of the federal line and also the one deployed closest to the enemy. The wheat field on this unit's left is the same wheat filed that the 3rd Indiana Cav. Regt. is covering (previous image).
The enemy advanced in a wide front. For some strange reason, the Confederates pushing towards the center of my line made contact first.


The Confederates pushing towards the center of my defense line come under fire from the 8th New Yorkers. Despite the good shooting, the New Yorkers will have to show more than this to repel the enemy.
Some five minutes later, the culminating point of battle: the Confederates on my right flank start moving towards the railroad cut. Right into the junction of my center (8th New York) and right flank (3rd Indiana)! I have no forces there!

Confederate forces advance towards the railroad cut (between the green corn field and the brown wheat field in the background). The men on the foreground are troopers from the 8th New York.
A bird's eye view of the Confederate Brigade's move towards our weakest spot.
Fortunately for my forces, the Confederates deploy in front of the 6th New York and 3rd Indiana Cav. Regts. instead of pushing through the railroad cut.


The Confederates deploy slightly in the right flank of the 6th New York. Although we are outnumbered, the deployment of the Confederates will buy us some time.
Confederates (background) deploy in front of the 3rd Indiana.
I knew it would happen, but I didn't know it was going to happen so fast. Cavalry skirmishers will skirmish, not defend to the last man. I thought the 3rd Indiana was going to hold for longer, but just after 5 minutes of shooting, they retreated.

The 3rd Indiana Cav. Regt. bugs out in all haste.
While all this was happening, I had the 12th Illinois Cav. Regt. pulling out from the McPherson's woods (they haven't seen any action yet) and rushing towards the trouble spot at the railroad cut.

The 12th Illinois Cav. Regt. mounts up and move towards where they are needed best. The men on the right are dismounted troopers from the 6th New York, still standing in a skirmish line after all the fighting.
The retreat of the 3rd Indiana Regt. had more devastating effect than what I anticipated, the center of my line (6th New York and Calef's battery) are now outflanked and under heavy pressure from the Confederates.

Our center has become our flank. Note the Confderates in the far background, now relieved by the retreat of the 3rd Indiana, moving to join the onslaught.
The 12th Illinois arrives and tries to recover a semblance of a protected flank.
And boy, if there was a well spirited unit in my command that was the 12th Illinois ... Not happy with shooting, they mounted up and charged the Confederates!

The 12th Illinois charges the enemy.
In case you haven't noticed, the enemy is within shooting range of the McPherson's barn. They have reached the ridge and while they haven't secured it, we are officially not in control of the objective.

My center falls back, we are even thrown back to the reverse slope of the McPherson's ridge. The only option is to conduct some dis-functional counter-attacks to disrupt the enemy's deployment.

Friendly infantry is within sight. Note the routed troopers in the background.
Most of my units are disrupted and I try to pull any trooper available back into the fight.

Troopers from the 8th Illinois fighting their way back to the McPherson's barn.

A terrible price to pay for the McPherson ridge ... But it needs to be done.
After some excruciating minutes, our infantry arrives. We are still enthralled in the fight, sabers waving slashes of Confederate blood up in the air, when the infantry men show up.

Friendly infantry (background) arrives and joins the fight.
The arrival of our infantry shows up the real status of the enemy's morale. A Confederate regiment retreats from the McPherson's farm after a short fire exchange with Federal infantry troops.
And this is how the scenario ended. I was awarded a major victory by the scoring system of the game, but we clearly failed the mission. We suffered 1042 casualties (out of 2805 men) and inflicted 1102 casualties to the enemy. We couldn't hold the ridge for our infantry and the poor souls will have to drive the enemy out of the objective.

My mistake was to push my troopers to fight as infantrymen ...

Cheers,

Sunday, October 10, 2010

DCS: A-10C Warthog - Paying to Try Out Non-Finished Goods

Ah, the joys of the brave new world of gaming! The seeker of quality and educational value is driven by a thirst that can only be quenched now and then. So, when the jug that will contain my holy water is offered to me,  I pay through the nose ... just to hold it and to imagine the smell of sweet vapors that are still to come ...


The beta of the highly anticipated DCS: A-10 Warthog can be purchased from Eagle Dynamics' website. The official line is that you are pre-ordering the game and being offered an exclusive beta version while you wait for the release version of the game. Eagle Dynamics said that they want to test the simulator through the widest possible amount of hardware configurations, hence the "open beta" release. Rolling eyes here. Why not being honest and telling me "I want your money now, please". I will give it you at once, I love what you have done in the past, just stop with the silly excuses. 


Considering is a pre-release version, DCS: A-10C Warthog beta is in quite very good shape. Off course there are typos, untranslated briefings, missing sound files (voices), one of the maps is unfinished, worrying framerate issues (around cities and when looking at your wingman) and other quirks. If you are thinking in hoping in and starting a campaign right after installation,  you may want to wait until the full release. 


But let's talk what is really important: this is the first flight simulator that has taken close air support seriously. I almost fell off the chair when the air controller told me "this is a type 3" and followed that with a 9-liner ... I almost cried of joy. There is a screenshot below about this. 


Screenshots are clickeable.


Tuesday, October 5, 2010

Clash of Armor - Battlefield Academy AAR by MikeAP

One of the best things of blogging is getting e-mails from people who read your blog. Mike A. P. (savvy wargamer/active duty Capt. in the U.S. Army) and I have exchanged e-mails from some time and I always enjoy discussing wargames, simulations and whatnot with him. Mike has written this fantastic AAR and was kind enough to let me share it with you. Battlefield Academy was recently released by Matrix/Slitherine games and is receiving great critique from both casual and hardcore wargaming venues. Without further ado ... Mike and his tanks in the Bulge.


Battlefield Academy
Clash of Armor
By MikeAP

This was my first multiplayer experience with Battlefield Academy and the good spirit that I am, decided that I would enjoy it much more if I actually won it. Keeping that in mind, I decided to approach the game like I would a real life situation, through the painful process of military planning.

For those of you not familiar with Battlefield Academy, it is a World War Two turn based strategy game that combines the realistic combat gameplay of Close Combat with the fun and graphics of Battlefield Heroes. Yes, I just compared a beloved and classic realistic combat-crushing strategy game with a comical first person shooter made by DICE. Before you stop reading this, I can assure you the game is fun and exciting. The graphics are set in a vintage comic book style and the combat is preserved through realistic values based on vehicles, guns ranges, and many more variables.

I thought I’d try my hand at multiplayer; but Battlefield Academy’s multiplayer aspect is unlike anything I’ve experienced before. Instead of playing a real time, turn based game, much like Combat Mission, players take their turns, then complete them through the game’s built in module. It’s something sort of like an email sent through your game to your opponent. Your opponent will receive your game, see your turn, make his turn, then return it to you. It sounds complicated, but it’s not. It allows players to take their time, think out their moves, and still have enough time to do the dishes and go shopping with the wife. The only drawback that I observed was that even four or five moves can take nearly a week, depending on you or your opponent’s real life schedule. No biggie.


So here’s the map we’re playing. It is set during the Battle of the Bulge and is called Clash or Armor, which features nothing but US and German tanks. The actual description of this map is ‘leave your infantry behind’. The map is very standard; It has two larger villages on the East and West sides of the map with patches of tree’s and shrub lines throughout it. The US forces start in the upper left hand corner, or for your regular grunts, the Northwest corner. The Germans (my team) will start in the Southeast corner.


As I mentioned, I enjoy a challenge. What I enjoy more than a challenge, is winning a challenge. So I decided to use some of the military planning that Uncle Sam has smashed into my brain. Why not, it worked for Patton, right?

I first look at my map and create something called an Obstacle Overlay. It shows me how limited my movement will be through the area and helps me visualize how this will affect my enemy as well.

I start with the red, or ‘no go’ terrain. The red marks areas that cannot be traversed by my vehicles. The red areas help me understand my maneuver limitations and therefore give me an idea of what my avenues of approach will be (black arrowed lines). From there I work on built up areas (marked in orange). These are areas that will funnel me in, or choke points that I need to be aware of in my advance. Finally, the large K’s that you see on the map represent Key Terrain. Key terrain is defined as areas that greatly benefit the person holding the ground. In this case, I marked key terrain as the major intersections on the map. From these areas you can control the roads and main access in and around the towns. Every mark I make on this map will help me understand my advance toward the enemy and what my limitations will be for maneuver. It will also help me try to understand how the enemy will approach. After all, my opponent is only human and faces the same challenges that I do.


So here’s how I see things going. I’ve identified three major avenues of approach for the enemy. I don’t know what kind of vehicles he has, but I can guess they are similar to what I have: a mix of medium tanks with tank destroyers and reconnaissance vehicles.

In the above plan, I will send recon vehicles forward to establish overwatch on the most likely avenues of approach. I will position my tanks along the flanks of these avenues in order to achieve a flanking shot.
I don’t think the enemy will come along all three avenues, so I will be ready to flex one of my hunter killer teams around the enemy’s flank in order to surround him. Once I’ve identified the enemy’s main effort I can find, fix, and flank them.

Let’s see what happens…


Here’s how things actually went down.

I moved my reconnaissance forces north to establish observation. I was able to establish positions to the west, but the enemy kept me on my feet in the Northeast. I wasn’t able to get very comfortable before the enemy started lobbing 76mm shells at me.

1 – As I set my recon vehicles in, I was immediately engaged by much heavier forces. My Puma vehicles were no match for M18’s and M4 Sherman’s with their 76mm high velocity cannons. My reconnaissance vehicles were immediately destroyed and positions were overrun.

2 – Again, my recon vehicles didn’t have much time to set their positions before being engaged by enemy tanks. I watched my vehicles be destroyed piecemeal, but knew that I had the upper hand because I had understood the enemy’s plan.

3 - I realized that the enemy main effort was approaching from the Northeast. Immediately, I dispatched tanks due north to stop the enemy advance, so I would not be surrounded. Simultaneously, I advanced my forces in the west. My original overwatch reconnaissance turned into a movement to contact, as I attempted to move on the enemy flank.


I sent a Panther, PZIV and Marder III north to stop the enemy advance on the village. It was a rough fight. The enemy had good vehicles; a slew of Sherman 76’s, M36’s and M24’s. The PZIVH and Marder III didn’t make it, but went down fighting. In the end, my detachment accomplished its mission and more by stopping the enemy advance and clearing North through the village.


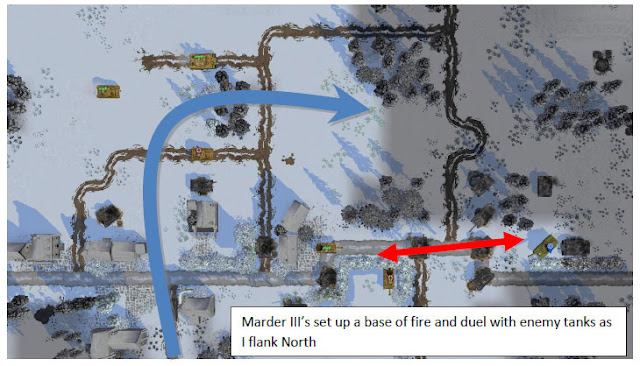
In the meantime, my forces in the west were making good progress; killing the enemy and pushing their advance around the Northwest flank. As seen above, I’ve been able to maneuver a Panther and two Panzer IV’s around the Northern flank. The enemy exchanges blows with my Marder III’s, who are acting as a base of fire for my maneuver forces.


My flanking force advances forward. Keep in mind, engagements are still deadly. M36’s lurk with their vicious 90mm high velocity cannons. It’s best to work in packs for this one. I decide to suppress my targets with my PZIV’s and flank with my Panther. It worked well on this unfortunate M36. This is a risky tactic; the M36 has no problem cracking the armor on the PZIV. It is a risk is working, only because the numbers advantage is on my side.


Meanwhile in the East …

My Panther completes its sweep through the village and begins clearing to the West as my tank destroyers exchange shots with the enemy. Most of the enemy vehicles we encounter are facing the West, waiting for the bulk of my advance. They must have realized something was going on when they saw the smoke coming from the horizon. I use the confusion to my advantage and batter the enemy vehicles from their flanks.


So here’s the current SITREP:

In the East, I have cleared the village and my Panther has begun clearing to the West.

In the center, my Marder III’s duel it out with M18’s and Sherman’s.

In the West, my flanking force has been successful pushing forward and killing enemy armor.

My forces have eliminated a significant number of enemy vehicles. There are still more remaining on the battlefield, and I will remember that as I advance forward. Now is not the time to let my guard down. Victory is on the horizon, but a few well placed shots can allow the enemy the chance to break through the envelopment.


The match ended with the enemy attempting to break the encirclement by driving East. I had my Panther in a good position to interdict the enemy, and that is just what he did.

In reality this engagement would’ve lasted maybe an hour. In real life the turns took almost a full week (thank you, real life). Fun, none the less.

If you’ve never heard of Battlefield Academy or are looking for a good World War Two strategy game, I suggest trying it out. It is a simple game, in a time where games have become so complex that most forget the fun aspect.

Sunday, October 3, 2010

ArmA 2 Operation Arrowhead British Armed Forces - On Being Section and Fireteam Leader at the Same Time - Part 2

This is a continuation of a previous entry.

Our platoon has lost contact with a dismounted scout section. My section is tasked with conducting a patrol north of the road that is our main route in order to search for the missing blokes. The terrain is a green zone, not exactly closed terrain, but our platoon leader insists in keeping our vehicles and armor on the roads.

The scouts we are looking for are either dead or captured. No scout will ever loose his bearing with such a huge landmark (power lines) in plain view.
I'm commanding my section as two separate fireteams. I'm in command of fireteam white and the 2IC (2nd in command) is in command of the red fireteam (note the colored numbers in the icons of each soldier).

Passing through fireteam red and making sure they have a good field of fire.
As far as I know, when British infantry sections move to contact, they will do it in "caterpillar" or "leapfrog" movements. These modes of movement are equal to the US Army/Marines alternate and succesive bounds respectively. During this scenario I used the leapfrog type of movement.

The rifleman and marksman (foreground) move ahead while the red fireteam (in the background below the power lines) overwatches.
Everything is great while we move on relatively clear terrain. Leapfrogging is all good so far.

Fireteam red moves past fireteam white.
Just when the section hits a patch of trees and I start to get worried about getting my two fireteams too separated ... Contact!

Two soldiers from fireteam white take aim at the enemy ahead. Fireteam red is behind the trees in the background (note the faded green romboid icons).
I try to get visual contact with my red fireteam and I drag fireteam white a few meters forward. The AR of fireteam white gets hit in the process.

I now can see the fireteam red (background), but my AR (soldier #4) has been hit.
From their shouts, I realize that fireteam red is engaging an enemy formation that my fireteam white can't see. The situation goes bananas from here. I recall fireteam red to join us, but to be sincere I still don't know where is the enemy hitting the white fireteam and me.

Everybody hit the dirt while your fearless section leader figures out what the fuck is going on!
Can't think under fire ... I order everybody to retreat to a nearby ditch. Complete and utter disaster! Our break contact drill is a living joke. More blokes fall to enemy fire.

Least thing I can do is to take these chaps into cover. What a mess!
A section working as two fireteams is supposed to be great in relatively close terrain like this. The critical moment was when my red fireteam started a firefight that we (fireteam white) couldn't see. We had our own firefight by that time. We were no more than 15 meters apart and not supporting each other. I wonder how close I should have kept both fireteams. And flanks ... are we allowed to have flanks with such limited amount of mens and guns?

Cheers,

Saturday, October 2, 2010

Finding Bogeys and Bandits in the Simulated Unfriendly Skies

Back from the days when I was really into combat flight simulators, I remember the realism-Taliban group explaining to the infidels how the only way fly 100% realistic was to not to allow external views and turn aircraft labels off. The infidels in the more relaxed camp had counter-argued  that so much sensory feedback was missing in the simulation that external views could help to compensate. Also, they said, a computer display could never deliver a picture so clear as real life and . I never saw that debate settled, but I see merit in both views. Simulators can be played in so many ways ... it all depends what you want to simulate.

How far can you see an aircraft in real life anyway?

Below is a graph from data generated by the US Navy. Getting a visual on another aircraft depends on its aspect towards your position, off course. If the other aircraft is flying towards you, the more difficult will be to detect it. It's kind of terrifying that a small aircraft such as the MIG-21 flying towards you can be detected at 2 miles! Anyway, the point of this chart is that if you are flying a combat flight simulator with labels, you may want to ask if the labels' appearance on the virtual skies depends on the aspect of the aircraft.


Using labels in simulated air combat negates the use of an important skill: visual search (link opens a pdf document). Pretty much like the ground warriors are trained to scan systematically the terrain ahead, pilots train to scan the skies.  Alas, our brains and eyes have evolved to hunt preys and evade predators in the plains ... Not aircraft in the skies. It takes training to find something in the vastness of the airspace around you, even when it is located within the ranges specified in the chart above. If labels are activated, a deliberate and systematic visual scanning is not needed.

I found the use of the visual scanning technique described in the paper above mildly useful in LockOn Modern Air Combat. At least is useful to develop some discipline on where to look and how long to look at each field of view. Just for fun, I edited a quick mission where I flew a MIG-29 against a computer-controlled F-14. The reason I chose the MIG-29 is because is a sleek fighter and very forgiving to my piloting skills. The F-14 ... Well is a damn big aircraft and I just wanted to maximize my chances of seeing something.

MIG-29A
As everything I do lately, the exercise didn't go as planned. I used a mission template and I forgot to unload the fierce AIM-54C radar-guided missiles from the F-14 before flying the mission.

AIM-54C, the radar-guided air to air missile from hell.
The AIM-54C gives the F-14 a tremendous edge. This missile can be fired from distances bigger than 150 km and the virtual guys in the F-14 used this missile accordingly. I could locate the F-14 with my radar, and I knew it was painting me. I scanned the space in front of me and I was almost shocked how long it took me to see the huge smoke trail of the incoming missile. I really needed to fixate my eyes for a good three seconds on a particular portion of the sky ahead to find the smoke trail.

Hint: draw an imaginary line in the HUD between the radar box and the "ILU" symbol.
Using the zoom feature helps a lot, but the portion of the sky being watched at is very small and a very slight motion with TrackIR will move the view towards other scan area.

Engaged defensive! The AIM-54C has started its dive towards me.
Now the trick is to combine the normal and zoomed views into a systematic visual scan technique.

Cheers,

Tuesday, September 28, 2010

ArmA 2 Operation Arrowhead British Armed Forces - On Being Section and Fireteam Leader at the Same Time - Part 1

The British Army's small-units tactical doctrine is secret. No field manual for you, civilian! There are a few books out there from which you can make up some pieces of the puzzle. But ... oh boy ... these accounts show you only shadows.

I will be out on a limb with these series of posts about the use of British Sections in ArmA 2. So take them with a big grain shovel of salt. Non-educated guesses coming.

The composition of a generic British rifle section is one of the few things we know for sure :
  • Section Commander
  • Rifleman
  • Grenadier
  • Automatic Rifleman
  • Fireteam Leader Section's 2nd in Command (2IC)
  • Rifleman
  • Grenadier
  • Automatic Rifleman
This section has two fireteams (labelled red and blue above) that are quite symmetrical in terms of firepower. Symmetry we can cope with (we have already been fighting with symmetrical US Army and Marines squads), but as you may have realized the British section commander has to keep an eye on his fireteam (red) and the whole section at the same time. The ratio between section and fireteam commanders (movers) over the amount of fireteams (moving parts) is 2/2=1 in the British infantry section. The same ratio is 3/2=1.5 in an US Army infantry squad and 4/3=1.33 in the US Marines rifle squad. 

Short in men and decision-makers, it looks like as if the British infantry section is conceived as a tactical entity that never operates independently from its parent platoon. If this is true, I wonder how challenging is to go into combat with a British section in the ever fragmented battlefields of today where every section or squad mostly fight different fights.

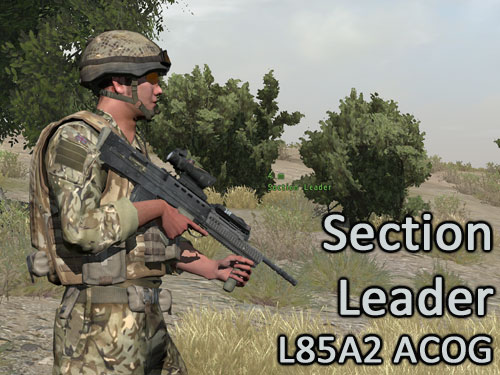
In ArmA2, the British rifle section is composed of (each soldier picture has a short description of his weapon too):

1st Fireteam


2nd Fireteam


Nice surprise in ArmA 2 is to have the so-called "marksman" with the L86A2 light support weapon. This awesome piece of hardware was originally conceived as a support weapon, but since it has a relatively high range (can deliver accurate fire up to 600 meters or so) it is used almost like a sniper role. Almost, because the caliber of the L86A2 is the same as the L86A2.

In the next installment, I will get into a fight along with these men.

Cheers,