Saturday, May 8, 2010

LOMAC Flaming Cliffs 2.0: Close Air Support (Part 2)

This is a continuation from this previous entry.

We are at the contact point, ready to copy our next CAS mission from the joint tactical air controller (JTAC).

Huh? See text to get even more confused.

"Type 1 in effect"
CAS comes in three tasty flavors (types 1 to 3). Type 1 CAS is used when the JTAC needs to acquire visually both the target and the attacking aircraft. The situation down there must be delicate.

"ALAMO ... 012 .. 11.0 ... etc"
This is the so-called "9-line brief". It has to include these specific items in this specific order:
  1. Initial Point (IP) (ALAMO in this case)
  2. Heading from the IP to the target (012)
  3. Distance from the IP to the target in nautical miles (11.0)
  4. Target elevation in feet above the sea level (325)
  5. Target description (Enemy infantry ...)
  6. Target location coordinates (NB 456746)
  7. Type of target marking (laser in this case)
  8. Location of friendlies form the target (East 400 meters. Sh!t I knew something was kinda pressing down there. Better watch out for where those bombs fall!)
  9. Egress direction and where to go (Egress east and go to the CP again)
"Remarks"
What? There is more? See below, please.

Huh? See text for further confusion.


Final attack headings is almost self explanatory: is a range of headings that you can have while flying to the target. This headings range ensures that you can see the reflected laser radiation and in some cases is used to make sure that we hot-rod pilots remember if there is any fire de-confliction measures in effect (nothing funny about being shot down by your own artillery).

Immediate TOT (time on target), means that we should deliver our ordnance as soon as possible (told you something urgent is going on down there).

"Say when ready for talk on" ... well ... there is a lot of talking in CAS. 

More coming soon ...

Cheers,


LOMAC Flaming Cliffs 2.0: Close Air Support (Part 1)

A boy returned from Sunday school and his mother asked him what he had learned. He said that he heard about how Moses and his people escaped from Pharaoh's Egypt. He told her that as Pharaoh's tanks approached the Israelites, Moses got on the radio and called in an air strike, which knocked the tanks out of action. The puzzled mother asked, "Is that really the way the teacher told the story?" The boy replied, "If I told it her way, you'd never believe it!"

This joke originally appeared in Reader's Digest around 1967 and it is the opening paragraph of "The Warthog and the Close Air Support Debate". The author of this book quoted the joke to make the point that in popular imagination, close air support is a given.

This series of entries are an amateurish attempt to outline how CAS is done in real life by the USAF, using LOMAC Flaming Cliffs 2.0 as a framework. I make no claim of being knowledgeable enough on the topic to provide totally realistic dialogs and comments. Whatever I write here you will find it elsewhere in the web. My only point is that besides the complexity of putting ordnance onto the enemy while flying at 300 knots, in real life there is another layer to it that is quite technical and time-consuming.

We are the US Air Force and we love to bomb ... just not near the battle lines!
This is what we got today. We (a flight of 2 A-10s) have been loitering for a little while before AWACS controllers directed us to a contact point (CP, way point 2 in the map below) and contact Dragon 11.

In the map below you will notice the CP (way point 2, WP2) and three other way points. These other three are pre-planned IPs that both us and the ground controllers know about. Since CAS is dictated by the needs of the troops below, we don't know which of the IPs we will use beforehand. But we will find out when we contact Dragon 11 from the CP (WP2).

Where are the troops in this map? Well, we only know that a US Army Bn is advancing north west and that they are fighting near IP TARAWA. This map should contain some control measures, but I omitted those for clarity. 

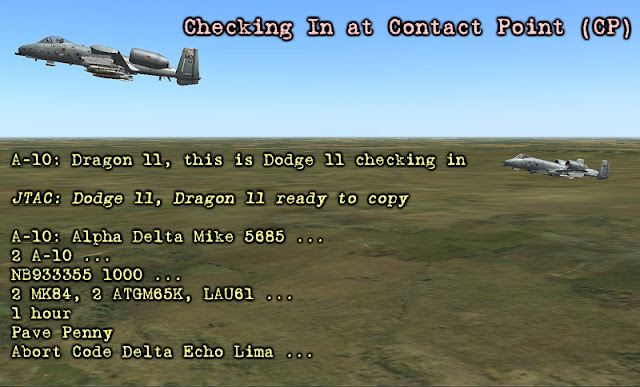
When we reach the CP, the following check-in chit-chat takes place.

Huh? See explanation in the text.

JTAC is the joint tactical air controller or more simply put, our ground controller. His callsign is Dragon 11.

During our check-in we say the following about us to the JTAC:
  1. Our Mission Number (ADM5685, this is something we got from the AWACS)
  2. Our Number and type of aircraft (2 A-10)
  3. Our position and altitude (6 digit grid number and altitude in feet ASL)
  4. Our ordnance (2 MK84, 2 Mavericks, rocket launcher)
  5. How much time we have available to be on station
  6. Which type of sensors we have available
  7. The abort code for our CAS mission (DEL, the JTAC will consult a code book that we also have in the plane and check which letter matches "DEL"-that letter is B in this case, so the abort code will be "BRAVO")
More coming in the next entry.

Cheers,


Thursday, May 6, 2010

LOMAC Flaming Cliffs 2.0: Battlefield Loitering in the A-10

One of the most crucial capabilities of the A-10 is it's ability to loiter around the battlefield for hours so it can be available after a few minutes whenever a ground commander needs its firepower.
Even the most hardcore combat flight simmers will stay away from a mission where you have to fly an aircraft for  more than one hour. Me too. Who has the time for that?

Nonetheless, I wanted to see if I could experiment the A-10's loitering capability in LOMAC. So, I took onto the virtual skies in my virtual A-10, loaded with 100% fuel and a spiffy payload for close air support. In this mission that I edited there is an SA-11 battery some 30 km ahead so I started my loitering circular circuit at around 1,000 ft.

How to stay airborne the most time with the least fuel? Stick and Rudder says:

"An airplane will maintain flight with the least amount of power if it is flown quite slowly, very nose-high, with its wings at very high angle of attack.[...] The airplane is not covering distance very effectively, for it is too slow, but if develops perfectly astounding endurance".

I make no claim that I nailed an optimal flight regime for loitering or that I even know the "speed of best duration" of the virtual A-10. But I was mildly surprised with my flight conditions, which I kept almost hands free for a good fifteen minutes (fell asleep on the keyboard).

At this fuel consumption rate, I can loiter for more than one hour and still have some fuel for an attack run and the RTB. 

In the image above, also note how the RWR is quiet. :)

Cheers,


Tuesday, May 4, 2010

Command Ops: Battles from the Bulge, Almost there

According to this thread, there are still a number of bugs to fix. Get ready for some this war gaming gem, folks.

Some screenshots below.

Click the image to see it in full size. I thought the Allies at Stavelot would run for the hills. Hours later I figured out I was wrong.

Click the image to see in full size. Moving to contact as the Germans. Night combat is always complicated because you almost have to stumble upon the enemy to see it. This may result in engagements that are difficult to shake off from.

Cheers,

Monday, May 3, 2010

Random Book Snapshot:Death of the Wehrmacht

Some selected text from just the second paragraph of this book by Robert Citino. There is some hyperbole, but the passage certainly conveys the epic proportions of the Eastern Front during WWII.

"Incredible", he muttered to himself, "absolutely overwhelming". Marshal Fedor von Bock stood at his hilltop observation post, just southeast of Lozovaia, shaking his head at the scene. The vista beneath him was on that few generals in history had ever been privileged to see: an entire army surrounded in a tiny pocket just a few miles away. He focused his field glasses here, then there, flitting back and forth. The entire area couldn't have been more than two miles wide from east to east, perhaps ten miles from north to south, and every inch of it was seething with activity. Massed formations of dusty brown infantry, tank columns so dense you could probably walk from one vehicle to the other without touching the ground, guns of every shape and description -all milling about, moving hither and yon without apparent plan or purpose.  Above them thundered hundreds of Luftwaffe ground attack aircraft, Richtofen's boys: Stukas and 109s and Ju-88s, bombing and strafing and herding. With so many men and tanks, guns and horses, packed into such a tight space, they were an impossible to miss target. The airmen were probably licking their chops, the thought, and the same went for his gunners. As he surveyed the scene, he could see artillery firing from all points of the compass into the helpless, writhing mass below him. There were explosions every where; every square inch of the pocket roiled with fire and smoke.
He thought of a term he had learned so many years ago as a cadet in the War Academy: Kesselschlacht, the "cauldron battle". It was the perfect term to describe what was going on below: an entire army being boiled alive. He remembered studying the campaigns of the Great Elector, Frederick the Great, Blucher, and Moltke. They were the gamblers of their day: bold maneuvers, daring attacks from flank and rear, battles of encirclement. And he remembered another word: Vernichtungsschlacht, the "battle of annihilation."

Cheers,

Friday, April 30, 2010

The Red Pill Gives You Wings!

Like the famous energy drink ... :)


A new wave of screenshots and a vignette of what The Red Pill can do are now available at WarfareSims.com.

This time, a JSTAR platform flying along the Saudi border finds a group of enemy tanks and an SA-6 battery. A SEAD flight (F-4Gs) and an AI mission (A-10s) take care of them.


There is war gaming goodness wherever you look at! If you read the original post at WarfareSims.com you will notice the extreme detail in the modeling of sensors. There is even mention of secondary explosions taking out some of the SA-6 launchers (!).

I wonder if there is any type of modelling of neutral vehicles. I bet that at that distance the JSTAR may detect Baghdad's rush hour traffic.

Cheers,

Thursday, April 29, 2010

Achtung Panzer Kharkov 1943, New Review at Training and Simulation Journal

This war game keeps getting very good reviews everywhere. Now at both the online and print editions of Training and Simulation Journal, a review by Michael Peck.

The ultimate pass-fail for a tactical game is immersiveness, and that is where “Achtung Panzer” shines above the rest of the tactical RTS pack. Too many tactical games tend to be crowded free-for-alls that demand constant clicking at the expense of decision making. “Achtung Panzer” depicts the loneliness of the modern battlefield, with only a few squads or vehicles in a square kilometer.
The game's weak points (interface and manual) are also mentioned. But overall the review is a thumbs up. Congratulations Graviteam!

Cheers,

Wednesday, April 28, 2010

Tank-Infantry Teams in ARMA 2: Protecting an immobile tank (Part 3)

This is a continuation from part 2.

I would like to spend a few words about how I edited this mission. The enemies are Russian infantry squads and AT-13, anti-tank missile teams. I placed one pair of such enemy teams some 2 km away and all around from the immobile tank position. Total of enemy teams pairs was 5. Each pair had a probability of appearance of 35% and a placement radius of 300 meters. Each team has a waypoint directly on the immobile tank and those waypoints get activated by a "Radio Alpha Call" (so I can spend some time setting up my defensive positions).

After setting up our defensive positions I decide to move onto the green fire team position (10 o'clock). As I mentioned in a previous entry, there is a very nice keyhole position there from which I can see all other fire teams.

Waiting for contact is one of the most exciting things in this simulation. Only second to hearing the first shot and trying to figure out where it came from.

An infantry squad spotted at 4 o'clock. Fire team blue (positioned at 6 o'clock and in great high terrain) opens up.

If they are moving, they are toast. That's pretty much how it works in this simulation.

While I was monitoring the fire fight and double checking that all other teams kept their original orientations (you will never know if more infantry could come from other directions), I hear that dreadful "wooooshhhh". The tank was hit but it survived. 

Who fired that? One day I'm going to be hardcore enough to recognize weapon systems by their sound, I swear ...

After two or three minutes the firefight winds down. The enemy apparently will not attack us from other directions. There are still some enemy infantry remaining at 4 o'clock, and they keep coming in and out of sight. 

I grab the green fire team leader and move towards 4 o'clock for a quick look. I am afraid I will have to set up a small patrol to clear that sector of our perimeter. We had to come back in a hurry ...

The AT missile flew directly over our heads and destroyed the immobile tank. We just failed our mission.

And then I did what I should have done all the time "All, suppressive fire". This order works like a charm for those enemy targets that play this diabolical hide and seek game with your fire sectors.

After 6 or 7 minutes, I know that the action has ended. Since we don't have an after action report utility in ARMA 2, I take a stroll to learn about what just happened.

This is the AT-13 team that took out the tank. Our destroyed tank is in the background, 250 meters away.

The enemy infantry squad was caught in the open. The AT-13 team chose a firing position with better concealment, right below the lighthouse.

Lessons learned:
  • My fire plan is barely enough for RPG threats, certainly not enough for AT missiles
  • For protecting an immobile tank in open country, one needs to seriously ponder moving the infantry considerably away from the tank
  • "All, suppressive fire", will shower lead onto enemies that are near the position where they were last seen, even when there is no line of sight to them
  • Would a three man patrol worked?
  • (Your input here ...)
Cheers,


Sunday, April 25, 2010

LOMAC Flaming Cliffs 2.0: Battlefield Air Interdiction at Gudauta (Part 3)

Soon after take off, we get painted by the one of the SA-11s. They should be in the far background.


Navigation. The Caucasus looks all the same from altitude. Rivers played a big role in our navigation.

En route, somewhere between WP2 and WP3. Note the tight space we are in.

At the contact point (CP), waiting for the ground team to contact and clear us. In real life, these CPs may hold you for a long time, so you better trim your aircraft for fuel efficiency.  I checked my fuel consumption and concluded that I could do this for 1.5 hours if needed. CPs around mountains like this may not be a good idea in real life (communications with ground controllers will be a tad difficult).

Once cleared hot, we zoom through the IP. The Death Canyon can be seen here. The SA-11 at the gate of this canyon painted us briefly while we sought refuge on the slopes ahead.

Deep breath nearing WP6. Last glance at ECM, weapons and targeting systems.

The moment of truth. At WP6, we emerge from the mountains and get a panoramic view of the enemy interior lines.

A few seconds later, during our attack run on the SA-11 in the valley (between the urban are and the river). One AGM-65D Maverick launched. No SAMs launched at us, thank goodness ...

This screenshot was made with a replay file, because off course at this point we were breaking hard from our attack run. The SA-11 in the valley goes up in flames.

With the SA-11 in the valley gone, we confidently align for an attack run on the tanks. We get a not-so-friendly reminder form the SA-11 in the coast line about keeping our altitude on check. The missile looses track and self-destructs over the woods.


 We move through the valley with the hills on our right covering us from the other SA-11 in the coast line. Is a tight space, but the A-10 can turn on a dime.

Acquiring targets with low altitude pop ups is challenging and we overshot the tanks during our first pass. They shot at us con gusto, but our serious error didn't have any consequences.

My second AGM-65D finds its target on the first tank. Note how we are breaking too close to the target.

My third AGM-65D misses! Again, we are breaking too close to the enemy.

My fourth AGM-65D. Only one tank left.

I order my wingman to engage the tanks with his missiles, and artificial stupidity kicks in afterburner. He aligns for a text book attack run from high altitude and gets fired at by the SA-11 in the coast line.

No chute, my wingman is dead (explosion in the left).

I then attack the only tank left with all I have at this point, the gun ...

Multiple passes, no results. In this image, a gentle slope made it impossible to put the tank into my sights. Low altitude gun runs suck ...

Another failed gun run with a shallow angle. I just can't pop up because of the SA-11 on my right. Flying over the target is not a good idea either.

I even tried changing the direction of the gun run. After some hits, the T-80 proved to be a tough nut to crack. Now he is getting too close to the front lines. With my guns dry, I RTB.

Landing at the forward base Sukhumi. Not a good day for our wing. A worse night for the troopers on the ground ...

Cheers,

LOMAC Flaming Cliffs 2.0: Battlefield Air Interdiction at Gudauta (Part 2)

Decisions, decisions ... what to do next. The grid lines indicate 20x20 km. Click the image for an expanded view.

The mission is to destroy the enemy tanks before they reach the front line. Resources available: a two aircraft flight of A-10s armed with AGM-65Ds and an special operations team behind the enemy lines.

In the image above the small arrows indicate the likely route the enemy tanks will take: a small valley between the Caucasus mountains and a patch of hills. We will need the assistance of the SOF team to know if and how the tanks are moving. Two SA-11 launchers are already known to be operative: one in the valley and the other one near the coast line. At the front line, the enemy infantry will likely have a good supply of portable IR-guided missiles (MANPADS).

The environment for this mission is moderate to high threat. At least in my experience, the SA-11 is a nasty foe. The two-stage missiles it fires out range our AGM-65Ds by more than a dozen kilometers. The MANPADS threat is no slouch either: silent (you get no instruments warning when they are shoved up to your engines) and many (cheap and easy to transport), I never take any chances against them.

In the image above, the aircraft icons represent different approaches I considered.

"Front Door", is the diddle, diddle, straight up the middle approach. Conscious of my poor piloting skills, I abandoned it quickly because I tend to get too close to any target and the MANPADS would take me out of action rapidly. Also, there is the line of sight issue when one approaches frontally a column of vehicles moving down a road: they tend to have a smaller footprint in my sights and disappear all at once when they move through moderate elevations.

"Slalom" involves popping up from the mountain range, acquire, fire and bug out towards the cover offered by the Caucasus. I called it "slalom" because I tend to spend too much time acquiring, and using this attack approach would have me flying downhill from a starting altitude of 2,000 meters. One would think that in a situation like that the terrain clutter would protect an aircraft from the enemy radars target acquisition systems, but alas the SA-11 is a heck of an air defense that fires a heck of a missile.

Though not undefeatable, the SA-11in the valley complicates things beyond recognition. That SA-11 in the valley ... it needs to be put out of action.

Did you know that you can safely approach an enemy SA-11, without being fired at, if you fly at around 30 feet above the surface level? That trick could be used against the SA-11 in the coast line ("Salty") because flying at very low altitude is easier on water bodies. But that would still leave me with the task of dealing with the other SA-11 and we have only 8 AGM-65Ds in this flight. Suppressing just one SA-11 is all I can stomach right now.

Using the Death Canyon to approach and engage the SA-11 in the valley ("Trench Rat") is just a crazy idea I had. Useless. The SA-11 is just at the gate of the canyon. Where would I break if I get fired? Upwards?

With these ideas in mind my flight plan was born (see way points in the figure above). Way point (WP) 6 is where I will start my attack run on the SA-11 located in the valley. I will pop up above the mountains at WP6. The altitude of the Caucasus there is just 1,300 m (compare that to the 2,000 of "Slalom"). I will then dive onto the SA-11 and destroy it. May my shooting fail, hopefully I will be inside a 3 km ring around this SA-11 (these things can't fire at you if you are closer than 3 km) and with more freedom to asses the situation. WP7 is just an orientation point, I would prefer not to fly through it but rather take the tank targets from a distance.

WP5 is the initial point (IP) far enough from the real attack position. I kept the IP a bit far from where the shooting will happen because if my initial run fails earlier than I can shoot anything, I want to go back to the IP and re asses from the safety of a good covered position. In addition, remember that IPs should be easily recognizable from the air without the aid of instruments. Mountain peaks look the same when you are flying in combat, so I don't use them as IPs.

WP4 is the contact point (CP). This is where I will wait for the ground element to give us a go/no-go.

I chose WP2 at a landmark (where two rivers merge) and WP3 as an intermediate, general orientation WP. Remember, flying the A-10 in combat is more about sensibly using the terrain rather than chasing waypoints. I don't mean to fly straight between WP2 and WP3, and I don't see the need to complicate the flight plan with 25 extra waypoints that will become a chore to manage and follow during the flight.

In that spirit, we fly ...

Cheers,