Sunday, May 30, 2010

Command Ops: Battles from the Bulge - Tutorial Scenario - Planning - Enemy

Continuing with the planning process, now I'll consider the enemy.

From the briefing, we know that across the bridge we face a single regiment of the 12th Volksgrenadier Division. And also we know that St. Vith is not occupied by the enemy but that is likely to change soon. Also, there is an armored column coming from the west.

The following map is combination image created with an in-game screenshot of the map plus graphics from MilSketch.

All things considered, the threat from the west is the one that worries me the most. Grid lines are 1 km divisions. Click the image for a better view.

Now a closer look of the enemy forces immediately in front of us.

The enemy (grey counters) looks like an all-infantry regiment. The size of the formation is indicated in the lower part of the counters. Almost every enemy unit is a company ("I" symbol), but there is also a platoon ("..." symbol). Remember this information shown at the beginning of an scenario can be not accurate (we have full fog of war in effect) due to faulty reconnaissance.

By clicking every enemy counter we get details about the equipment and personnel that the formation could have.

Don't believe everything you see!
Note the "Reliability" field, it says "vague". This information should be taken with a grain of salt. Please click the image for a better view.


More details on equipment.
Please click the image for a better view.


New! Now we can see pictures of most of the vehicles and equipment by clicking on the text.
Please click in the image for a better view.


Coming up, the next step in planning: terrain considerations.

Cheers,

Saturday, May 29, 2010

One Trip to the Attic ... And There Goes the Afternoon!

The list of overdue blog entries is not getting any smaller. This noon I went into the attic to recover some game manual and found my CDs of Sonalyst's Naval Combat Pack. I forgot about it almost by the time I bought it, quite a while ago.

Two British Harriers (0027 and 0024) fend off a couple of Argentine Mirage IIIs under the attentive watch of HMS Beaver. It's a long sail to the Malvinas/Falklands ...

Spent the afternoon playing this thing. Gah! Gotta focus ...

Cheers,

Command Ops: Battles from the Bulge - Tutorial Scenario - Planning - Mission

Well, yours truly had quite a week at work and couldn't keep up with the many news that are relevant for this blog. Let's start with the news I was very anxiously awaiting ... Command Ops: Battles from the Bulge was released!

The price of the game has spurred some fierce discussions elsewhere. I will comment about that in the future.

Now, onto the game!

The tutorial scenario features an easy-to-win scenario for the human player playing as the Allies. Even when the scenario is not challenging, please bear with me while I plan for this battle because alas I'm not tactically gifted.

Let's start the planning with a full understanding of the mission.

Please make sure to click the pictures so you can actually read the text.

The text paragraph on the left, just below the tabs displays the never-to-ignore briefing. It is important to read it to understand the mission. Yellow circles and writing are mine.

One of the other tabs shows the scenario-specific objectives. Let's take a look at those.

First objective (highlighted black) is straightforward. As shown at the bottom of the screenie, if you kill 79% of the enemy force you get 33 points in your overall score.

A comment about the destruction of enemy units. I was once discussing with  one of my best friends (a surgeon) about the optimal post-surgery feeding of cancer patients who had almost all their digestive tract removed to prevent metastasis. It was a wacky talk; the surgeon couldn't grasp amino acid dissociation constants, the biochemist couldn't grasp the electrolytic balance of a person with half their guts removed. When I asked him about how it is possible for a human being to survive such a harsh surgery, he shared a bit of his emergency room experience back in poor slums in Argentina and capped everything with "it takes a lot to get a man killed". Well, paraphrasing my non-wargamer surgeon friend, it takes a lot to get an enemy formation eliminated. Single units in this game don't want to get killed; they will take a lot of punishment, maybe rout, but they will be back into the fight when they rally. I always found this aspect of the engine quite spot on. It may be a bit shocking for the newcomer because we kind of became accustomed to turn based games where you throw the dice and if your odds are good the enemy unit just goes away. In this war game, you will push the enemy aside, but they will be back sometime. After years of playing games from Panther, "destroy the enemy" is the objective I am always sure I will miss. :)


Second objective (highlighted black) is the Steinebruck bridge (for its location see full map above). Note the timing of the objective: this objective is relevant (or active) from day 1 at 0600 to day 5 at 0600. Also, there is a distinction between occupation and completion. For occupying the objective (from day 1 at 0600 to day 5 at 0600) you can get a maximum of 8.3 score points. For having this objective under your control at day 5 at 0600 you will get 4.2 score points (no matter which side controlled the objective up to that time).


The tabs corresponding to the other objectives are reproduced below. Make sure to take a look at the full screen and map above to get an idea of the objective's location. Also note how objectives Breitfeld Crossroads and St. Vith become active not at day 1 but at day 2.


Next entry: second step of planning, the enemy.

Cheers,

Tuesday, May 25, 2010

"Battles from the Bulge" War Game to be Released with Extensive Data Editing Tools

Last Sunday, Wargamer.com published a short interview with Dave Arjuna (Panther Games) about the soon-to-be-released "Command Ops: Battles from the Bulge". Among other things, the issue of user-created content was mentioned. 
We have listened to our customers and hope they will take up the challenge and opportunity of creating their own scenarios. With the Estab Editor they will now have carte blanch in terms of what forces they can create and what battles they can simulate with the Command Ops engine.
These news are big! It means that in addition to creating maps and scenarios (a thing you could do with previous Panther games), now you can create new units, new equipment, new ammo types.

I am sure that exciting times are ahead for both scenario authors and us simple users.

Cheers,

Thursday, May 20, 2010

Keeping my fleet afloat

The naval branch of the blog sails through the seas of conflict ... at creep speed! :)

Still haven't completed the tutorials of Harpoon 3 Advanced Naval Warfare. So many great games to play, so little time!

Tutorial #4. I'm in command of a US frigate (blue circle). A Russian bomber passes by (red symbol). Are we going to shoot it down or what?

The main screen of H3ANW. The expanded map on the left shows some bogies coming down to us (yellow icons that look like half-squares).

On a serious note, I'm coping with some serious paradigm shifts because of my land-based warfare baggage.

Sure, some principles of warfare are almost universal. But changing the virtual smell of mud to the one of salt water is quite a thing for me. Oops! Slash that part of the smell of salt water, most of the warships I will be taking into battle are not commanded from the top of a bridge but rather in a command room buried inside the guts of these colossal beasts of steel. So, it will be the smell of sweat and stale coffee!

As opposed to land-based operations, in naval warfare there is no river to cross, no hill to be taken, no forest to conceal your troops. Yet, the seas are so big that finding the enemy is not a trivial task.

Looking forward to my first engagement!

Cheers,

Steel Fury Kharkov 42: Mob Tactics

Having a blast with Steel Fury. Pun intended. :)

Only thing a bit disappointing is that I'm not able to figure out how to command my troops efficiently. Specially when I'm a tank-infantry combined arms team. Apparently there is no way to detach those panzergrenadiers to keep them back or send them forward from my tank platoon.

Rejoin formation immediately before they blow you up!

These PzGren have no air-watch discipline (note the empty rear mount for the MG42)

Cheers,

Sunday, May 16, 2010

TacNuggets #3: If insurgents cross the street and there is no Marine aiming at them, is the town already lost?


I was a believer that defeat in tactical combat is always due to the cumulative effect of several small, apparently irrelevant failures ...

The game: Combat Mission Shock Force-US Marines Module
The Scenario: Circle the Wagons, by George McEwan
SITREP: A two tank section is bogged down in the middle of an insurgent-controlled town. One platoon of US Marines is on site and will protect the tanks until reinforcements arrive.

The star symbol is the position where the tank section is stranded. I moved one Plt. of Marines forward and I am trying to position them inside buildings, in a wide arch (blue line) located forward from the tank. A long time ago I played this scenario and deployed the Marines in an arch behind the tank section (dotted blue line). This was a mistake; infantry-tank cooperation in these situations needs the infantry ahead of the tank. For the most part, the Marines near the tanks are doing a great job. Now another Plt. has arrived (blue icons in the far background). Just in time, the insurgents are getting really nasty.

The plan is to have the reinforcement Plt to move into the town and move downtown in an axis perpendicular to the position of the Marines near the tanks.

The reinforcement Plt. moves its AAVs through the open using standard bounding overwatch technique. Lots of suppressive fire, these AAVs are surely thin skinned and I don't want to loose any of them to a lucky RPG shot. As planned the AAVs stop short of the town and the Marines disembark under the cover of smoke. The Marines occupy a narrow ditch and orient towards the town. After a few minutes, they move forward to take a foothold on the town. More suppressive fire. Things are going well, but an insurgent team appears on the left flank and draws the attention of everybody. 

In the foreground, an AAV and a two Marine fire teams take aim at an insurgent team that suddenly appeared on the left flank. Another Marine fire team moves forward into the town. In the far background, a mob of insurgents crosses the street towards the immobile tank section. A full Marine squad is in a building at mid-distance between the AAV and the insurgents, but they don't have an angle to shoot at them.

I counted the insurgents that crossed the street to feed the carnage downtown. 25 of them. If this AAV would have been aiming in the right direction, this battle would have ended in an early victory.

Cheers,

LOMAC Flaming Cliffs 2.0: Close Air Support (Part 4)

This is a continuation from this entry.

We have been cleared hot. This time the JTAC gave us free reign on what ordnance to use, but it is common practice in Type 1 CAS for the JTAC to choose which type of weapon the attack aircraft should use.

I haven't mentioned yet, but there is an SA-11 some 20 km from our target. By the way, I don't know what happened since the latest patch, but the SA-11 is not giving us such a hard time. We keep it real, though, and try to fly low as much as we can.

For our attack run, I used (more or less) the tactics explained by SimHQ's Andy Bush (former A-10 pilot) in this excellent article. We approach low and at the pull up point climb for the final bomb run.

Attention: during the pull up don't let your airspeed to go below 240 knots! In this case, we could only climb to 1,200 ft. My wingman is reporting enemy armor. Just super. Note the RWR; an SA-11 is tracking us.

There is not much diving when you come in from 1,200 ft, so our bomb run goes on from a shallow -20 degrees dive. The target mentioned by the JTAC is the house below the left -20 degree mark in the HUD, but his laser appears to be pointing at a bunch of trees nearby.

The JTAC reports bombs on target, but the house is still standing.


As specified by the JTAC, we exit east towards the CP.

As in real life, from the air we couldn't really figure out if our bombing run was effective or not. We have been tasked with bombing infantry; they are almost invisible from the air. We have to rely in our JTAC for that ... and he bugged out from his position. What's going on down there?

A recording of the mission allows to see all those things we missed because we were busy flying, bombing and staying alive. Below is a sneak peak of what was going on below our wings.

There was enemy infantry around that house. The JTAC may have moved his laser a bit from it ... whatever ... the bombs fell close enough to the enemy position.

During the debriefing, I was informed that our bomb run killed 8 enemy infantry.

Our infantry was relatively close to our target. They started pulling out to the south as soon as we were cleared hot. A smoke column and two aircraft in the far background can be barely seen. That's us.

These infantrymen better hurry up across the river. Enemy armor is approaching the town!

Cheers,

Saturday, May 15, 2010

Great Blog About the A-10 Warthog

Hogs of War, a blog by Gillers, is a great resource on all things A-10: flight simulations, news, books and other goodies. Hogs of War has referenced this blog a couple of times (thanks Gillers! :) ).

In Hogs of War's  "Books & Reading" section, there are two great books listed. One is Smallwood's "Warthog: Flying the A-10 in the Gulf War". Excellent book. The other book is "A-10s Over Kosovo" which can be downloaded for free from the Air University Press website.

Keep up the good work Gillers!

Cheers,

VBS2 Lite US Army Makes it to the Front


A short video of VBS2 Lite US Army made by one of our servicemen. 

Stay safe DevilDog!

Cheers,

Thursday, May 13, 2010

Steel Fury Kharkov 42

Installed and briefly messed around with it. I definitively like it. The manual was slightly better than in the demo. There is a lot to learn yet.


It does look great!

Cheers,

Tuesday, May 11, 2010

Fingerspitzengefühl

I am reading Fleet Tactics and Coastal Combat. My grasp of naval warfare is still comparable to the one of a two year old kid, but ... Crap! This book sometimes is a trip down the deepest roots of war waging.

I came across this passage on leadership and I wanted to share it here.
"Another difference between good and bad leaders lies in what they see when they look, what they hear when they are told, and what they communicate when they speak."

Cheers,

How much is a user interface worth?

Well folks, I am enjoying Achtung Panzer Kharkov 43. So much that I've got a serious case of Graviteam virus and yesterday I decided to get Steel Fury Kharkov 42. First I downloaded the demo to check out if there was any type of graphics incompatibility issues (there was none). But the sim's interface of the demo is hell and the user's manual editor appears to be Google translate. After Achtung Panzer Kharkov 43, I was expecting some clunkiness in those two aspects of Steel Fury. Still, I was shocked with the demo's interface and manual.

I'm not a gamer that expects 100% polish in games and simulations. I don't even care about storylines, campaigns or how many missions the game has. As such, from what I saw in Steel Fury's demo, I'm going to enjoy this thing. Yet, I can't help but wonder about the impact of presentation in Graviteam's offerings. Sales lost ... developer goes under ... we are left again in the dark.

It is kind of funny that other GREAT games have wonderful interfaces, manuals and tutorials but still struggle to convince gamers about their worth. And I'm not going to give names ...

Yes! Download of Steel Fury is done. Off to climb the ultimate learning curve.

Steel Fury Kharkov 42 demo.

Cheers,

Monday, May 10, 2010

Command Ops: Battles from the Bulge - New video

There is a faint smell of release coming from Matrix Games' kitchen. :)

Dave Arjuna, head honcho of Panther Games has assembled a video about their upcoming Command Ops: Battles from the Bulge. It covers the basic theme and mechanics of the game.  This video will help the newcomer to appreciate what this game is about.

A Matrix forumite was kind enough to upload it into YouTube. The first part is embedded here. Please follow the links below for the other 3 parts.


Second Part (YouTube)
Third Part (YouTube)
Fourth Part (YouTube)

Cheers,

Where is the Hearts of Iron franchise heading?

Among other many sore spots, this blog never covered anything at the strategic level of war. As you know, I blog about what I play, and with the many work and family obligations I don't play as much as I would want. I have toyed around with some strategic-level war games, but although I think they are great playing them would demand an amount of time I can't afford.

Past Friday I received my press pack of screenshots for Hearts of Iron III Semper Fi and while browsing them I remembered the nice level of detail that the Hearts of Iron franchise packs for land warfare. I don't think any other strategy level war game models land warfare as good as the Hearts of Iron franchise does. But take that with a grain of salt because as I said, I am mostly ignorant about this genre.

The Russian front: expansive, limitless ... Like the amount of time needed to play this game? 

Nothing quiet of the Eastern Front ... Am I supposed to remember where each unit is going?

How long would it take to manually set the stance of every unit in your OOB?

In closing, Paradox appears to be taking the Hearts of Iron franchise more deep into micro-management territory. My question: is it more always better?

Cheers,

Sunday, May 9, 2010

LOMAC Flaming Cliffs 2.0: Close Air Support (Part 3)

This a continuation of this previous entry.

We left the contact point and we are a few miles short of the initial point ALAMO (IP ALAMO). The chat with the JTAC continues.

Talk to me JTAC ... (laser spot is the green diamond in the HUD)

The "talk-on" is a very common part of type-1 CAS because this type requires the aircraft to have visual tally to where the JTAC wants the ordnance delivered. "Contact" is the brevity code for having visual contact and "spot" is the one for being able to receive the reflected laser signal emitted by the JTAC. I still can't see the target, but moving a few miles forward solves that issue.

I see the target now ... (laser spot is the green diamond in the HUD)

The "readback" is just to make sure that both the JTAC and the attack aircraft are on the same page. The attack aircraft reads back items 4 and 6 of the 9-line brief plus some items from the remarks given by the JTAC.

Once the readback is acknowledged by the JTAC, he clears us for the attack run.

Cheers,

Saturday, May 8, 2010

LOMAC Flaming Cliffs 2.0: Close Air Support (Part 2)

This is a continuation from this previous entry.

We are at the contact point, ready to copy our next CAS mission from the joint tactical air controller (JTAC).

Huh? See text to get even more confused.

"Type 1 in effect"
CAS comes in three tasty flavors (types 1 to 3). Type 1 CAS is used when the JTAC needs to acquire visually both the target and the attacking aircraft. The situation down there must be delicate.

"ALAMO ... 012 .. 11.0 ... etc"
This is the so-called "9-line brief". It has to include these specific items in this specific order:
  1. Initial Point (IP) (ALAMO in this case)
  2. Heading from the IP to the target (012)
  3. Distance from the IP to the target in nautical miles (11.0)
  4. Target elevation in feet above the sea level (325)
  5. Target description (Enemy infantry ...)
  6. Target location coordinates (NB 456746)
  7. Type of target marking (laser in this case)
  8. Location of friendlies form the target (East 400 meters. Sh!t I knew something was kinda pressing down there. Better watch out for where those bombs fall!)
  9. Egress direction and where to go (Egress east and go to the CP again)
"Remarks"
What? There is more? See below, please.

Huh? See text for further confusion.


Final attack headings is almost self explanatory: is a range of headings that you can have while flying to the target. This headings range ensures that you can see the reflected laser radiation and in some cases is used to make sure that we hot-rod pilots remember if there is any fire de-confliction measures in effect (nothing funny about being shot down by your own artillery).

Immediate TOT (time on target), means that we should deliver our ordnance as soon as possible (told you something urgent is going on down there).

"Say when ready for talk on" ... well ... there is a lot of talking in CAS. 

More coming soon ...

Cheers,


LOMAC Flaming Cliffs 2.0: Close Air Support (Part 1)

A boy returned from Sunday school and his mother asked him what he had learned. He said that he heard about how Moses and his people escaped from Pharaoh's Egypt. He told her that as Pharaoh's tanks approached the Israelites, Moses got on the radio and called in an air strike, which knocked the tanks out of action. The puzzled mother asked, "Is that really the way the teacher told the story?" The boy replied, "If I told it her way, you'd never believe it!"

This joke originally appeared in Reader's Digest around 1967 and it is the opening paragraph of "The Warthog and the Close Air Support Debate". The author of this book quoted the joke to make the point that in popular imagination, close air support is a given.

This series of entries are an amateurish attempt to outline how CAS is done in real life by the USAF, using LOMAC Flaming Cliffs 2.0 as a framework. I make no claim of being knowledgeable enough on the topic to provide totally realistic dialogs and comments. Whatever I write here you will find it elsewhere in the web. My only point is that besides the complexity of putting ordnance onto the enemy while flying at 300 knots, in real life there is another layer to it that is quite technical and time-consuming.

We are the US Air Force and we love to bomb ... just not near the battle lines!
This is what we got today. We (a flight of 2 A-10s) have been loitering for a little while before AWACS controllers directed us to a contact point (CP, way point 2 in the map below) and contact Dragon 11.

In the map below you will notice the CP (way point 2, WP2) and three other way points. These other three are pre-planned IPs that both us and the ground controllers know about. Since CAS is dictated by the needs of the troops below, we don't know which of the IPs we will use beforehand. But we will find out when we contact Dragon 11 from the CP (WP2).

Where are the troops in this map? Well, we only know that a US Army Bn is advancing north west and that they are fighting near IP TARAWA. This map should contain some control measures, but I omitted those for clarity. 

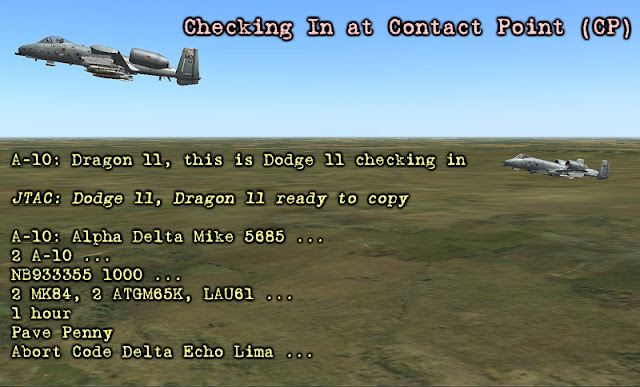
When we reach the CP, the following check-in chit-chat takes place.

Huh? See explanation in the text.

JTAC is the joint tactical air controller or more simply put, our ground controller. His callsign is Dragon 11.

During our check-in we say the following about us to the JTAC:
  1. Our Mission Number (ADM5685, this is something we got from the AWACS)
  2. Our Number and type of aircraft (2 A-10)
  3. Our position and altitude (6 digit grid number and altitude in feet ASL)
  4. Our ordnance (2 MK84, 2 Mavericks, rocket launcher)
  5. How much time we have available to be on station
  6. Which type of sensors we have available
  7. The abort code for our CAS mission (DEL, the JTAC will consult a code book that we also have in the plane and check which letter matches "DEL"-that letter is B in this case, so the abort code will be "BRAVO")
More coming in the next entry.

Cheers,


Thursday, May 6, 2010

LOMAC Flaming Cliffs 2.0: Battlefield Loitering in the A-10

One of the most crucial capabilities of the A-10 is it's ability to loiter around the battlefield for hours so it can be available after a few minutes whenever a ground commander needs its firepower.
Even the most hardcore combat flight simmers will stay away from a mission where you have to fly an aircraft for  more than one hour. Me too. Who has the time for that?

Nonetheless, I wanted to see if I could experiment the A-10's loitering capability in LOMAC. So, I took onto the virtual skies in my virtual A-10, loaded with 100% fuel and a spiffy payload for close air support. In this mission that I edited there is an SA-11 battery some 30 km ahead so I started my loitering circular circuit at around 1,000 ft.

How to stay airborne the most time with the least fuel? Stick and Rudder says:

"An airplane will maintain flight with the least amount of power if it is flown quite slowly, very nose-high, with its wings at very high angle of attack.[...] The airplane is not covering distance very effectively, for it is too slow, but if develops perfectly astounding endurance".

I make no claim that I nailed an optimal flight regime for loitering or that I even know the "speed of best duration" of the virtual A-10. But I was mildly surprised with my flight conditions, which I kept almost hands free for a good fifteen minutes (fell asleep on the keyboard).

At this fuel consumption rate, I can loiter for more than one hour and still have some fuel for an attack run and the RTB. 

In the image above, also note how the RWR is quiet. :)

Cheers,


Tuesday, May 4, 2010

Command Ops: Battles from the Bulge, Almost there

According to this thread, there are still a number of bugs to fix. Get ready for some this war gaming gem, folks.

Some screenshots below.

Click the image to see it in full size. I thought the Allies at Stavelot would run for the hills. Hours later I figured out I was wrong.

Click the image to see in full size. Moving to contact as the Germans. Night combat is always complicated because you almost have to stumble upon the enemy to see it. This may result in engagements that are difficult to shake off from.

Cheers,

Monday, May 3, 2010

Random Book Snapshot:Death of the Wehrmacht

Some selected text from just the second paragraph of this book by Robert Citino. There is some hyperbole, but the passage certainly conveys the epic proportions of the Eastern Front during WWII.

"Incredible", he muttered to himself, "absolutely overwhelming". Marshal Fedor von Bock stood at his hilltop observation post, just southeast of Lozovaia, shaking his head at the scene. The vista beneath him was on that few generals in history had ever been privileged to see: an entire army surrounded in a tiny pocket just a few miles away. He focused his field glasses here, then there, flitting back and forth. The entire area couldn't have been more than two miles wide from east to east, perhaps ten miles from north to south, and every inch of it was seething with activity. Massed formations of dusty brown infantry, tank columns so dense you could probably walk from one vehicle to the other without touching the ground, guns of every shape and description -all milling about, moving hither and yon without apparent plan or purpose.  Above them thundered hundreds of Luftwaffe ground attack aircraft, Richtofen's boys: Stukas and 109s and Ju-88s, bombing and strafing and herding. With so many men and tanks, guns and horses, packed into such a tight space, they were an impossible to miss target. The airmen were probably licking their chops, the thought, and the same went for his gunners. As he surveyed the scene, he could see artillery firing from all points of the compass into the helpless, writhing mass below him. There were explosions every where; every square inch of the pocket roiled with fire and smoke.
He thought of a term he had learned so many years ago as a cadet in the War Academy: Kesselschlacht, the "cauldron battle". It was the perfect term to describe what was going on below: an entire army being boiled alive. He remembered studying the campaigns of the Great Elector, Frederick the Great, Blucher, and Moltke. They were the gamblers of their day: bold maneuvers, daring attacks from flank and rear, battles of encirclement. And he remembered another word: Vernichtungsschlacht, the "battle of annihilation."

Cheers,