Wednesday, February 2, 2011

Maneuver Warfare: A Wargamer's Notebook - OODA Cycles - In the Air: Sabres vs Migs

This series of blog entries are about the so-called "maneuver warfare" as explained by William Lind. The writings of Robert Leonhard will also be included. I claim neither expertise in the subject nor devotion to this way of waging wars and thus I am not trying to convert you into anything. This series is not an analysis or a review of all ideas about maneuver warfare but rather some explorations about the topic based on computer war games and simulations. Future entries will be delivered based in readership.


In the previous entry, I mentioned how John Boyd got the idea of the OODA cycles from the air combat realities of the Korean War. Apparently, the F-86 Sabre had no advantage over the Mig-15 in thrust, turn or climb rates. It was the ability of the F-86 Sabre to quickly transition between maneuvers what made the difference against the Mig-15.


In this entry, I fly through the virtual skies of North Korea looking for some edu-fun-meint.


The choice of flight simulator was easy: Rowan's Mig Alley. I don't think any mod out there for more modern combat flight simulators can replicate the dogfight experience of the good ole Mig Alley. A thing I never got over with fan-made mods to flight simulators is the lack of information about their flight models. Since flight models are really very important for this entry, I just sticked with Mig Alley. BTW, this flight simulator (ugly as it looks by today's standards) has a lot of personality. Maybe I should write a few more entries about it.


So, I went on and flew the Sabre and the Mig in empty skies. On the issue of maneuver transitions: yes, I can invert, roll and shake the stick with an almost immediate response in the Sabre. Not so fast with the Mig-15. Check, issue is closed.


Can the fast transitions of the Sabre translate in faster observation-orientation-decision-action  cycles that can be used to gain an advantage? Seoul, we have a problem ... Of the OODA cycle, 3 out of 4 steps (observation, orientation and decision) depend exclusively on the man and just one (action) step partially depends on the machine. Yours truly is a terrible combat pilot ... 


Even when the Mig-15 was mentioned above in having the advantage in sustained performance, this advantage is not gigantic. For air-combat purposes, the Sabre and the Mig can be considered as "similar aircraft". I experienced this in the flight simulator: flying the Sabre in turn-and-burn dogfights (angles fights would be the academic term), and in particular at the very end of flat scissors maneuvers, I frequently ended up in a head to head zoom ins. In other words, both aircraft can turn almost at the same rate and with the same radius.


Head to head zoom in. Scary stuff ...


I still have to work my flying skills to take advantage of the supposedly faster transitions of the Sabre. All I can report today is how I took advantage of a bad OODA cycle of a Mig-15's pilot.


So here it goes: a mano a mano with a Mig-15 (computer opponent set to "hero", the maximum skill available).


A Mig-15 in my tail ... Just another day in the office.


The Mig-15 is turning with me.


He tries hard to saddle. Here is to hope that the Mig-15 overshoots.
The turns into me, I turn into him ... A tad late but that's what the books say I am supposed to do.

Another opening of the scissors. The Mig is shown turning into me. Note that this maneuvers are not actually textbook rolling scissors, as the Mig-15 has still  positional and angles advantages over me.
BAM! The Mig-15 pilot, now spooked by the multi-story buildings, is short in airspeed and altitude and abandons the turn in order to regain both. I can see him struggle to regain control of the aircraft without stalling. I turn into him immediately.
The Mig-15 is trying to get away. I struggle to regulate my airspeed to a perfect closure rate that avoids an overshoot. 
The Mig-15 is in the background, it gained some airspeed but it is still low and flying away in a gentle turn. My inability to regulate airspeed forces me into a lag pursuit roll, here shown in its initial stage.
In a surprising move, the Mig-15 reverses his turn into me and climbs to meet me. Fortunately, he started to climb at a relatively low airspeed and to add insult to injury he turns into me. He made an awful decision and is flying really slow. That's why I got a chance for a couple of on-target snapshots. Shown here, a few seconds after my two cannon bursts (smoke can be seen from the Mig's tail).


I let him to pass by my aircraft. He goes down in a gentle spiral turn. It's a confirmed kill.


Cheers,

Sunday, January 30, 2011

Air Assault Task Force - Mini Thunder Run

The game: Air Assault Task Force
The scenario: a US Cavalry company reinforced with engineer assets is pushing into Baghdad and trying to spoil an ongoing Iraqi Army withdrawal.
What I want to share: fire and maneuver while on the run with a platoon of M1A2 Abrams tanks.

Click the image for an expanded view. The graphics are a bit dated (this scenario is quite old), but you have to give it to me that ProSimCo games rock when it comes to immersive military command decision making. The white slashed areas are urban terrain of different densities. Our axis of attack (Warrior) is a nightmare: obstacles (not depicted since I don't know where they are) and AT missile ambushes along the roads (white lines) leading to the bridge south of objective Fox.
Click the image for a better view. Black grids on the map are squares of 1 km.  Our order of battle is shown in the right pane of the user interface. I'm going to advance towards phase line Falaise with the First Platoon (4 M1A2 Abrams) up front and the Second Platoon (4 M2A2 Bradleys) in a follow and assume posture/mission. I'm going to avoid the main road on axis Warrior because it is likely that the AT missiles are aimed directly to them. The edge of the urban terrain south-west of the main road is particularly good for AT positions and I plan to clean it up with the tank platoon.

I know, I know ... urban terrain and tanks do not mix well. But I'm claiming extreme time constrains. An infantry platoon with a "clear" order would take no less than two hours to clear that amount of terrain.

Click the image for an expanded view. First Platoon is in the center of the map, just a few hundred meters before entering the hot zone. The First Platoon will move northeast but keeping itself southwest of the axis Warrior. Selecting a "staggered column" formation for this platoon would result in each individual tank too separated from each other and this would generate mutual support issues.
Click the image for an expanded view. To make sure each tank can support by fire the rest of the platoon I select "none" as the formation and drag the tanks very close to each other.
Click the image for an expanded view. The First Platoon is selected (note the green squares/outlines on each icon in the map) and ready to move (the little green arrows are the waypoints for the Platoon). Most important: the "suppress" order (blue cross with a surrounding green circle): whatever hostile unit is detected within that circle will be fired upon by the tanks. 
Suppression is the name of this game, folks!

Click the image for an expanded view. We made contact right away. The range is close and murderous. In the screen above, the Platoon fires and suppress the enemy position. Note the "S" marker, for suppressed. 
Click the image for an expanded view. I had to move the Platoon really close to identify the enemy position. Now with the unit identified, I can issue a "TRP" order to the platoon so they use their fires to destroy the enemy unit. This AT-5 team, if un-suppressed, would kick our asses from 3 kilometers away. So watch it.

The first AT-5 team is destroyed and I move my units right away. Very important: re-issue a "suppress" order in front of the First Platoon, so they fire away against any hostiles they find on their way.

Click the image for a better view. We are moving and kicking butt. The red "X"s are enemy AT-5 positions destroyed. In the screen shot above, the First Platoon has just encountered another one and I'm issuing a TRP order. It's quite a pleasure to hear the sound of the main guns blasting the enemy position at point blank range.

Click the image for an expanded view. The First Platoon (red and white flag with a number 1) has cleared 3 km worth of AT ambushes (7 of them, marked as red "X"s in the map) and stops short of phase line Falaise. Unfortunately, we lost a tank right at the end (blue "X" in the map) of the run. 
Cheers,

Saturday, January 29, 2011

Maneuver Warfare: A Wargamer's Notebook - OODA Cycles - A Brief Intro

This series of blog entries are about the so-called "maneuver warfare" as explained by William Lind. The writings of Robert Leonhard will also be included. I claim neither expertise in the subject nor devotion to this way of waging wars and thus I am not trying to convert you into anything. This series is not an analysis or a review of all ideas about maneuver warfare but rather some explorations about the topic based on computer war games and simulations. Future entries will be delivered based in readership.


Veni, vidi, vici.
Shortest OODA cycle ever.
As the theories of other influential military thinkers, the thoughts of John Boyd are commonly summed up in a short catch word or phrase. In this case, the OODA loop. Not much of a loop but rather a cycle, OODA cycles are the central piece of Boyd's theory and the very foundation stone of the maneuver warfare school of thought.


OODA is an acronym for:

  • Observation
  • Orientation
  • Decision
  • Action
These are the steps any entity in a competitive environment has to go through in order to gain an advantage over a rival. The OODA cycles of competing entities affect each other, as each entity will be starting a cycle based in the actions of the other. In general the entity with the fastest cycle will win, but not all is about speed. The maneuverist seeks not only to speed up his OODA cycles but to frustrate the efficiency and the output of his opponent's cycle. In an ideal situation, one could eventually force the opponent into OODA cycles that generate actions more and more inadequate. Think of the judo martial art, where the energy of every punch thrown at you is used   against the other guy, but with the addition of forcing the other guy to throw certain punches at a certain sequence that you know you can use to complete his defeat.


The OODA cycle is a deep and far reaching concept. In the present day is used in almost every competitive environment, including business. Unfortunately is often trivialized and misinterpreted. I already mentioned the popular interpretation of it as a "loop" rather than a cycle. For a complete discussion please check Science, Strategy and War by Frans Osinga (the most complete study of Boyd's military theories). A link to this book is provided below.


No less important than the ideas themselves are the ways these come to life. John Boyd's life and the origin of his ideas are described in Robert Coram's biography (link provided below). Boyd's intellectual pursuit on land warfare originated from the following observation about the kill ratios during the air war over Korea: the Mig-15's specifications (ceiling, max speed, thrust, climb rate, etc) toped the ones of the F-86 Sabre, yet the Sabres shot down more Migs.


The quest for the answer to this question is really fascinating. By this time, Boyd was perfecting his energy maneuverability theory (a theory about air combat that is another outstanding contribution) but the numbers from that theory favored the Migs. It had to be the men flying those aircrafts. Training? Nah, the North-Koreans were not bad fighter pilots and their training was almost identical to the one of the Soviets. Boyd's interpretation of the kill ratios was that the F-86 pilots could see better (the F-86 canopy had a better field of view) and change maneuvers faster because of the hydraulic controls of the aircraft (the Mig-15 had sluggish controls that resulted in a delayed aircraft response). In short, the F-86 pilots could see better (observe, orient, decide) and have their aircraft to respond faster to their decisions (action). A shorter OODA cycle.


These ideas are so deep that a whole dedicated blog would just scratch the surface. For the sake of brevity, I will just leave to you the task of exploring them. But please comment for inaccuracies above, ideas that you want to add just plain fun of discussion.


And now, let's go for some fun themed along the lines of the paragraphs above. Stay tuned.


Cheers,


Thursday, January 27, 2011

SITREP: Pinned Down by Day Job!

I'm itching to write more. So many ideas, so many games!

Unfortunately, my day job has been crazy these last two weeks. It's easing up, though.

Still in the fight. Thanks for reading my mumblings!

Cheers,

Sunday, January 23, 2011

Squad Battles Moder War - The Taliban Who Wouldn't Die

The Game: Squad Battles Modern War
The Scenario: Dahaneh (Scenario A)
The Mission: An un-supported heliborne insertion to investigate a suspected Taliban compound. Forces available are one US Marines Rifle Platoon plus a US Marines Weapons Platoon (-). No indirect fire support, no close air support available. Forces to be inserted with three CH-53 Sea Stallion helicopters armed with .50 cals. Time available for the mission is one hour of simulated time or 12 turns.
What's up? An assault on a single sniper position by a US Marine squad came at the expense of one grunt.

Enough to make nervous even the toughest Marine, this mission has a lot to comment about and learn from. Just to mention two:

  1. Unsecured, non-prepped by fire helicopter landing zones. During the Russo-Afghan War, the Russians developed a knack for surprise heliborne insertions damn close to suspected enemy held towns. Many times the surprise turned out to be that the Mujahideen were ready and waiting in ambush. In this scenario, given the lack of reasonable fire support and the meager forces available, I had to land just 200 meters outside Dahaneh because landing away from the town and thus approaching through the open ground would be time consuming and the enemy would be on alert by the time we set up a scheme of fire and maneuver.
  2. The slugfest of advancing through built up areas.  How demanding on time, sweat and blood urban combat is. We landed in the southeast corner of our sector and quickly moved west to gain a foothold within the protection of the built-up area. Plan was then to gain our way north, advancing in a left-leaning wedge to provide some sort of support on our west flank.


Please click the image for an expanded view. Blue lines and icons were added with MilSketch. The objectives are marked with brown squares containing a number (victory points) within them. The landing has begun. Note the northmost helicopter icon with a white bar in its bottom: the helicopter is in the ground now.
And early on during our advance towards the compound, a pesky Taliban sniper that took a whole ten minutes to pin down before assaulting his position.

Please click the image for an expanded view. The orange icon near the Marines is a single Taliban sniper. In this screenshot I'm choosing the right ammunition to suppress this guy ... Even after fires from three US Marines squads, the Taliban wouldn't get suppressed and continued to fire.

Please click the image for an expanded view. After pinning down the Taliban sniper, a Marines squad assaults his position (hex highlighted red). Unfortunately one of them fell during the action (numbers in the highlighted hex indicate losses: 1 attacker, one defender). 
Assaults in the Squad Battles series is one of those things I never got a good hold on. Maybe I should have assaulted with two squads?

We just started the fight, and we have only 30 minutes left for the whole mission!

Cheers,

Monday, January 17, 2011

Gary Grigsby's War in the East - Review

This review does not include a detailed description of game features that I think is important for your decision of buying this game or not. Please take a look at my AAR for a closer look of such game features: Part 1, Part 2 and Part 3. Thanks!


A non-scary monster game
War in the East is a bold game with an ambitious goal. It is the story of the biggest operation in military history told in 2113 counters and 25760 hexes. Based on its scope, depth and amount of moving parts, this game qualifies as a so-called "monster game" and is apparently geared exclusively towards the hardcore audience that enjoys this type of games. However it is surprisingly approachable and worth a look by all war gamers interested in operational warfare and/or the Eastern Front.


Headquarters at your cursor tip
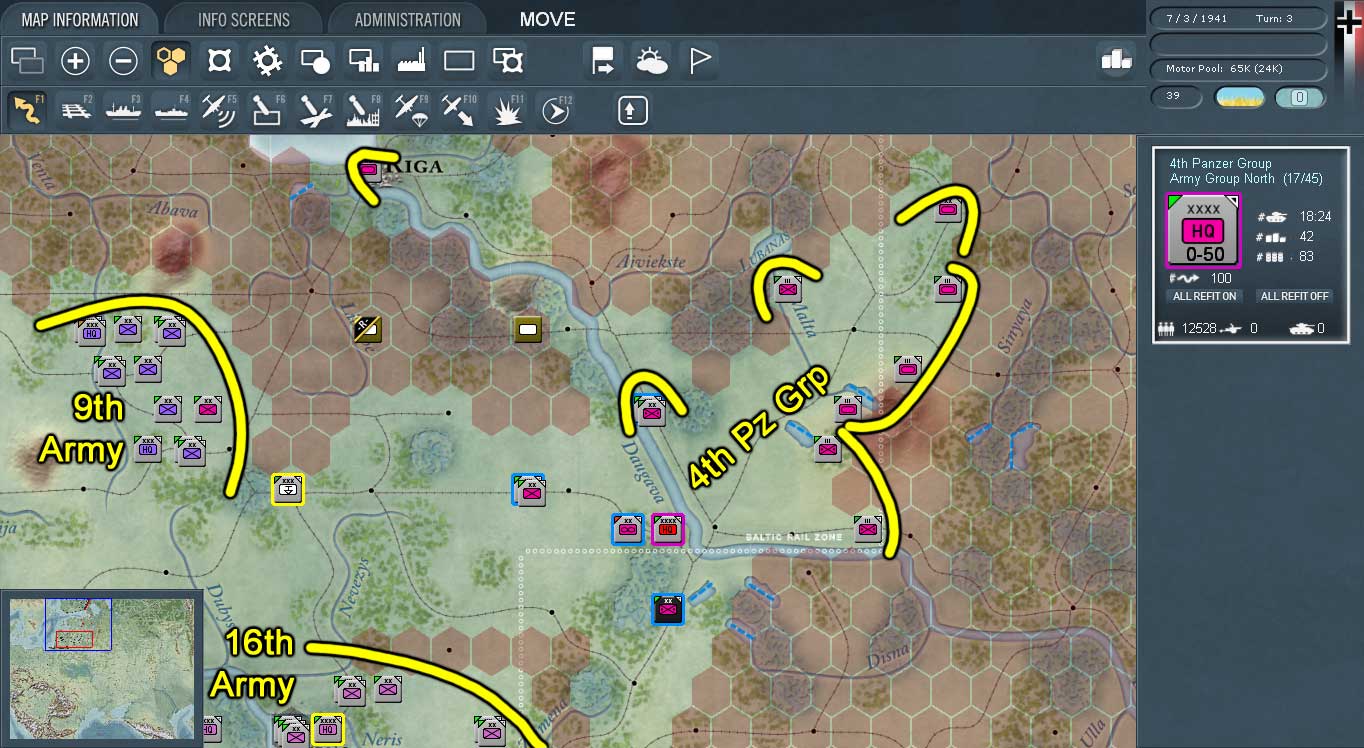
War in the East is a war game encompassing the whole WWII Eastern Front and focusing at the military strategic and operational level of war (there is no diplomacy or other politico/socio-strategic options as in games like Hearts of Iron).  The game's smallest moveable units are divisions (or regiments if you break divisions down), with the occasional smaller-sized combat support unit. The terrain is divided in hexagons of 10 miles and each turn lasts one week of simulated time. The game flows depending on the player's actions and the progress of the war feels realistic. If everything goes according to history, the player is faced with the daunting task of invading or defending Russia (June 1941-November 1942), lead the reversal to an strategic offensive (as the Russians) or to an strategic defensive (as the Germans) (December 1942-December 1943) and finally leading the offensive (as the Russians) or the defense of Germany (1944 to 1945). To wage this gigantic conflict, the player has an sizeable amount of data to consider and a comparable amount of decisions to make. Data presentation in War in the East is simply fantastic, one of the best organized and interactive interfaces I've ever seen. It has hiccups here and there (for example I couldn't figure out is how to know how many air assets for close air support I have available before a ground attack), but overall is lean, functional and very well thought. The decision-making is mouse driven off course, and the clicking needed to put the command decisions in action is very straightforward. I am not talking about the obvious clicks needed to attack the enemy, but decisions like reinforce a formation, put it into reserve, repair a railroad, provide air supply to a troubled unit, change the leader of a division, corp or army, etc.

Hexes and turns for the age of Google Earth and real time-everything 

Every now and then I bump into titles that remind me that the turn and hexagon-based war game format is not exhausted but rather that I am exhausted of some other games using the format in a way that destroy the war-waging experience beyond recognition. War in the East is a turns and hexes war game but somehow I felt the game play as less constrained by such partitions in time and space.There are abstractions in War in the East, but every command decision I  made at the corps level and above were done without ever thinking of them. 


Jumping over the learning curve: drop that manual and fight!
I spared myself of the chore or reading the manual from cover to cover. My grognardy urge of checking and knowing every single rule and mechanism of the game was replaced early on by a desire to fight this virtual war, because it is obvious that the game's message was the war and not the way the game is designed.  I don't want to be a lawyer perusing the rules of a virtual war of precise clockwork inner workings but rather want to be a general leading men in the marshes of the unpredictable. The majority of individual rules and mechanics of the game that I've checked are pretty much like the ones found in other turn-hex-based war games. Your mileage may vary but consider this: how many of the total available Microsoft Word's menu items/buttons have you ever used? Has your relatively limited knowledge of all the commands available ever stopped your from writing a good story? To the spirit of these two questions, I learnt quite a bit about this game by having a clear understanding of what I wanted to accomplish in the military realm (objectives, lines of operation, shaping or decisive operations) and then going back to the manual to see what should done in terms of game rules and mechanics. War in the East is a tool to simulate the WWII Eastern Front, and every time I played the virtual war came out as the result of good or bad military command decisions and not as the by-product of the intricacies of the game engine.

Don't judge a game by its level of detail
War in the East is also one of the first games where complexity and high level of detail was not thrown at me like hot potatoes. In some War in the East game session somewhere in the world, a gamer is busy checking how many gallons of fuel, rounds of ammunition and number of grenadier squads the 7th Panzer Division has available and I'm sure he will put that information to good use. In my war room, I focus on lines of operation, mobility corridors for anything bigger than a Corps and I wonder if air superiority is all that necessary at this time of the operation. The other gamer is not being overzealous and I am not being careless. We are enjoying the same game from different perspectives and with different styles. I don't want to fool you into thinking that there will be no pain in moving a thousand counters at every turn of the big scenarios, but also I don't want you to think that all the detailed information the game can feed you needs to be acted upon. A big part of being a leader is to figure out what information is important.

Pushing three million men to victory
The big scenarios featuring the whole theater of operations are not to be played quickly. You couldn't even if you wanted to. The amount of counter pushing is big. It took me some thirty minutes just to move every German unit in the Barbarossa scenario. That is not counting the time to identify formations and to decide and sort objectives. Turn resolution in scenarios that cover the whole war take also some serious time. The big scenarios are more like a project you work on through several gaming sessions. If you are not into such type of commitments, you will find smaller scenarios with lots of game play value. Yet after a while you will agree with me that War in the East sorely needs more of the smaller scenarios featuring operations during the 1942-1945 time period.

Specs of the new car great, driving it feels like ...
.. being a military strategist, an operational planner, the organizer of things sized beyond the grasp of most mortals, the rallying leader in the eve of certain destruction. This is like having command over the collective fighting spirit of two nations in the ultimate duel for survival.

Final thoughts
Some people see an unsurmountable mountain in the sheer size of this game. I see opportunities. Others gasp at its price. I rejoice at the prospect of years of quality gaming. Whatever your take may be, this is not a war game that will go un-noticed in the history of the hobby.

Cheers,

Sunday, January 16, 2011

Gary Grigsby's War in the East - AAR(eview) - Pskov and Beyond

This is an AAR of an scenario of the game Gary Grigsby's War in the East. I have included some comments and screenshots as a supplement of a review that will be published in the near future.


Continuing from the previous entry, 4th PzGrp has advanced towards the Western Dvina. It is still well within reach of the supply network, but as I mentioned before the bulk of the supplies are distributed from a rail head and the supply issue needs to be thought of from early on. The Russian rail lines had a different gauge than the ones in Western Europe and need to be converted. This task is accomplished by construction units like the one shown below.


Outlined fucsia in the map, a construction unit that can convert railroad lines into the Western gauge. To convert railroads, the user has to click on the acronym RRC (railroad conversion) in the right panel. 
The status of the railroad lines is visualized by clicking F2.
The railroad map overlay. Green icons indicate usable railroad and red icons indicate ... you know. In the previous turn, a construction unit has converted a total of 3 hexes from the border (yellow dotted line in the map). Note the shading of the hexes: clear for areas where supplies can be delivered directly from the rail head, shaded grey for areas where a subordinate unit will have to pull supplies from a HQ unit and red for areas where supplies can't be delivered because they are under enemy control. 


During the second week of operations, 4th PzGrp routs the Russian paratroopers near the rail road crossing on the Western Dvina and upon crossing the river splits its lines of operations in two: (i) the decisive operation/main thrust by the XLI Pz Corp pushing northeast towards Pskov and (ii) a shaping operation/secondary envelopment move by LVI Pz Corp towards Riga to cut off Russian troops withdrawing in the northeast direction.


Despite a lightning advance by the 8th PzDiv, which arrives at Riga virtually unopposed, the envelopment by LVI Pz Corps ends up being a fiasco. With just two divisions separated along the Western Dvina, the LVI Pz Corps fails to even spot retreating or routing Russian troops. As in real life, achieving an hermetically closed kesselschlacht in the game is extremely difficult.


XLI Pz Corps is having troubles of its own. The spearhead of the XLI Corps is the 6th Pz. Div. and is just 50 miles short of Pskov. The advance of XLI Corps has bought us some 200 miles worth of unprotected flanks and this is something that I don't take lightly. To cover the extended flanks of XLI Corps I experimented with splitting the 36th Mot. Div. and the 1st Pz. Div. into three regiments each. This is done by selecting the unit and then clicking the "b" (for breakdown into smaller units). Each division was split into three equal regiments that I later reinforced with support units from the XLI Corps HQ.


Splitting the 1st Pz. Div. into three regiments.
At the end of the second week of operations the situation looks like shown below.


Situation after two weeks of operations. Yellow graphics were added with an image editing software. The shape of the yellow lines do not reflect the in-game orientation of the units (the game engine does not feature unit's facing) but rather the intended path of movement or the direction of future combat operations. 9th Army had it's share of combat south of Riga and now is advancing towards the city. 16th Army is slogging through difficult terrain, it will be difficult to catch up with 4th Pz. Grp. and protect its eastern flank.


Following the fruitless dispersion of forces during the previous week, I intend to consolidate the lines of operation of 4th Pz. Grp. for an assault on Pskov. This regrouping of the 4th Pz. Grp took one whole week. The Russians appear to be converging towards Pskov from the east and northeast.


Situation at the start of week 5. Yellow graphics were added with an image editing software. 9th Army is past Riga advancing north. 4th Pz Grp is approaching Pskov in a very wide front.


The relatively wide deployment of the Russians near Pskov means that if I concentrate 4th Pz. Grp. for a final assault on the city, I will be leaving this formation vulnerable to outflanking and envelopment by the Russians. I hope that a successful assault on Pskov will shock the Russians enough to force them to move northeast.


Pskov must fall. Stacked in a couple of hexes, the best combat units of 4th Pz. Grp. get ready for an all-out on Pskov. Note the Russian infantry units on our east flank: not a pretty sight.
Pskov has fallen and our right flank is clear now. The Russians likely withdrew northeast or moved north of Pskov to put a plug into our advance. 


We are now clear to consolidate Pskov as a base of supplies and combat operations and bring up the whole Army Group North for an attack on Leningrad.


Lines of operation for the second phase. Note Luftflotte 1: although I moved all of its assets north weeks before, it is time now to move it again closer to the battle lines.


16th Army's slow advance through that marshy terrain slows down the whole Army Group plans. The prospect of battling in the woods north of Pskov with the 4th Pz. Grp. made me anxious at the beginning but the Pz. Divs. are so powerful that manage to rout and push back every Russian formation in their path of advance. This heavy combat came at a price, though: time. I arrive at the end of the scenario (10 turns/weeks) with my eyes on Leningrad, but my men and tanks not quite ready yet to break through the formidable defenses in front of the city. 


Final situation: not quite ready for the final push. Image is clickeable. 
This concludes the AAR. The purpose was not show operational savviness but rather some of War in the East's features and gameplay. Stay tuned for a review of this game.


Cheers, 

Monday, January 10, 2011

US Army Looking for Something Better than VBS2

The US Army is aiming to replace VBS2 by FY 2014. That is if they secure funds for it (given the future cuts in defense, who knows). Please see the full article at the Training and Simulation Journal.

“In our gaming strategy, we don’t want to be married to one application forever,” Parks said. “We want to utilize it as long as it’s relevant and it meets our training needs. But we know that technology and our training requirements change from year to year, and we want to remain relevant to our users.”


Cheers,


Sunday, January 9, 2011

DCS: A-10C Warthog - 210 KIAS, A Speed to Remember


Volume 3 of the Multi-Command Instruction 11-A/OA10 says the following in Chapter 6 (air-to-surface weapons employment):
If airspeed decreases below 210 KIAS in a pop-up attack, abort the maneuver. Base this airspeed on typical training weights and configurations. At heavy gross weight, adjust abort speed upward to provide sufficient G and turning room to recover from an adverse flight condition.

We all know that flying too slow during an attack run is a recipe for disaster, but why 210 KIAS?

I don't know if you have noticed the yellow tick mark in your airspeed indicator of your virtual A-10C, it's at 210 KIAS ...


210 KIAS is not a stall speed. I have been able to fly the A-10 at speeds well below that if I trim the aircraft accordingly.

Let's take a look at the sustained turn rate performance chart of the A-10. This chart is actually is for the A-10A.
To extract information from these type of charts is a bit convoluted, so bear with me for a little while.

Let's say we are flying at 250 KIAS. To know how many Gs we can pull in a sustained turn we start in the x-axis of the graph of the left (I marked this example as A1) and we go up until intersecting the barometric/pressure altitude (sea level, SL in this case) and then we trace a horizontal line from that intersection until we reach the line that corresponds with the weight of the aircraft (35,000 pounds in this example). From that point we trace a vertical line towards the x-axis of the graph in the right. We can have a sustained turn at approximately 3.1 Gs at sea level when we our bird weights 35,000 pounds and we start the turn at 250 KIAs.

Let's suppose that because of bad turning or other unfortunate circumstances of the mission, we lost 25 KIAs and we now start a second turn at 225 KIAS. From the curve above (follow the A2 traced path), we know that we would be able to pull 2.9 Gs at this second turn. Not a catastrophic loss of turning capability overall.

Now, let's imagine that we start a turn at 200 KIAS. Following the trace labeled B1 in the plot above, we predict being able to pull around 2.75 Gs. In the same way as above, by means of bad turning or something else we loose 25 KIAS and go down to 175 KIAS, our second sustained turn will be pulling only 2.1 Gs (trace B2 above)..

In summary:

  • Pilot A starts a first turn at 275 KIAS and will be able to pull 3.1 Gs in a sustained turn (trace A1). Some time later pilot A starts a second turn at 250 KIAS and will be able to pull 2.9 Gs in a sustained turn (trace A2). Between the two turns, pilot A lost 25 KIAS that translated in the loss of 0.2 Gs for the next sustained turn.
  • Pilot B starts a first turn at 200 KIAS and will be able to pull 2.75 Gs in a sustained turn (trace B1). Some time later pilot B starts a second turn at 175 KIAS and will be able to pull 2.1 Gs in a sustained turn (trace B2). Between the two turns, pilot B lost 25 KIAS that translated in the loss of 0.65 Gs for the next sustained turn.


If you are good with graphs you will notice that the curve in the left panel has a breaking point around 200 KIAS. Any two points that have an x value of less than 200 KIAS project onto the graph in the right as segments bigger than any two points that have x values higher than 200 KIAS. That is unless you go above 250-275 KIAS, but that's food for a next meal. :)

Bored you enough? Let me make it up to you with some simulator hands on.

I start with a custom mission in which the aircraft is loaded to a gross weight near 35,000 pounds.

The combat payload is the one in the screenshot I showed above at the start of this entry.

I dived to near the ground, controlled my airspeed to around 250 KIAS and started making some turns. I closely watched out the G load indicator, hanging on the left side of the HUD. Trim was to neutral and the throttle totally opened.


Just as the sustained turn performance curve predicted, if I keep my Gs not higher than 3 Gs, I can make some spiffy turns without loosing too much airspeed (lost around 20 knots after a 360 degrees turn). The only issue I had is getting a hold of the rudder to avoid loosing altitude.


I am delighted to be able to make better turns for my combat maneuvers. I now realize that before I was pulling the stick too much and my Gs too high. At 4Gs the aircraft becomes uncontrollable after just a couple of seconds.

Now, it is unlikely that I will evade a missile with a turn of just 3Gs. All of the above is for sustained turns and not for instantaneous turns. But as I mentioned in the previous paragraph, at least in my hands a 4 Gs turn lasts for just two seconds. Any ideas?

Cheers,

Saturday, January 8, 2011

ArmA 2 Operation Arrowhead Private Military Company - Breaking Contact (Firefight and Epilogue)

The farther, second bridge looks clear.


But that's the only piece of good news as we get abruptly interrupted by a truck approaching from the same route we took minutes ago.

A truckload of insurgents approaching towards the bridge. My men open fire immediately and we are now officially in contact.

This is not good, what a shame being caught with our pants down. There are too many of them. We need to disengage immediately. I throw a couple of smoke grenades to little effect.


I pull back in the direction of the canal bed, trying to disengage by bounds, with two of my men (team red) left covering #4 and me.


Those damn bushes again ... At #4's and my turn to provide over watch for team read I realize that is going to be very difficult to survive a firefight so outnumbered and with fields of fire so broken up.


My men look at me with incredulity ... I just pulled them into the canal. Your leader willingly putting you in a natural kill zone is not something to cheer about. But we are a small team and I am hoping that I can manage our fields of fire better than in those bushes up there.


Now the insurgents have covered flank approaches to our position. I direct team red to cover the terrain surrounding the bridge while #4 and me cover the flanks. It's a fiery firefight. The insurgents pop out from very close distance.


We take every short lull in the firefight to inch away from the bridge. After a series of cycles of shooting and pulling back, we are now away from the bridge and with a lot of insurgents dead.


It feels good to take our bellies out of the ground and move back to our car. We move cautiously, though as we don't know if the group of insurgents that attacked us is completely eliminated or if they have called for help.

One survivor of the insurgents team makes a run for the truck with the clear intention of escaping. We are at an ethical dilemma here since he is not shooting at us but he could alert some other group out there. Maybe he already did.


He must have been seriously injured, we think, as he wasted the truck in a nearby hill. We don't even bother to check it out up close.


We quickly move back to our car. It feels like an accomplishment. I am still shaky from the firefight we had minutes ago. We don't think it is safe to move through those damned bridges and we report to our coordinator promptly. Time to go back to the safe house.


Cheers,