Friday, December 3, 2010

Panzer Campaigns Goes Downloadable - Kharkov 43

Panzer Campaigns, the great series from John Tiller has gone the digital download route. The first title available is Kharkov 43 and its from John Tiller's website and store.

All other John Tiller titles are available from HPS Simulations at this time. It will be interesting to see where this goes. Has John Tiller parted from HPS?

Kharkov 43 has some minor differences from the other Panzer Campaigns titles but it is still Panzer Campaigns.

The new game has a moderate DRM device on it: you are given a serial number and with it you can activate it via the internet. Apparently you can only have one copy of the game installed at a time.

Some screenshots follow. Another fine study of the Eastern Front.


Cheers,

Wednesday, December 1, 2010

ArmA 2 Operation Arrowhead Private Military Company - Ranks no more, we rely on payscale now

I got the Private Military Company (PMC) DLC today. 

It is an interesting module, but I am not as enthused as I am with the British Armed Forces one. I don't know, maybe because it is late at night.

Two contractors pulling security at a remote road in the new "Proving Grounds" map.
This contractor is armed with the good ole M16.
The new map (Proving Grounds) is a bit smaller than the one we got with the BAF DLC.


Despite the dull appearance of the 2D map above, the new Proving Grounds has plenty of very nice tactical landscapes.

Air support is taken care of by this Ka-60.
Thanks, dude. I think I will wait for the next IFV ...
Wait! This one will do. Can I man the gun ... please? :)
Cheers,

Harpoon 3 ANW - Fighting the Wrong Battle with the Wrong Warships - Part 1


On the night of June 18th, 1944 Admiral Raymond Ames Spruance decided to move Task Force 58 away from the Japanese fleet and back into a position near the main body of the US Fifth Fleet . Many have criticized Admiral Spruance for this decision (an entire Japanese fleet escaped unmolested), but few have recognized that he was committed to support and protect the amphibious operation at Saipan.

In the "Malvinas Part II" scenario (Malvinas is the Argentine name for Falklands Islands) I am sailing almost the same tactical waters as Spruance in the Pacific but I am a thousand miles short of his admiralship. "Malvinas Part II" is a fictional scenario with a backstory identical to the real war of 1982. I am in command of a British fleet with the mission of  placing a landing force and its supplies within reach of Port Stanley.

My fleet is organized as 3 task forces and a nuclear submarine. God help us, my entire force looks like more apt for escort duty than anything else. In a certain way this is good as we have many landing and logistics vessels to escort. But the rear of the fleet is holding back a good portion of the naval firepower we need in the van.

TF02, the ram that will crack the Argentine Navy's hull open and the arrow that will break the Argentine Air Force's wings for good, has a dozen Sea Harrier's flying off the HMS Invincible. Escorted by HMS Argyll, HMS Argyll, HMS Battleaxe (all purpose frigates) and HMS Gloucester (area air defense destroyer).

TF01 harbors men, guns, equipment and ammo of the land assault force within the guts of RFA Sir Galahad and RFA Sir Bedivere. HMS Fearless will open its gates and deliver the tip of the spear of your Majesty's  finest Royal Marines onto the islands shores. Guarding this precious cargo, HMS Southhampton, HMS Glasgow (area air defense destroyers) and the general purpose frigates HMS Amazon and HMS Broadsword.

TF06 has the support and logistics needed for the war, both at sea and land within the store of RFA Regent and  RFA Fort Austin. These vessels are protected by the general purpose frigates HMS Active and HMS Arrow. Also in this force we have HMS Sirius, an anti-submarine (ASW) frigate beefed up for anti-air and anti-surface warfare.

Last but not least, the HMS Trafalgar nuclear submarine provides a much needed screen for the whole fleet.

The Armada Argentina (Argentine Navy's) main assets are the carrier Veinticinco de Mayo and the diesel submarine Santa Fe.

2140, May 15 1995. The green outlines of the Malvinas/Falklands and the continent are spectators to the naval battle to come. The red square icon is Port Stanley. The blue concentric circles are my task forces. From south to north TF02, TF01 and TF06. West of TF01 a Lynx helicopter (blue inverted semicircle with two small "ears") has detected some surface contacts (yellow squares) and considerable air activity (yellow inverted half-squares). One air contact (the one selected) is a fast mover (note its airspeed at 420 knots) and considering its location and bearing (far from land masses) it is possibly coming from the Veinticinco de Mayo. The two surface contacts northwest of TF01 are a bit worrying too, but so far we haven't observed any aircraft in their proximity. They may well be patrol boats. The HMS Trafalgar (blue inverted semi-circle) is west off Port Stanley.
To be continued. Stay tuned.

Cheers,

Tuesday, November 30, 2010

ArmA 2 Private Military Company

I woke up this morning at 4:00 AM to download this one and it is not ready yet. Just kidding. I woke up at 4:00 AM to get a stab at "the overdues" (work, family and off course, the blog).

So, no ArmA 2 PMC yet ... At least we have a release video.


Cheers,

Saturday, November 27, 2010

Revolution Under Siege - New AGEOD/Paradox's Wargame


By this time AGEOD's engine is a known quantity. With more than seven titles that have received accolades at every hard core war gaming venue, the engine continues to deliver great war games. The new offer now is from French third party developer SEP Reds. The topic is the almost unexplored PC war gaming territory of the Russian Civil War.

Some screenshots follow as a preview of my review of the game.

The Polish-Soviet War heats up north of the Pinsk marshes.
Detailed battle report, showing an un-glorious defeat of my communist forces.

The 16th Army (red counter near the bottom of the map) is about to be outflanked by Polish troops aiming at Kiev.
The vast expanses of Russia need an strategic map to show all your troops. Red, Soviet troops; black, Polish troops.
Those icons in the map make me wonder how orthodox is our collections department, comrade Lenin.
Cheers,

Friday, November 26, 2010

Maneuver Warfare: A Wargamer's Notebook - Surfaces and Gaps - German KSKs and a Gap that Actually is a Kill Sack


This series of blog entries are about the so-called "maneuver warfare" as explained by William Lind. The writings of Robert Leonhard will also be included. I claim neither expertise in the subject nor devotion to this way of waging wars and thus I am not trying to convert you into anything. This series is not an analysis or a review of all ideas about maneuver warfare but rather some explorations about the topic based on computer war games and simulations. Future entries will be delivered based in readership.

This entry is related to the previous one. Today, a German SOF team reveals the hidden truth behind a seemingly inviting gap.

War is all about things not being what they actually look like. The wise warrior will use every ounce of imagination to trick his enemies into believing he is stronger or weaker than he actually is. In the previous entry, we found out about surfaces and gaps and how you as a commander should avoid the enemy strong points and pull through his weak spots. We should keep in mind that in the battlefield very few things stay the same over time or are actually what they look like. That's why once we detect an enemy's weak spot we should act fast but keep our eyes open to avoid any surprises.

Today's mission: a German KSK special forces squad is returning from a successful snatch and grab at a urban area and now is attempting an exfiltration towards a linkup point eastward from their position. The squad featured in this mission is part of a platoon and the exfiltration is being conducted by squads. The enemy (insurgents) is slowly coming to grips about the raid and is setting up blocking positions wherever they can.

A German KSK squad (light blue icon) is exfiltrating eastward towards a linkup point (not shown here). The wavy line is the tactical graphical symbol for an infiltration mission, but given the similarities between infiltration and exfiltration missions it is used here with a bit of gamer's ignorance license. Both lines set up a corridor for the maneuvering of the squad and provide a control measure just in case there is a need for indirect fire support. 
The German squad will attempt to move at or near streets to keep speed at a reasonable level.

First things first, I organize the squad into two teams: recon/probing and support teams. Shown here, the recon/probing team: squad leader (me) and a light scout (#4). I have come to appreciate this team organization thing after the previous blog entry. This type of organization works great for commanding the AI and ensures that you make contact with a very small force, giving you ample options to develop the situation with the support team. 
Peeking east through "right street" reveals an enemy patrol reinforced with an APC. "Right Street" is a surface.
Looking east down "left street". At least two enemy patrols in the distance with maybe a technical truck. "Left Street" is another surface.

Looking down "center street" was a bit more tricky because its corner was an obscene open space. Here I am looking down "Center Street" from the safety of a house in front of it. Note how I avoid staying close to windows and doors. 

No contact so far in "center Street", this one is looking like a gap. Since my scout (#4, not shown here) is pulling security on my flanks, I am the only gun and pair of eyes on "center street". But in any case I already observed the street from a house now on my back and it is relatively safe. An additional peek down the street, now "slicing the pie". The house in front of me is an ideal point to bring my support team to over-watch and close up in case we make contact.


SITREP. Left and right streets are definitively surfaces. The question is: is the "center street" actually a gap?
With the support team holding a house on the side of the center street, I carefully move east with my scout (#4). 

Contact on the right flank. A heavy machine gun. I quickly dispatch it from my position without incident. Damn I love my rifle!

Moving east down "center street". This is the not-so-fun part of dividing the team into a light probing/recon and a support one. I have the support team overwatching my axis of advance, but  my flanks are not covered. Note the side street and alley on my left: great fields of fire for the enemy.
#4 and me make it to one of the houses where "center street" ends into a "T". Careful scouting required to leave #4 behind (AI pathfinding is atrocious inside buildings). I am not a big fan of roofs but the buildings were extremely short on windows. In the background, an enemy APC with a field of fire perpendicular to our axis of advance.
Need a moment to think. I am watching towards my guys now (note the support team in the house across the "center street", green icons). We have no AT weapons, how are we going to take out this APC?

I have no options but to try to snipe the APC gunner. Since the APC has no overhead armor, I may have a chance. I don't know how on earth I killed the heavy machine gunner before without throwing the enemy onto us, but this time I may not be that lucky and I want to have the whole squad ready to move out east once I take out the APC gunner.


I come back to my support team and organize them on the sides of the "center street".

I them move east with #4 and choose my shooting position carefully. I want to have to engage the APC from the maximum range possible for obvious reasons. In this picture, a few last nervous chews at the gum before getting into position. The APC is at my left and #4  is covering my right flank. 
In situations like this, I hate being such a lousy shot. I got the APC gunner, though, and the vehicle moved away really fast. I was lucky that this vehicle was unsupported by infantry.

It is time now to move the squad east and this is where I am going to stop the narrative and get back to the original point.

It all started with a clear tactical picture of "left" and "right" street as being surfaces. "Center" street, originally thought as a gap, ended up being a kill sack.
Take home lesson:the physical absence of enemy in a piece of terrain doesn't guarantee a gap and any piece of terrain where the enemy has a field of fire is actually a surface. 

Cheers, 

Saturday, November 20, 2010

Maneuver Warfare: A Wargamer's Notebook - Introduction

This series of blog entries are about the so-called "maneuver warfare" as explained by William Lind. The writings of Robert Leonhard will also be included. I claim neither expertise in the subject nor devotion to this way of waging wars and thus, I am not trying to convert you into anything. This series is not an analysis or a review of all ideas about maneuver warfare but rather some explorations about the topic based on computer war games and simulations. Future entries will be delivered based in readership.

Much has been written and debated about maneuver warfare and chances are you heard about this before.As a said in the opening paragraph, this is not a review, analysis or tutorial about maneuver warfare. For a complete coverage of the ideas you will have to check out any of the literature available. I can recommend two books as a starting point.


Maneuver Warfare Handbook, by William Lind, is the book that I will be using as a premier source for this series of entries.


The Art of Maneuver, by Robert Leonhard, is a discussion of maneuver warfare in the context of the now defunct AirLand Battle doctrine. Leonhard is borderline genius in his explanation of the art of war and this book is no exception.


More books will be added to this list in future entries.

What is maneuver warfare? That's a difficult question.

Let's start with what is not. Maneuver warfare is sometimes confused with "fire and maneuver" (the tactical moving and positioning of weapon systems in order to deliver fires onto the enemy). Although maneuver warfare involves "fire and maneuver", the former is a more encompassing way of fighting.

In Maneuver Warfare Handbook, Lind comes a bit short of defining it in a formal sentence or paragraph. One gets the impression that Lind is not very fond of summing up a way of fighting in a single grammatical salvo. Waging wars shouldn't be about applying fixed recipes and drills, and his reluctance to deliver a single definition is replaced by thought provoking tactical narrative.

However, there is a common theme to all the scenarios that Lind explains and that is the focus in incapacitating the enemy's command decision process. That is not to say that destroying the enemy is the ultimate focus. After all, we want to kill the enemy, not just annoy him. But it is easier to defeat a foe whose decision process has been targeted early on.

Lind recognizes three major guidelines (he calls them "filters") to shape a battle plan:

  1. Mission type orders: you can't defeat the enemy's tactical decision process if yours is very slow. Let your subordinates accomplish their mission or exploit opportunities as the see fit instead of waiting for your orders at every speedbump.
  2. Main effort or schwerpunkt: even when you don't want a battle-group of robots that wait for every detailed instruction, you don't want a circus where every captain thinks is an army group commander either. Your battle plan should have a point of main effort to glue all your subordinates' tactical actions  
  3. Surfaces and gaps: this one is very simple, put your strength onto the enemy's weaknesses. 
Cheers,

Friday, November 19, 2010

DCS: A-10C Warthog - Three Betas Down, Many More to Go

Beta 3 for DCS A-10C has been released. Better framerates here and there, avionics/weapons fixes and fog, lots of fog.
If you never beta tested a game, let me sum it up for you: not that fun, not for everybody.

The first beta version you download makes you feel you are living the dream. A game you like ... And you are playing it before the crowd. You get that shiny avatar with the words "beta tester" on it and you use it in discussion forums like a badge vested for your savviness, awesomeness, luck or whatever. Your forum posts are read and dissected to the last word in search for new bits and pieces about the game .You are admired, popular, even needed. And if you are the quiet type who don't post anything in any forum, you feel like you got your efforts compensated by a free copy of the game, even when is far from finished.

The office looks as good as always, the view out of the window ... very foggy
Around the third or so beta download, it all starts to wear off. - Gee! I have to play this scenario again? By the sixth beta download you are so busted that you are just clicking around to find out the bug that will save your reputation among the other beta testers. - Damn! I'd rather be playing that other game I just bought ... With the game getting less buggy at every download, you start having problems finding anything of substance. You search in vain for spelling errors in the briefings, for insignificant graphical glitches, for that miracle finding that will earn you two days away from the game.

By the ninth beta download, you have completely gave up and left everything up to those other guys who apparently don't have a life other that this game and report more than ten bugs per beta. - I played ... It didn't crash ... Good job guys fixing that stability problem that I reported before! Yup, those two crashes you got while running  at the same time the beta and that other game you bought.

By the time of release, the very sight of the splash screen of the game gives you a headache and carpal tunnel syndrome symptoms. - Send my free copy to this address ... and let me have my life in peace!


Flying around Russia, weaponless.
Joking aside, beta testing is and will always be a labor of love. But one can't negate it has a toll on your enjoyment of the game you test.

In the case of DCS A-10C, we are not required to report bugs. But I am wondering how spent we are going to be when the sim is officially released.

Tactical signaling with smoke or there is always somebody grilling something in these Caucasus towns?
We are now at version 3 of the DCS A-10C beta and it looks like there is a lot of work to be done. Is there a need to release every single beta version to the pre-order customers?

Cheers,

Tuesday, November 16, 2010

War Over the Mideast - Jamming Down the Valley

War Over the Mideast is an air operations war game by John Tiller. Instead of a virtual cockpit, this war game puts you in virtual command of one or more air forces. Yours is the task of coordinating air operations, in this case over the unfriendly skies of the Middle East during wars from the 50s to the present day.


Today's operation is a tricky one. From the game's briefing (bold is mine):
The Multinational Force in Lebanon (also MNF) was an international peacekeeping force created in 1982 and sent to Lebanon to oversee the withdrawal of the Palestine Liberation Organization. The MNF included US Navy and Marines, French Navy, Italian, and British soldiers and supporting aircraft.  The destabilized Lebanese government was unable to prevent massacres in the  Shabra and Shatilla refugee camps. 
French aircraft flew airstrikes against PLO positions in the Bekaa Valley in November, hitting Iranian Revolutionary Guard positions. Tensions flared between Syria and the US as SAMs were fired at US Navy aircraft patrolling over Lebanon. These provocations triggered the first direct US air attacks into Lebanon on December 4, depicted in this scenario.
After firings by Syrian SAMs, US Navy fighters and attack jets targeted Syrian missile batteries in the Shouf mountains east of Beirut. In response to the US attacks Syrian SAMs shot down an A-6 Intruder and an A-7 Corsair. The pilot of the A-7 was rescued, but the A-6 pilot was killed and his bombardier-navigator was captured by the Syrians, to be later released. 
This scenario is designed to be played solitaire as the UN MNF. Launch aircraft from the carriers offshore and search out enemy bunkers and bases for air attacks. Avoid Syrian SAM launches and stay out of Syrian airspace (No Fly Zone.)
 Fighter, fighter-bomber, CSAR, and resupply aircraft are stationed on Cyprus shown on the northwest corner of the map.  Fly in supply pallets to Beirut to help offset damage and increase your game score.
This war game is engrossing and you get really busy tendering to every mission being flown. In this blog entry I'm going to focus only in one mission of reconnaissance-strike against enemy bunkers in the valley neighboring the Syrian border.

This is not a turkey shoot. Yes, you have air superiority but boy, this scenario will make you miss the sensors  and stand-off ordnance of the modern F/A18s. Flying off the USS Independence (CV/CVA-62), some 50 miles off the Lebanese coastline, we have F14As in the air superiority and reconnaissance roles. Strike missions are available from flights of A7Es armed with free fall bombs. 

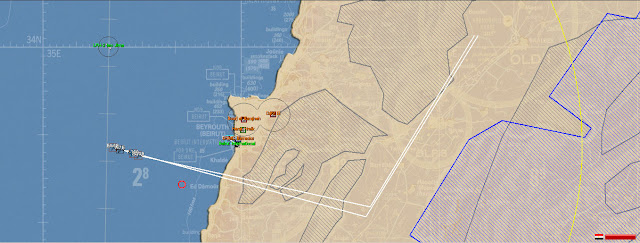
Click the image for a better view. East-bound from the Mediterranean, our pilots are about to enter Lebanese territory. The white lines are the flight plans for the US aircraft: they will turn northeast for a thorough search of enemy bases in the valley between Beirut and Syria. Shaded in grey, the two mountain ranges that define the valley of trouble. The blue area is the Syrian territory (no-fly zone).
Courtesy of the overzealous Syrian air defenses, we had to make use of stand-off jammers (SOJ) mounted on EA-6Bs. Tactical reconnaissance brought to us by F14s equipped with tactical airborne reconnaissance pods (TARP). Based on mission, I sorted my flights in two packages: a flight with a reconnaissance mission (flight 1) and a flight with a strike mission (flight 2). To avoid being hit by the Syrian SAMs coming from the blue area, each flight has its own pair of jamming aircraft.


Click the image for a better view. This looks a lot like a hunter (flight 1) killer (flight 2) team.
One may question the wisdom in putting all the above assets in the valley at the same time. One excuse is the lack of tactical marking in the game engine: if no aircraft is seeing (visually or by other sensor) a land target, the target will not be displayed or marked. With the abysmal amount of targets in this mission and my lack of memory, I need eyes on target at all times. I'm running some sort of "detect, acquire and strike" mission-tasking here. This should put bombs on target on short order. That's my story and I'm sticking to it.

Click the image for a better view. The Syrians light up the electronic warning receivers of the US pilots. The green areas are areas effectively jammed by the pods. Note the red circles indicating the range of the Syrian SAMs.
Click the image for a better view. And they fire ... I counted up to 12 missiles in the span of 5 minutes of simulated mission time. Dont' get fooled by the size of the tiny dot in the center of the screenshot. This represents a SAM, and it bites hard. Luckily, the jammers work great and both flights continue without being hit.
Click the image for a better view. The selected aircraft are the F14As of flight 1. Note the red pie-slice representing the reach of the TARPs. Flight 2 is immediately ordered to strike one of the rebel camps (white line in the northeast direction).
Click the image for a better view. The reconnaissance flight has turned back, but now the target is within visual range (blue circle) of the strike flight. The Lebanese have a SAM battery north of the target. 

Click the image for a better view. The free fall bombs barely scratch the enemy forces. This is going to be a damn long day ...
Cheers,

Sunday, November 14, 2010

The Red Pill is Getting Serious Media Attention

Just when everybody is scratching their heads about why the world needs another re-re-re-release of Harpoon with no new content and no significant bugs fixed, The Red Pill's Dimitris Dranidis got interviewed by the very Armchair General.

I'm both ecstatic and anxious about The Red Pill. Here is to the Red Pill Team, wishing them a great success with their naval war game.

Cheers,