Tuesday, August 4, 2009

The British Army Tactical Doctrine is ... What?

At least for me, the great thing about playing around with simulators and war games is trying to understand what the real deal is all about. I'm just so fond of this approach to the hobby that I like to browse military doctrinal publications and field manuals. There is plenty doctrinal publications out there from the US Army and the US Marine Corps, and so far I never found a shortage of material for a well-read tactical war gaming session involving US land forces.

Right now, I have two war games on my desk that are waiting to be played with some minimal doctrinal backbone: "Battle Group Commander: Episode One" and "Combat Mission Shock Force: British Forces".

Unfortunately, it turns out that the British Army tactical doctrine is ... classified! (?)


The publications that compose the British Army military doctrine have been consolidated in the so-called "British Army Electronic Battle Box". Allegedly, "the box" is 7 CDs that are only available to British servicemen and MoD personnel.


I would bet that in general terms, the British Army tactical doctrine is not that different from the one of the US Army and US Marine Corps. There are tactical drills which are almost universal. However, if one browses the scenarios included in the games I mention above, the organization and equipment of the British Army suggests that there have to be some particular things they do differently than their US counterparts.

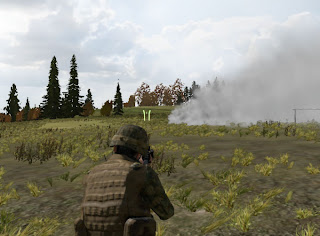
For a complete ignorant on this topic like me, there are at least some nice sources to start learning about the real life operations of the British Army (see the attached images).

Cheers,

Sunday, August 2, 2009

ArmA 2: Can an Automatic Rifleman Run as Fast as a Rifleman?

In a previous entry, I asked if a Marine automatic rifleman would actually move slower than a rifleman. The automatic rifleman carries more weight than the rifleman and it sounds reasonable to expect a difference in their speed.

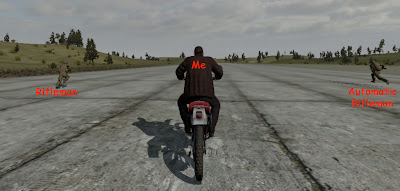
To test this, I placed an AI AR and an AI R in one end of the runway at Utes. Each of the AI units had a move waypoint at the other end of the runway. I followed this race from a bike.

Watching the race from the comfort of a virtual bike. Image is clickeable.

It was a perfect tie: both the AR and the R arrived to their destination at the same time.

I'm a bit surprised by this result. That big backpack the AR carries must be empty.

Cheers,

Combat Mission Shock Force: British Forces is Selling Well

According to this forum thread, in just 48 hours the module sold enough to calm the nerves of Battlefront. Congratulations!

Overview of what's included in the British Forces Module. Image is clickable.

A mechanized infantry section moves along with a FV432 MK3 "Bulldog" armoured personnel carrier. Image is clickeable.

The British Forces module includes the following formations:
  • Light Infantry Battalion
  • Light Gun Tactical Group
  • Mechanized Infantry Battalion
  • Mechanized Engineer Troop
  • Armoured Infantry Battalion
  • Armoured Engineer Troop
  • Armoured Regiment 58
  • Armoured Regiment 44
  • Reconnaissance Regiment
  • AS90 Tactical Group
  • TacAir Control Party
... and others, including artillery units and air support units (Apache AH-1s, Harrier GR9s, Tornados GR4s and Typhoon F2s).

As you can see, no Paras ... :(

Cheers,


Saturday, August 1, 2009

ArmA 2 Tactical Vignette #1: Leapfrogging a Marine Squad onto Hill 368 (Part 4)

What a Marine would do?

Don't look at me, I'm asking you! :)

As a civilian, best thing I can do is guess taking into account what I read here and there. If you are a real Marine or know better, I will really appreciate your comments.
  • The USMC strongly believes in control of fires (after playing ArmA 2, so do I). Squad leaders should make sure that overwhelming fire is delivered on a single target rather than each squad member choosing the target he pleases. Each fire team should have just one target at a time. (careful with the meaning of the word "target" here: it also indicates an enemy formation, like a squad or section)
  • When moving by bounding overwatch, only one element/fireteam moves at a time.
  • When moving through big danger areas, all attached MGs (SAWs if those are not available) should provide overwatch.
  • When moving to contact by bounding overwatch, the measure of success is how much firepower can be mustered on the enemy at the very instant contact occurs.
That's all I have. Again, feel free to comment below if you have more information.

So, to try the points explained above I organized my squad as follows.

Don't always stick to doctrinally-correct fire teams: re-organize your squad as your mission requires. Don't be shy, real life Marines aren't! Image is clickeable.

Team red has all the SAWs of the squad plus a FTL with a grenade launcher. It is the team with the biggest firepower.

In terms of firepower, team blue follows with its two AT specialists one R and one FTL with a grenade launcher.

The least firepower is carried by team yellow.

The squad organization I've chosen has a reasonable amount of moving parts (I've always had problems commanding more than 3 fire teams) and creates variability among those parts in terms of firepower (maybe in terms of mobility too: are ARs slower than Rs in ArmA 2?).

Off course no matter how you organize your squad for a bounding overwatch movement, the total firepower of your squad is always the same. But having teams with different firepower gives you the flexibility of choosing when and where your team/s with the biggest punch will be moving and aiming.

I ordered team yellow to move some 100 meters ahead, while teams red and blue provided overwatch. Team yellow soon spotted the enemy, and I could rapidly order teams red and blue to target the enemy.

An AR from team red overwatches the movement of team yellow. Image is clickeable.

The firefight lasted for 15 seconds or so, and again team yellow could still move while the bullets were flying. The Russian squad was wiped out and the Marines got one man injured (see below).

The injuries of #6. Image is clickeable.

In closing, bounding overwatch appears to work in the virtual battlefield of ArmA 2. There are many ways to execute this movement technique (I've just explored two in this blog) and the player will have to choose one based on the tactical situation at hand, his personal preferences for command and control, etc.

One has to remember that every tactical problem has not "a solution" but "many solutions". In the end, all that matters is to kill the enemy and arrive to the other side of the danger zone alive.

Cheers,

Friday, July 31, 2009

ArmA 2 Tactical Vignette #1: Leapfrogging a Marine Squad onto Hill 368 (Part 3)

In the previous entry, I advanced through the danger zone "carrying along" the rest of the squad with me (i.e. the AI squad members advanced trying to keep the formation). In this entry, I write about what happened when I ordered the squad to move 100 meters or so into the danger zone.

In the assembly area (starting point) I ordered the whole squad into a line formation and alerted them ("all, danger!"). Then I selected the whole AI squad and ordered them to move 100 meters into the danger zone.

As you may have known, the AI squads in ArmA2 move using bounding overwatch when they are ordered to advance. As expected, in this case some AI men stayed put providing cover for the others advancing.

Ok, fellas: let's chat a bit less and keep cohesion in check. Image is clickeable.

I don't know if the bounding overwatch performed by the AI is by fire teams or something else. It certainly didn't look like one or two fireteams were left behind with the other/s advancing. If bounding overwatch is left entirely to the AI things tend to get a bit messy, with units advancing way too much ahead (see screenshot above).

Ey Marine! There are unknown men at our front and you are aiming at exactly what ...?. Image is clickeable.

Also of note: when the AI is moving with bounding overwatch, the AI squad members tend to forget your "all, look at that position" order. They shouldn't be berated for this, because they cover the flanks very nicely as shown in the screenshot above.

I'm happy to report that upon contact, the AI Marine squad greeted the enemy with an appropriate volume of fire. The nice thing I noticed is that even when the firefight was still raging, some AI Marines were moving ahead.

Still moving on to Hill 368. Image is clickeable.

The Russian squad was wiped out and the Marines got one man (#9 AR) wounded. The tally was much better than in my previous entry. The only thing negative is how the squad spread too much. May be I should have ordered a move 50 meters forward instead of 100 meters? Thank goodness the danger area was big enough to accommodate our lack of cohesion.

In the next entry: What a Marine would do?

Stay tuned.

Cheers,

Thursday, July 30, 2009

ArmA 2 Tactical Vignette #1: Leapfrogging a Marine Squad onto Hill 368 (Part 2)

In order to close with the enemy, I need to move my Marine squad through a big open area on which the enemy can deliver fires from the cover and concealment of hill 368. Yeah, barely comforting to know that the enemy can shoot the crap out of us without being seen. I guess that's why they call them danger areas.

I tried to move my squad through the danger area in different ways and in this entry I will write about what happened when I did it in the wrong way.

Please don't do this to your squad!

I deployed my squad in a line formation (to maximize our firepower towards our front) and I moved with them forward until enemy contact.

Race to the swift ... death. Click the image for an expanded view

Among all the things wrong with my squad sprinting straight into a potential curtain of flying hot lead, there is something particularly insulting on how I moved my squad ahead: I didn't alert my squad of the danger ahead ("all, danger!"). The virtual minds of my squadies were clueless. As far as they were concerned, it could have been a sprint to the chow hall.

I was surprised to find out that upon contact, my squad stopped immediately to take shots at the enemy. Not a bad reaction for the AI.

But I didn't notice they have stopped and I continued firing and moving for a little while. As a result, I found myself considerably ahead of the squad.

Sometimes your squad just needs to stop and smell the cordite. Click the image for an expanded view

This is exactly when all the brown stuff hit the fan. The Marines of the squad tried to catch up with me and off course when they move they don't aim and they don't shoot. The situation deteriorated from bad to hopeless in a matter of seconds.

You think you have problems? Click the image for an expanded view

It was a catastrophe. I threw a couple of smoke grenades to withdraw and hide my shame from the enemy.

Don't look at me, I'm tactically hideous! Click the image for an expanded view

In the next entry, how all went better when I moved using bounding overwatch.

Stay tuned.

Cheers,

Wednesday, July 29, 2009

Combat Mission Shock Force British Forces Released!

News just in (thanks Olav!).

Go grab it, here.

Cheers,

ArmA 2 Tactical Vignette #1: Leapfrogging a Marine Squad onto Hill 368 (Part 1)

[Off topic: excuses! I've spent all my available gaming time since Saturday trying to get ArmA 2 to run decently in my computer. It's like another game inside the game, but off course less enjoyable. I've tried all the tips available elsewhere in the web and more or less succeeded. Now my ArmA 2 looks worse than the original Operation Flashpoint though, so bear with me for the ugliness of the screenshots. Donations for a new computer will be gladly accepted :) .]

The purpose of this tactical vignette is to explore the bounding overwatch movement technique in ArmA 2. Specifically I want to see how it works in ArmA 2 and how well can one simulate the US Marine Corps take on this movement technique.

This vignette is heavily inspired on an article Chuck "Magnum" Ankenbauer wrote for SimHQ.com. By the way, if you are looking for a great online tactical experience in ArmA 2 I would recommend you join the online sessions hosted by Mr. Arkenbauer at the SimHQ ArmA 2 server.

Pretty much like those corny and extremely cheesy stories that precede adult-rated movies let me assassinate your suspension in disbelief with the background story of this vignette.

The point platoon of a US Marine company team has driven a Russian company-sized combat patrol off a small airport.

While the US Marines point platoon was going firm at the airport and waiting for orders from the company commander, remnant enemy forces delivered indirect fires (rockets and mortar rounds) from reference point "Hill 368" to the airport.

The enemy fires from Hill 368 will threaten our urgently needed heli-borne medevac efforts.

One squad of the Marines point platoon is tasked with clearing the enemy from Hill 368.

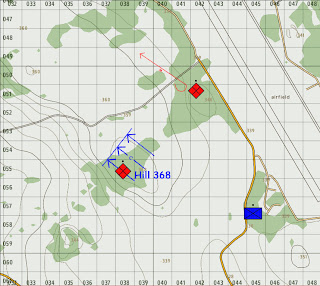
Tactical situation. The enemy forces at Hill 368 are estimated to be an infantry squad. Northeast of Hill 368, an enemy infantry squad is withdrawing. A US Marine squad is assembling near the southern tip of the runway and is tasked with clearing Hill 368. Image is clickeable.


A panoramic view of the airport, Hill 368 and the starting point for the Marine squad (labeled as "assembly area"). Image is clickeable.


Panoramic views from a different angle. In the foreground, the starting position of the Marine squad (labelled as "assembly area"). In the far background, the objective (Hill 368). Between the two, the ominously big danger area the Marine squad has to cross. Images are clickeable.

This vignette will focus on the movement across the danger area south of Hill 368.

To be continued ...

Cheers,


Monday, July 27, 2009

On Reading and Playing

At SimHQ.com, Chris “BeachAV8R” Frishmuth added a great article to his "Read it-Do it" series.
This series is an "exploration of the close relationship between the books we enjoy reading and the sims we love to play".

Besides the great material and writing style Mr. Frishmuth pours into each article, his idea of coupling what he reads and the simulations he plays is fantastic. The synergy between reading and playing around with simulations is a great "enjoyment multiplier".

Kudos to Frishmuth, let's keep those books close to the computer, and let's start a new section here at the blog: Reading and Playing!

In this section, I will post books and game/sims that mak good combinations.

Cheers,

Friday, July 24, 2009

Combat Mission Shock Force: British Module Demo Released

Battlefront just announced the release of a v1.20 demo including contents from the British Forces and Marines modules.
... the all new v1.20 demo for Combat Mission Shock Force, including British Forces and Marines content, is out now!!! With an additional and completely new British mission, the demo showcases all the new features of the latest v1.20 of the series, includes full multiplayer functionality and a total of 5 (!) missions.
As for the British Forces module, the word is that they are working on the installers so the release won't be until the next week.


Cheers,