Wednesday, July 22, 2009

The "Push Button War" Myth and Wargaming

The "Push Button War" myth is the wide-spread notion that NATO superpowers win wars with the ease of pushing a button just because their arsenal is so superior.

In this forum discussion, it is hinted that the lack of challenge in Combat Mission Shock Force is that it lacks a worthy opponent with the right tools of war.

The notion that modern superpowers can win wars with little effort may have started when the first Tomahawk missiles flew from the Persian Gulf to Iraq back in 1991. Ever since then, there is this pervasive view that if a NATO superpower goes to war, it should be a short and almost blood-less affair.

There is no doubt that NATO superpowers have awesome tools of destruction. The superiority of equipment is in our favor. Every branch of the US Armed forces (except for the US Marine Corps, whom our leaders have chosen to ignore at our own peril) has the fanciest tools a professional soldier can imagine. We have the biggest guns, case closed ...

... Not!

You don't have to be a military insider to grasp how hard, tactically challenging and blood-letting is to fight modern wars.


Battle of Fallujah, almost a casualty every block of urban combat


Big fight at An-Nasiriyah during Operation Iraqi Freedom. Even friendly fire incidents!
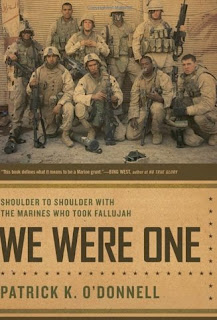


Battle of Fallujah again, it is heart breaking to see how you can loose half a platoon in just a few blocks of urban fighting


What it has driven our armed forces into victory is not having the biggest guns but the training and prowess of our servicemen.


In this book, Stephen Biddle argues that in an armed conflict, even when one side has an edge in technology, training is the determining factor for victory and the best indicator of military power. If you have a chance to read this book, take a special peek at his war gaming of the Battle of 73 Easting.

Back to Combat Mission Shock Force, in the same way that hastily thrown together trivia doesn't help to understand a particular topic, data worshiping is not a good way to understand modern conflict.

The argument that Combat Mission Shock Force is un-challenging because the Syrians have less than stellar arsenal is way off. In real life, a war with Syria would be not a cakewalk. Combat Mission Shock Force is un-challenging because poor scenario design and other flaws in the game engine.

Is the myth of unbeatable modern NATO forces going to make war game developers shy away from designing modern conflict war games and simulations?

I hope not.

Cheers,

Monday, July 20, 2009

ArmA 2: Friendly Fire Incident

I was practicing the command and control of fires at the squad level (details to come in a future blog entry) and my command skills were so good that my virtual Marines started shooting each other!

Seriously, this is what happened. I was in charge of a squad of Marines, moving to contact down a road. I was on point when I saw a squad-sized enemy patrol (Russian infantry) at a distant crossroad. I immediately ordered my Marines to hit the dirt and hold fire. I thought I could bag half of the Russians with the first volley if I bring the 3 squad automatic weapons (SAWs) up front. Predicting that the surviving Russian infantry would try to flank us, I ordered a couple of riflemen to stay just behind the SAWs as a maneuver buddy-pair that would block the assaulting Russians and buy some time for the SAWs so they could reposition.

After pointing targets for most of the squad members, I ordered everybody to open fire. It's always nice to see smoke coming out simultaneously from 3 SAWs' ...

And then I heard one of the automatic rifleman in front of me say "Cease fire, #$#@#it!".
Friendly fire, who the hell is messing up?

It was not me, I haven't shot a single round. It was one of the riflemen, whose line of fire had the automatic rifleman in it.

Screenshot taken moments after the friendly fire incident. See image below for an explanation. Image is clickeable.

Captioned image showing the position of the enemy in the far background, the automatic rifleman hit by friendly fire and the offending rifleman who messed up. Image is clickeable.

I'm humbled. This incident shows that I should be very careful positioning the Marines and watching out for their fields of fire. It also speaks volumes of ArmA 2's simulation capabilities.

The automatic rifleman survived and he is recovering from his wounds.

Cheers,


Saturday, July 18, 2009

Combat Mission Shock Force British Module, Release is Imminent


Making fun of the secrecy around the release of the British Forces module, Battlefront says "if people know our announcement pattern... at this point no news is very good news".


Taking into account their announcement pattern and the previous remark, the release of the British module should be early next week.

Cheers,

2009 Joint Services Open House, More Pictures

This event was in May 2009 and I still have a lot of pictures from it. Today, the F-16 and a USAF band passing by a vintage military transport.


Cheers,


Wednesday, July 15, 2009

Shrapnel Games' 10 Year Anniversary Sale

Full disclosure: I'm not affiliated with neither Shrapnel Games nor Prosim. I just like their stuff!

I received an e-mail about the big 10 Year Anniversary sale at Shrapnel Games.


Offer ends July 22.

Cheers,

Combat Mission Shock Force: British Module, Manual Available

Battlefront has made available the manual for their upcoming their Combat Mission Shock Force British Module.

I briefly browsed the manual yesterday and it has a very good summary about on the British forces and equipment we will soon command into battle.

The British module will bring up the CMSF engine to its v1.2 version. Updates for the v1.2 version are available in an updated manual.

Taking gossip and previous posts by the developers at the official forums, it looks like the release of this module is imminent.

Cheers,

Monday, July 13, 2009

ArmA 2: Meet the USMC Fire Team (Part 3)

Summing up the situation at hand:
  • The insurgents at Kamenyy are 3-4 men strong and they have one DShK. This heavy machine gun packs a lot of punch for both its ground and anti-aircraft role.
  • Under my command, a USMC fire team.
  • Our mission: neutralize the defenders at Kamenyy
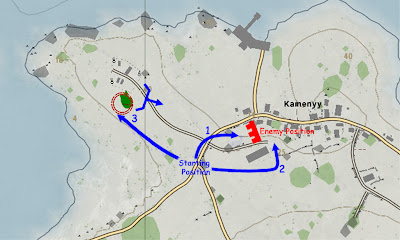
In the map below (make sure to click it for a better view), the courses of action (CoAs) I came up with.


  • (Arrow labelled 1 in the map) This is a "Hey diddle diddle, straight up the middle" type of frontal assault. I tried it a couple of times and all I achieved is getting my Marines chopped to pieces by the DShK. My attempts to move the AR into a position from which he could suppress the enemy position always ended in him being spotted and killed. Without the fire support of the AR, moving down with the AAR and R as a sort of assault buddy-pair was impossible.
  • (Arrow labelled 2 in the map) The insurgent enemy position has an inviting dead space provided by the high ground on its south flank. I managed to get my fire team as close as tens of meters of the enemy position by using this covered and concealed approach. But I lacked the commanding skills to surprise the enemy: every time they spotted us, the situation degenerated into a chaos fueled by minimal ranges of fire, the insurgents' unintended tactical savvy of not staying put when their position is under fire and that damned DShK which can shoot through flesh, sheds and un-clever plans.
The two plans above were conceptually flawed. Although my fire team has the guns and the guts, four men fire teams rarely can provide themselves with enough security and support for an assault. That's why fire teams are not really intended for independent assault. The real Marines know well about the fire team shortcomings and they sometimes cannibalize some fire teams to provide extra guns to another. There are even advocates for six-men fire teams within the Corps.

  • (Arrow labelled 3 in the map) Put some distance from the enemy position and attack by fire. No frills, no thrills, just get the enemy position out. Please check below for more details about how it worked out.
I pulled back my fire team and moved NW, hidden from the enemy by a steep hill that crests at a dirt road. Then we pivoted NE and stopped just short of the hill's crest.

The uphill battle is actually on the other side of the hill, Marines! Click the image for an expanded view.

I ordered the fire team to hit the dirt, hold fire and wait behind me. I crawled forward to get a visual on the enemy position.

Not getting noticed. The enemy position is behind those bushes. Image is clickeable.

There is something funny in ArmA 2: even when your physical eyes cannot see something up front, your virtual eyes can. It is slightly disturbing to hear your virtual character say "Enemy man at Kamenny" when actually you cannot see it in the monitor with your own eyes. I like to call these spottings "faith-based" (thou who believe without seeing ...) but I'm not complaining about them because they are loaded straight into your fire team's list of targets. Which is great given what I discussed in a previous entry: your responsibility as a fire team leader is to control the fires of your team. The Marines deem fire control drill to such importance that they gave it its own tongue-twister: ADDRAC.
  1. Alert, prepares the crew to receive and execute a fire mission
  2. Direction, when it is not obvious
  3. Description, what is the target
  4. Range in meters
  5. Assignement, who fires what onto which target
  6. Control, when to start firing
Besides not being in the receiving end of a real DShK, we virtual Marines have an advantage over the real life Marines: most of the ADDRACing is done automatically by the computer. Of the list above, only 1, 2 (to a certain extent), 5 and 6 need real input from us. Once your virtual character declares a target, all the info about it is automatically available to the other fire team members. "Faith-based" spotting turned out to be a blessing.

Back to the battlefield, I was prone in the crest of the hill with all the targets spotted. I was really thrilled that the enemy was not aware of my presence. Putting some distance between the enemy and us appeared to be paying off. I alerted my fire team on the other side of the hill ("all, danger"), gave them a direction ("all, look in that direction") and ordered them to hold fire so they wouldn't give away our position. I ordered the fire team to crawl forward ("all, stay low") and assigned each fire team member with a target. The AR and the AAR were assigned the DShK (just to make sure) and the R got one insurgent. When the fire team came back to me with their "target acquired" messages, I felt a mixture of joy (for the fire team working as a well oiled machine) and fearful anticipation (what would happen if our volley fails? It was good to be far from the enemy, but we were still in the open!)

Got ADDRAC? Image is clickeable

I then gave the "open fire" order to the fire team. A USMC fire team worth of hot lead headed down the hill. Unscatched by the first few rounds, the DShK turned towards us sputtering some rounds which fell short of our position. I could see the SAW rounds peltering around the DShK until destiny catched up with the soul manning it. The enemy heavy machine was gone and finally I could breathe with ease. The insurgents around the DShK tried to move away, but were cut down by our fire. One of them took refuge behind a metal shed and never came out of it. I'd bet he was shot-through by the SAW.

Being a FTL doesn't mean you can't have fun. Do some shooting! Image is clickeable

Fireteam rush down the hill. Mission accomplished.

It all happened in a matter of seconds and in certain ways felt like sucker-punching. Who said wars were supposed to be fair, anyway?

Cheers,

UPDATE: I left one image out in the original post. Added now.
UPDATE 2: I miss-named an arrow. Corrected now. Thanks Greg!

ArmA 2: Meet the USMC fire team (Part 2)

Before taking out the insurgents in Kamenyy, what I needed first was a crash course on the organization and employment of the USMC fire team.

I consulted mainly two sources: (i) Dslyecxi's Tactics, Techniques and Procedures Guide for ArmA 2, and (ii) FMFM 6-5, Marine Rifle Squad, the doctrinal publication available elsewhere in the web.
  • Mission of the USMC Rifle Squad:
The mission of the Marine Rifle Squad is to locate, close with, and destroy the enemy by fire and maneuver, or to repel the enemy's assault by fire and close combat.
Note those are the missions of the squad, not the fire team. The mission of the fire team is to execute the squad leader's orders, which are issued with the squad's tactical mission in mind. Nonetheless, note the words "close with" and "fire and maneuver" in the quote above. Eventually, are we supposed to move out from the security of cover until we see the "white of the eyes" of the enemy? Euphemisms apart, this scares the hell out of me.

The USMC fire team is composed of the following personnel.


Fire Team Leader (FTL)


-Executes the orders imparted by the squad leader

-Positions himself where he can control the fire team

-Controls the fire discipline of the fire team

-Exercises fire control over the fire team

-Positions himself near the automatic rifleman so he can effectively control his fire

-He is also the fire team grenadier, using the M203 grenade launcher to cover the dead space/s in the principal direction of fire (PDF)


Automatic Rifleman (AR)


-Under the direct control of the fire team leader (FTL)

-Responsible for the squad automatic weapon (SAW)

-The automatic rifleman carries the weapon with the highest firepower and rate of fire in the fire team

-The foundation and bedrock of the ability that the fire team has to destroy the enemy. Ignore this guy at your own cost and peril.

-Assumes the role of fire team leader if the later becomes a casualty


Assistant Automatic Rifleman
(AAR)

-Primarily a rifleman, he also carries extra barrels and ammunition for the SAW

-Trained to assume the role of automatic rifleman


.
.
.


Rifleman (R)


-The rifleman is usually trained in the point man and scout roles


To be continued ...

Cheers,

Sunday, July 12, 2009

ArmA 2: Meet the USMC Fire Team (Part 1)

(I apologize for the lack of entires since Wednesday ... my work days have been intense this week. Thanks for following this blog anyway!)

It's time for ArmA 2!

As I said before, one of the things I really appreciate from simulations with editors as good as the one in ArmA 2 is that they make it possible to throw in some units and start to play around in a jiffy. In this case I edited a fictional situation where I command a USMC fire team approaching a small town defended by a small team of insurgents.

The town of Kamenyy. Image is clickeable.

Insurgents defending Kamenyy. Image is clickeable.

Another view of the same insurgents defending Kamenyy. This DShK absolutely rules the road, but the high terrain in its left flank masks most of its field of fire. Image is clickeable.


At the other end of the road, the USMC fire team I'm commanding. Image is clickeable.

The purpose of this micro-scenario is to get used to command a USMC fire team and to learn how to use it in the "Marines way".

Moving towards Kamenyy.

I know this have been mentioned to death, but I just couldn't resist posting it. Is that GW Bush? :) Image is clickeable.

To be continued.

Cheers,


Wednesday, July 8, 2009

Combat Mission Shock Force: British Module Near Completion?

At least it looks like.

We have seen a variety of sources showcasing their previews of the upcoming module. Screenshot features are coming out more often.

And then, in the official forums, Moon says:
Yes, we're going to release the manual just ahead of the module. I've just about wrapped it up today actually and it goes into final proofreading now. There will be no pre-orders for the BF module, it's going to be a straight release.
Looks like almost everything is ready.

Cheers,