Showing posts with label Wargames. Show all posts

Sunday, September 26, 2010

Combat Mission Afghanistan - Surprise! We are not dead ... we are just suppressed!

Although I'm not Battlefront's biggest fan, I am having a great time with Combat Mission Afghanistan.

This week I had a rude tactical awakening while storming a trench line with my Soviet paratroopers.

Men from the 2nd Squad, 1st Platoon, A Company move towards an enemy trench. No enemy has been seen in this trench after sustained suppression from the rest of the platoon.
Privates Sukhodolets and Nudler are the first ones to arrive to the edge of the trench and everything looks like the enemy fled. Note the facing of these two comrades. 
Two seconds later, the Mujahideen pop out and shoot our brave paratroopers.

Suppression is a must-do tactical task. But keep in mind that our mission is to kill the enemy, not just annoy him.

My tactical mistakes were multiple. Just to mention one, the 80's Soviet tactical atom was the platoon and I (kinda) tried to keep this in mind. The trench was technically being assaulted by the entire 1st Platoon, but the problem was that at the moment of truth (one squad arriving at the edge of the trench), the two other squads were providing over watch to something they couldn't see (the guts of the trench). Battlespaces, folks, is a concept that is hard to learn for the tactically challenged like me.

Other crucial mistake I made was not properly using the wide range of orders available to the player.When Sukhodolets and Nudler arrived to the edge of the trench, they were facing in the direction of the last movement order, not in the direction of the trench. In Combat Mission, it is sometimes advisable to issue a firing arc (or "target light" if you are in deep caca) order at every movement node. These "watch there" type of orders provide a tactical movement menu that is incredibly satisfying.

Cheers,

Saturday, September 18, 2010

Combat Mission Afghanistan -Landing Zone from Hell: Forming Up in the Middle of an Enemy Kill Zone

This Combat Mission Scenario has me a bit puzzled.

Briefing says that I am in command of an airborne battalion (-) conducting an air assault on a fortified complex in some remote mountain area. When I saw the tactical map below I thought that somebody put the wrong picture in the briefing.

We are the red forces, right in the middle of the enemy. Are you sure this is not a Muji ambush?

 When I hit the OK button, I realized that the tactical map was correct. Whoah!

Our fearless battalion commander has skillfully landed us into an enemy kill zone. Click the picture for a better view.

Boy, that's a tough spot to have our desants!

First things first, I order massive suppressive fires on each hill top.

Combat Mission tip of the day: even when you can't see the enemy, area fire impacting nearby an enemy unit will have them suppressed. Click the image for a better view.

What to do next? Attack each hill simultaneously? I thought of extracting my troops from the kill zone, so I can attack the hills sequentially.

Would this work? Extract the battalion from the landing zone, move it into assault possition 1 and take Hill 2131. The leave some fire support detachments and FOs in Hill 2131 to support the attack from position 2. The third hill would fall by itself. Click the image for a better view.
Now, the stunner: this is a mini-version of an air assault that happened during the real war. During the early hours of April 12, 1987, the 1st Air Assault Battalion conducted this assault as part of a bigger operation by the Separate Air Assault Brigade. In real life, the Soviets succeeded attacked each hill simultaneously with one company and took all the real estate after a short firefight.


So, I better stop whining and keep it simple.

BTW, it has been a long time since I don't command a whole battalion in Combat Mission.

Wish me luck.

Cheers,


Wednesday, September 1, 2010

Command Ops: Battles from the Bulge - Tutorial Scenario - Day 1

With the new patch for Battles from the Bulge, I have no more excuses to not continue with the tutorial scenario.

This is a continuation of a series of entries I made quite a while ago. After a long digression, I settled for a  (sorta) plan.

During the first day  I want to secure the Steinebruck bridge and extend the bridgehead towards Lommerweiler.

The brigade I have available for the first day has one infantry battalion, one armored infantry battalion and one tank battalion. The troops on foot are useless for any assault on the Steinebruck bridge. The enemy occupying the heights of Lommerweiler would have a hay day if I move my foot infantry through the low terrain surrounding the bridge. I decided to use the 51st Armored Infantry Battalion and 35th Tank Battalion for an assault on the bridge. The 1st Battalion-318th Infantry Regiment is of better use if they cross the river where wheeled/tracked vehicles can't and try to attack from some sort of concealment. See tactical plan below.

Opening moves. Click the image to expand it.

Did you know that you can combine both the 51st and the 35th Bns in a single coordinated attack by clicking on one Bn HQ, pressing the Ctrl key, clicking the other Bn HQ and then issuing an attack order? The most senior HQ unit will then be in operational control (OPCON) of both battalions and will guide them through the attack. Only caveat is the increased command load for the HQ unit in control (watch for those in the Cmd tab, listed as "capacity" [how much the HQ unit can handle without too much trouble] and "load" [how much the HQ unit is handling at the moment]). If "load" exceeds "capacity", the two-battalion task force may suffer some extra orders delay. I'm kinda milking the system here, because during the first hour of the scenario there are no orders delays.

 After hours of hard fighting, at 1100 of day 1, my forces finally cross the river. I have detached a cavalry troop for reconnaissance missions. By now I need a larger bridgehead.

It was about time! We have crossed the river.

As soon as some space is gained across the river, the two-battalion task force (51 Arm Inf Bn and 35 Tank Bn) is ordered to pivot west and continue their attack towards Lommerweiler. By this time the foot infantry is in position to attack Lommerweiler in the opposite direction. With the combined firepower of an entire brigade, the enemy breaks down easily. Lommerweiler falls in our hands by mid afternoon.

The gods that wield swords and hold shields have been good with us so far, but the gods that ride horses have been more generous. That cavalry troop that I detached was ordered to conduct a reconnaissance mission towards St. Vith using the east flank of the enemy. The troopers reached St. Vith unopposed and found no signs of the enemy so far. By now the time is 1524 (day 1) and this is a pivotal moment in today's fight. This opportunity needs to be exploited with no delay. See map below for the new set of orders.

Onto St. Vith!

After some 40 minutes of nervous waiting (are orders delay fun or what?) the 35 Tank Bn moves towards St. Vith. The tanks reach St. Vith around 1730 PM with not enemy to shoot at. I feel like I sucker-punched the Germans and I wish I could preserve the battlefield as it is until the next day, when my reinforcements arrive. As the night falls, the enemy continues to attack towards the Steinebruck bridge and to put pressure in my foot infantry near Breitfeld. My troops hold their positions through a long night.

We are ready to be reinforced!

To be continued, stay tunned.

Cheers,

Wednesday, August 4, 2010

Achtung Panzer Kharkov 1943 - The Infantry Game - Bring a (Better) Gun to a Gunfight

Two very well known 3D tactical war games have a weak spot and that is infantry modelling. The Panzer Command series (Matrix) has come a long way since their first title, but the way infantry is modeled continues to be disappointing. The Combat Mission series has evolved from its abstracted squads to an explicit 1:1 representation but unfortunately Battlefront has downgraded other features of the engine (like the so-called "tactical AI", the one that used to oversee the overall performance of the computer-controlled troops) to an extent that negatively affects the whole combat experience.

I recently resumed playing Achtung Panzer Kharkov 43 (APK43) and I am focusing on infantry combat. I don't expect these infantry-oriented series of entries that I start today to be very popular. We all prefer the fast pace of armor combat against the slug-fest of infantry combat. But ... Ey! You don't drop by this blog for visceral game play stories, don't you?

So here is what happened. Me as the Germans commanding a full company of dismounted panzer grenadiers against computer-controlled Russian infantry. I am giving orders with a single click to whole platoons  at this time. My point platoon approaches one of those villages with a single row of houses leaning on one side of a road. The point platoon comes under fire from the odd and only house that is on the other side of the road, at the opposite extreme of the village. Great position, awesome field of fire, great job by the Russian AI. I command the point platoon to put the whole village between them and the nasty Russian defensive position. The fog of war doesn't allow to determine which type of Russian unit is firing at us. I want suppressive fire on the enemy so I command the whole point platoon to put some fire into the Russian position.

All by themselves, a few grenadiers get out of the cover offered by the houses and cross the road into an open field. It's like in Close Combat (a fire order will result in soldiers moving to a location where they can see the target)! But that's not just it: the first grenadiers that moved out to provide suppressive fire were carrying MG42s! All of this with just one click.

These grenadiers crossed the road to get a better field of fire. In the foreground, two MG42s and one submachine gunner. In the background, one additional MG42 is about to join the fun.

Cheers,

Sunday, August 1, 2010

The Right Time to Attack is Always in the Past - Scourge of War

The game: Scourge of War (Norbsoft)
Sandbox scenario - Division against Division - Yours truly vs computer-controlled Confederates
Click on the images to see them in full-size.

I thought I had all things in place for a quick victory: my Division split in half, one brigade to skirmish against the advance of the Confederates and other brigade waiting on the reverse side of the slope of a hill, well  hidden from view alongside most of my artillery. The plan was to pop up from the reverse side of the hill with these guys and smash the Confederates below.

For a few minutes the Confederates appear to take the bait and move towards my skirmishers ... but my ruse starts to go awry when I am not able to pull out my men in due time. The Confederates overrun my skirmishers and close in with the main line. Are the Confederates charging? These are madmen! Cold steel here, and also there ... The slaughter is horrendous. Time for the rest of my boys' appearance act from the top of the hill.


What? The artillery is still not up in the hill?
The horses can't pull the cannons up to the hill  because of a crevice in the terrain. This terrain accident can be jumped over by even a small kid. Yet today, it has become as big as the canyon that separates the alive from the dead.

Then, more bad news. The Confederates are on our left flank, threatening the whole brigade that I had out of contact. My ambush has been ambushed.

I see the Confederates forming up at my left flank (see screenshot below) and I think that this would have been the perfect time to hit them with my artillery. Are my cannons coming up this bloody hill? My saber can't point my boys to victory and my mind can only think about the perverse nature of this transaction of violence we call battle.  


Cheers,

Sunday, July 18, 2010

Gefechtsaufklarung - German Reconnaissance Units in Achtung Panzer Kharkov 43

I regard reconnaissance units as military elite. In WWII they went ahead of everybody, in nimble vehicles, armed with just a stick and skill ...  looking for trouble.

In Achtung Panzer Kharkov 1943 (APK43), reconnaissance units are important assets during the 2D turn-based phase. They will spot enemy units at a larger range than other regular units. The moves and spotting done by reconnaissance units during the 2D turn based phase are the last throws of what the Germans called tactical reconnaissance (link opens a pdf written by me and stored at Matrix Games). Any type of reconnaissance done during the 3D phase would have been called "battle reconnaissance" by WWII German doctrine .Battle reconnaissance came in different flavors and sizes, being more of communal endeavor of line and reconnaissance troops. With a wise mixture of armored car patrols, 4 men battle patrols and squad-sized combat patrols, the objective was to gain detailed information in order to plan the battle accordingly.


It all depends on your commanding skills!


"While scouting a woods, a favorite German ruse is to drive the leading car toward its edge, halt briefly to observe, and then drive off rapidly, hoping to draw fire that will disclose the enemy positions." Quote from this book.


Fight the good fight, but bug out if the odds are against you.


By the way, why is this guy's wingman not providing mutual support?


Don't be shy and mix your platoons!

Cheers,

Sunday, May 30, 2010

Command Ops: Battles from the Bulge - Tutorial Scenario - Planning - Enemy

Continuing with the planning process, now I'll consider the enemy.

From the briefing, we know that across the bridge we face a single regiment of the 12th Volksgrenadier Division. And also we know that St. Vith is not occupied by the enemy but that is likely to change soon. Also, there is an armored column coming from the west.

The following map is combination image created with an in-game screenshot of the map plus graphics from MilSketch.

All things considered, the threat from the west is the one that worries me the most. Grid lines are 1 km divisions. Click the image for a better view.

Now a closer look of the enemy forces immediately in front of us.

The enemy (grey counters) looks like an all-infantry regiment. The size of the formation is indicated in the lower part of the counters. Almost every enemy unit is a company ("I" symbol), but there is also a platoon ("..." symbol). Remember this information shown at the beginning of an scenario can be not accurate (we have full fog of war in effect) due to faulty reconnaissance.

By clicking every enemy counter we get details about the equipment and personnel that the formation could have.

Don't believe everything you see!
Note the "Reliability" field, it says "vague". This information should be taken with a grain of salt. Please click the image for a better view.


More details on equipment.
Please click the image for a better view.


New! Now we can see pictures of most of the vehicles and equipment by clicking on the text.
Please click in the image for a better view.


Coming up, the next step in planning: terrain considerations.

Cheers,

Saturday, May 29, 2010

Command Ops: Battles from the Bulge - Tutorial Scenario - Planning - Mission

Well, yours truly had quite a week at work and couldn't keep up with the many news that are relevant for this blog. Let's start with the news I was very anxiously awaiting ... Command Ops: Battles from the Bulge was released!

The price of the game has spurred some fierce discussions elsewhere. I will comment about that in the future.

Now, onto the game!

The tutorial scenario features an easy-to-win scenario for the human player playing as the Allies. Even when the scenario is not challenging, please bear with me while I plan for this battle because alas I'm not tactically gifted.

Let's start the planning with a full understanding of the mission.

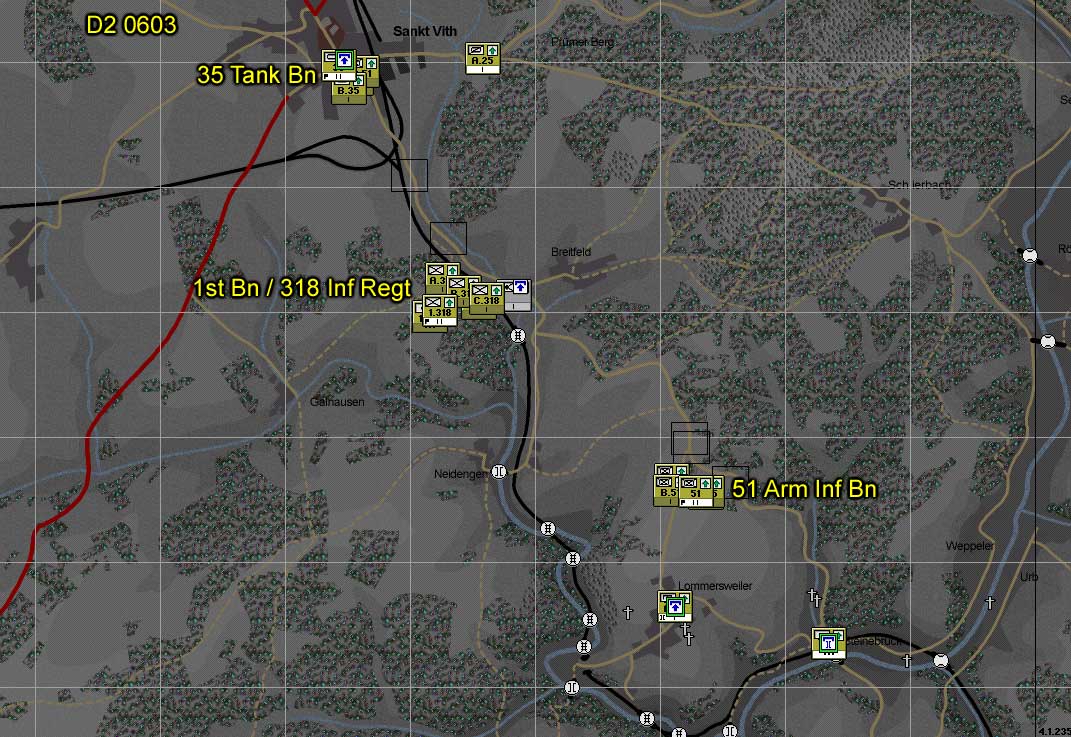
Please make sure to click the pictures so you can actually read the text.

The text paragraph on the left, just below the tabs displays the never-to-ignore briefing. It is important to read it to understand the mission. Yellow circles and writing are mine.

One of the other tabs shows the scenario-specific objectives. Let's take a look at those.

First objective (highlighted black) is straightforward. As shown at the bottom of the screenie, if you kill 79% of the enemy force you get 33 points in your overall score.

A comment about the destruction of enemy units. I was once discussing with  one of my best friends (a surgeon) about the optimal post-surgery feeding of cancer patients who had almost all their digestive tract removed to prevent metastasis. It was a wacky talk; the surgeon couldn't grasp amino acid dissociation constants, the biochemist couldn't grasp the electrolytic balance of a person with half their guts removed. When I asked him about how it is possible for a human being to survive such a harsh surgery, he shared a bit of his emergency room experience back in poor slums in Argentina and capped everything with "it takes a lot to get a man killed". Well, paraphrasing my non-wargamer surgeon friend, it takes a lot to get an enemy formation eliminated. Single units in this game don't want to get killed; they will take a lot of punishment, maybe rout, but they will be back into the fight when they rally. I always found this aspect of the engine quite spot on. It may be a bit shocking for the newcomer because we kind of became accustomed to turn based games where you throw the dice and if your odds are good the enemy unit just goes away. In this war game, you will push the enemy aside, but they will be back sometime. After years of playing games from Panther, "destroy the enemy" is the objective I am always sure I will miss. :)


Second objective (highlighted black) is the Steinebruck bridge (for its location see full map above). Note the timing of the objective: this objective is relevant (or active) from day 1 at 0600 to day 5 at 0600. Also, there is a distinction between occupation and completion. For occupying the objective (from day 1 at 0600 to day 5 at 0600) you can get a maximum of 8.3 score points. For having this objective under your control at day 5 at 0600 you will get 4.2 score points (no matter which side controlled the objective up to that time).


The tabs corresponding to the other objectives are reproduced below. Make sure to take a look at the full screen and map above to get an idea of the objective's location. Also note how objectives Breitfeld Crossroads and St. Vith become active not at day 1 but at day 2.


Next entry: second step of planning, the enemy.

Cheers,

Monday, May 10, 2010

Command Ops: Battles from the Bulge - New video

There is a faint smell of release coming from Matrix Games' kitchen. :)

Dave Arjuna, head honcho of Panther Games has assembled a video about their upcoming Command Ops: Battles from the Bulge. It covers the basic theme and mechanics of the game.  This video will help the newcomer to appreciate what this game is about.

A Matrix forumite was kind enough to upload it into YouTube. The first part is embedded here. Please follow the links below for the other 3 parts.


Second Part (YouTube)
Third Part (YouTube)
Fourth Part (YouTube)

Cheers,

Tuesday, May 4, 2010

Command Ops: Battles from the Bulge, Almost there

According to this thread, there are still a number of bugs to fix. Get ready for some this war gaming gem, folks.

Some screenshots below.

Click the image to see it in full size. I thought the Allies at Stavelot would run for the hills. Hours later I figured out I was wrong.

Click the image to see in full size. Moving to contact as the Germans. Night combat is always complicated because you almost have to stumble upon the enemy to see it. This may result in engagements that are difficult to shake off from.

Cheers,

Thursday, April 29, 2010

Achtung Panzer Kharkov 1943, New Review at Training and Simulation Journal

This war game keeps getting very good reviews everywhere. Now at both the online and print editions of Training and Simulation Journal, a review by Michael Peck.

The ultimate pass-fail for a tactical game is immersiveness, and that is where “Achtung Panzer” shines above the rest of the tactical RTS pack. Too many tactical games tend to be crowded free-for-alls that demand constant clicking at the expense of decision making. “Achtung Panzer” depicts the loneliness of the modern battlefield, with only a few squads or vehicles in a square kilometer.
The game's weak points (interface and manual) are also mentioned. But overall the review is a thumbs up. Congratulations Graviteam!

Cheers,

Monday, April 12, 2010

HistWar Les Grognards: Friendly Fog of War Delight

Friendly fog of war (FFoW) is the ultimate challenge for simulations of command. It's not easy to implement and it's not easy to present to the player.

I was playing a quick scenario of HistWar Les Grognards (HWLG) and I thought of showing here how FFoW looks in this war game.

This is good ole 2D map showing the situation of my troops (little squares highlighted blue) at the beginning of the scenario. Of particular interest is the strongest formation in my Army, V Corps commanded by Mortier. Before the start of the scenario, Mortier was ordered to deploy in the center (see figure). He received and understood his orders.

It is now 8:35. Note how I started moving towards the center of the battlefield ("Me" in the figure above). The units that are within my sight are displayed lighter than the ones I can't see. The icons of V Corps have not changed position. Also note the little explosion icons in the center. Some units are fighting there, but since I neither received situation reports from those nor I can see them from my position the only thing displayed is explosions. Some of my reconnaissance detachments have reported the Austrian battle line (squares highlighted white).

8:51 and a lot has changed in the battlefield. Some of my units have updated me on their positions. Not V Corps, who is represented as if it were at the start point. I'm approaching a hill and hopefully that will give me a vantage view of my own troops.

Three minutes later I just reached the top of a hill and now I can see that VCorps has been moving all the time. I just wasn't informed about that.

Mortier and his staff supervising the approach march of V Corps. Merde, Mortier! Drop me a line sometime!

If this doesn't teach me that I have to command from the front, nothing will!

Cheers,

Thursday, April 8, 2010

Across the Dnepr Second Edition

I remember playing for hours with the first edition of this game. Boy this game engine has made some astonishing changes from then!

Across the Dnepr Second Edition is an add-on for Kharkov Disaster in the Donets. This second edition of Across the Dnepr uses all the tricks of SSG's new game engine.

One thing that immediately hooked me in this second edition is how the mobility of motorized/armored groups has been improved. Now I'm able to use my reconnaissance units deep into enemy territory.

The 10th Panzer Division (10PzD, blue icons with the "Y" yellow symbols) and the 4th Panzer Division (4PzD, blue icons with the inverted Y white symbols) approach Mogilev from the north and the south respectively. Note how the reconnaissance battalions have successfully bypassed the Russsian infantry (light brown counters).

Just because SSG cares about old farts like me,  the magnifying glass will never be dropped from their games. Ever. On a serious note, the reconnaissance party has bumped into the Russians. Time to call the tanks up.

The 4PzD is running circles around the Russian infantry. 

I'm going to review this game sometime in the near future (the backlog of reviews is not getting any smaller, yikes!).

Cheers,

Achtung Panzer Kharkov 1943: Get Off that Road!

I'm enjoying the relatively slow pace of WWII tank battles in Achtung Panzer Kharkov 1943 (APK43). Compared to the fast and furious pace of modern armor combat (as shown in Steel Beasts ProPE), in APK43 I have a chance to screw it and fix it. Sometimes it's hard not to be overconfident and forget "good manners".

In one instance I was moving a German tank platoon down a road. There was a small patch of woods ahead and as soon as the point tank emerged from the tree line it was welcomed by a well placed Russian AT gun.

AT ambush, 10 meters ahead.

Take a look at the figure below, taken from the "Training Directives for the Light and Medium Tank Companies, March 1939".

The square inside a circle represents a tank and the other symbol an AT gun (you may recognize from APK43). Left side (wrong), the tank at the edge of the trees gets nailed by an AT gun. Right side (correct), the tank steps aside the road and spots the AT gun from the cover of the foliage.


Put those trees to work for you. Russian AT gunners don't have IR imaging. A German tank takes a peek at the open terrain ahead from the concealment offered by the trees.

Cheers,

Wednesday, March 17, 2010

TacNuggets #2: My (AT) Gun is Bigger than Yours


It was about time for a second tactical snack!
(or for a new post, for that matter. I've been quite busy with other unhealthy distractions, like my day job)

Today, the sad story of how my borzois got trapped in a badly deployed defense line.

The game: Achtung Panzer Kharkov 1943
Topic: The use of AT guns in the defense.

Please click "read more" to see the full entry. Plenty of screen shots inside.

Tuesday, March 9, 2010

Rise of Prussia Released


The new war game from AGEOD/Paradox is out, fellows.
Reviewing this game right now (and thus the lack of posts since Friday), stay tuned.

Cheers,

Friday, March 5, 2010

HistWar Les Grognards got patched

Every time I sit down to play HistWar Les Grognards I find something I didn't know.

There is a new patch out. See announcement and link here.

There is a fantastic video in YouTube about the multiple choices you have while in command of a corps. This war game has more features than you can shake a stick at!


I continue with my lame attempts to wrap my head around Napoleonic warfare. A couple of days ago I had a rude awakening about the use of cavalry.

Cuirassiers, great for shock action in a reserve role but too cocky to screen your main body. Later in the battle, they charged on the enemy almost at fist sight.

More Cuirassiers at work on my right flank. 

Cheers,

Wednesday, March 3, 2010

Achtung Battlefront!

Elsewhere I am reading comments from very smart people saying that Achtung Panzer Kharkov 1943 (APK43, by Graviteam) is a breakthrough war game. Although I reckon APK43 as the best 3-D tactical war game experience I had since Combat Mission Beyond Overlord/Barbarossa to Berlin/Afrika Korps (by Battlefront), in my agenda APK43 scored just two inches short of becoming a classic. One inch for the lack of multiplayer. Another inch for the lack of a map editor. But Graviteam fired this shot from a mile away, so let's keep things in perspective.

Graviteam came out of nowhere and kicked down the chits and board of a game that Battlefront has been playing solo since the year 2000. And did so in such a humble, un-assuming and polished way that will double the shock to Battlefront. Pay attention to the words "will" (is Battlefront aware of the new competition? Will Battlefront admit it publicly?), "humble"/"un-assuming" (compare to Battlefront's relationship with their old guard fans) and "polished" (do you remember the sorry state and horrible review scores Combat Mission Shock Force got upon release?).

And speaking of the old guard Combat Mission fans, I'm sure they will tear APK43 into pieces. And I'm not saying this with a negative connotation. Their analytical talents and knowledge have no apparent limits.  Also, keep in mind that even after all this years, they continue to do so with the very Combat Mission itself! Sometimes these fellows are like an old elementary school nurse I had back in Argentina: she would shake you like hell to make you spit that marble choking you. I take it like though love. Unfortunately, Battlefront takes it like sexual abuse.  

Competition propels progress. So here is hope that Graviteam's success will continue to release  more tactical goodies. And that Battlefront will reckon there is serious competition out there, and do what needs to be done with their upcoming Normandy war game. Because this time around, a Combat Mission Shock Force painted with WWII lacquer may not be enough.

Cheers,

Tuesday, March 2, 2010

Rise of Prussia Screenshots


All screenshots below are from Paradox Interactive, used here with their permission.
Click on each image for an expanded view.