I woke up this morning at 4:00 AM to download this one and it is not ready yet. Just kidding. I woke up at 4:00 AM to get a stab at "the overdues" (work, family and off course, the blog).
So, no ArmA 2 PMC yet ... At least we have a release video.
Cheers,

Tuesday, November 30, 2010
Saturday, November 27, 2010
Revolution Under Siege - New AGEOD/Paradox's Wargame

By this time AGEOD's engine is a known quantity. With more than seven titles that have received accolades at every hard core war gaming venue, the engine continues to deliver great war games. The new offer now is from French third party developer SEP Reds. The topic is the almost unexplored PC war gaming territory of the Russian Civil War.
Some screenshots follow as a preview of my review of the game.
 |
| The Polish-Soviet War heats up north of the Pinsk marshes. |
 |
| Detailed battle report, showing an un-glorious defeat of my communist forces. |
 |
| The 16th Army (red counter near the bottom of the map) is about to be outflanked by Polish troops aiming at Kiev. |
 |
| The vast expanses of Russia need an strategic map to show all your troops. Red, Soviet troops; black, Polish troops. |
 |
| Those icons in the map make me wonder how orthodox is our collections department, comrade Lenin. |
Friday, November 26, 2010
Maneuver Warfare: A Wargamer's Notebook - Surfaces and Gaps - German KSKs and a Gap that Actually is a Kill Sack
This series of blog entries are about the so-called "maneuver warfare" as explained by William Lind. The writings of Robert Leonhard will also be included. I claim neither expertise in the subject nor devotion to this way of waging wars and thus I am not trying to convert you into anything. This series is not an analysis or a review of all ideas about maneuver warfare but rather some explorations about the topic based on computer war games and simulations. Future entries will be delivered based in readership.
This entry is related to the previous one. Today, a German SOF team reveals the hidden truth behind a seemingly inviting gap.
War is all about things not being what they actually look like. The wise warrior will use every ounce of imagination to trick his enemies into believing he is stronger or weaker than he actually is. In the previous entry, we found out about surfaces and gaps and how you as a commander should avoid the enemy strong points and pull through his weak spots. We should keep in mind that in the battlefield very few things stay the same over time or are actually what they look like. That's why once we detect an enemy's weak spot we should act fast but keep our eyes open to avoid any surprises.
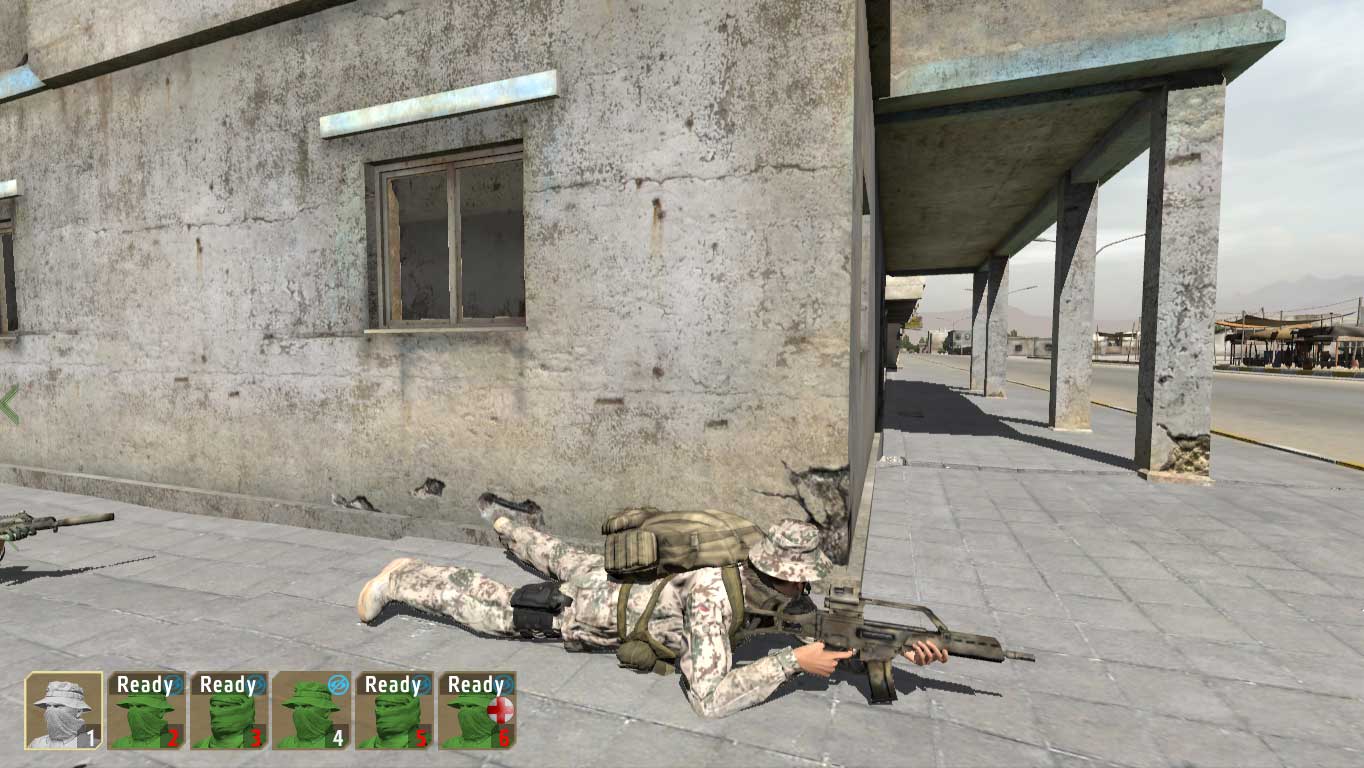
Today's mission: a German KSK special forces squad is returning from a successful snatch and grab at a urban area and now is attempting an exfiltration towards a linkup point eastward from their position. The squad featured in this mission is part of a platoon and the exfiltration is being conducted by squads. The enemy (insurgents) is slowly coming to grips about the raid and is setting up blocking positions wherever they can.
 |
| A German KSK squad (light blue icon) is exfiltrating eastward towards a linkup point (not shown here). The wavy line is the tactical graphical symbol for an infiltration mission, but given the similarities between infiltration and exfiltration missions it is used here with a bit of gamer's ignorance license. Both lines set up a corridor for the maneuvering of the squad and provide a control measure just in case there is a need for indirect fire support. |
The German squad will attempt to move at or near streets to keep speed at a reasonable level.
 |
| First things first, I organize the squad into two teams: recon/probing and support teams. Shown here, the recon/probing team: squad leader (me) and a light scout (#4). I have come to appreciate this team organization thing after the previous blog entry. This type of organization works great for commanding the AI and ensures that you make contact with a very small force, giving you ample options to develop the situation with the support team. |
 |
| Peeking east through "right street" reveals an enemy patrol reinforced with an APC. "Right Street" is a surface. |
 |
| Looking east down "left street". At least two enemy patrols in the distance with maybe a technical truck. "Left Street" is another surface. |
 |
| Looking down "center street" was a bit more tricky because its corner was an obscene open space. Here I am looking down "Center Street" from the safety of a house in front of it. Note how I avoid staying close to windows and doors. |
 |
| No contact so far in "center Street", this one is looking like a gap. Since my scout (#4, not shown here) is pulling security on my flanks, I am the only gun and pair of eyes on "center street". But in any case I already observed the street from a house now on my back and it is relatively safe. An additional peek down the street, now "slicing the pie". The house in front of me is an ideal point to bring my support team to over-watch and close up in case we make contact. |
 |
| SITREP. Left and right streets are definitively surfaces. The question is: is the "center street" actually a gap? |
With the support team holding a house on the side of the center street, I carefully move east with my scout (#4).
 |
| Contact on the right flank. A heavy machine gun. I quickly dispatch it from my position without incident. Damn I love my rifle! |
 |
| Moving east down "center street". This is the not-so-fun part of dividing the team into a light probing/recon and a support one. I have the support team overwatching my axis of advance, but my flanks are not covered. Note the side street and alley on my left: great fields of fire for the enemy. |
 |
| #4 and me make it to one of the houses where "center street" ends into a "T". Careful scouting required to leave #4 behind (AI pathfinding is atrocious inside buildings). I am not a big fan of roofs but the buildings were extremely short on windows. In the background, an enemy APC with a field of fire perpendicular to our axis of advance. |
 |
| Need a moment to think. I am watching towards my guys now (note the support team in the house across the "center street", green icons). We have no AT weapons, how are we going to take out this APC? |
I have no options but to try to snipe the APC gunner. Since the APC has no overhead armor, I may have a chance. I don't know how on earth I killed the heavy machine gunner before without throwing the enemy onto us, but this time I may not be that lucky and I want to have the whole squad ready to move out east once I take out the APC gunner.
 |
| I come back to my support team and organize them on the sides of the "center street". |
 |
| I them move east with #4 and choose my shooting position carefully. I want to have to engage the APC from the maximum range possible for obvious reasons. In this picture, a few last nervous chews at the gum before getting into position. The APC is at my left and #4 is covering my right flank. |
 |
| In situations like this, I hate being such a lousy shot. I got the APC gunner, though, and the vehicle moved away really fast. I was lucky that this vehicle was unsupported by infantry. |
It is time now to move the squad east and this is where I am going to stop the narrative and get back to the original point.
 |
| It all started with a clear tactical picture of "left" and "right" street as being surfaces. "Center" street, originally thought as a gap, ended up being a kill sack. |
Take home lesson:the physical absence of enemy in a piece of terrain doesn't guarantee a gap and any piece of terrain where the enemy has a field of fire is actually a surface.
Cheers,
Saturday, November 20, 2010
Maneuver Warfare: A Wargamer's Notebook - Introduction
This series of blog entries are about the so-called "maneuver warfare" as explained by William Lind. The writings of Robert Leonhard will also be included. I claim neither expertise in the subject nor devotion to this way of waging wars and thus, I am not trying to convert you into anything. This series is not an analysis or a review of all ideas about maneuver warfare but rather some explorations about the topic based on computer war games and simulations. Future entries will be delivered based in readership.
Much has been written and debated about maneuver warfare and chances are you heard about this before.As a said in the opening paragraph, this is not a review, analysis or tutorial about maneuver warfare. For a complete coverage of the ideas you will have to check out any of the literature available. I can recommend two books as a starting point.

Maneuver Warfare Handbook, by William Lind, is the book that I will be using as a premier source for this series of entries.

The Art of Maneuver, by Robert Leonhard, is a discussion of maneuver warfare in the context of the now defunct AirLand Battle doctrine. Leonhard is borderline genius in his explanation of the art of war and this book is no exception.
More books will be added to this list in future entries.
What is maneuver warfare? That's a difficult question.
Let's start with what is not. Maneuver warfare is sometimes confused with "fire and maneuver" (the tactical moving and positioning of weapon systems in order to deliver fires onto the enemy). Although maneuver warfare involves "fire and maneuver", the former is a more encompassing way of fighting.
In Maneuver Warfare Handbook, Lind comes a bit short of defining it in a formal sentence or paragraph. One gets the impression that Lind is not very fond of summing up a way of fighting in a single grammatical salvo. Waging wars shouldn't be about applying fixed recipes and drills, and his reluctance to deliver a single definition is replaced by thought provoking tactical narrative.
However, there is a common theme to all the scenarios that Lind explains and that is the focus in incapacitating the enemy's command decision process. That is not to say that destroying the enemy is the ultimate focus. After all, we want to kill the enemy, not just annoy him. But it is easier to defeat a foe whose decision process has been targeted early on.
Lind recognizes three major guidelines (he calls them "filters") to shape a battle plan:
Much has been written and debated about maneuver warfare and chances are you heard about this before.As a said in the opening paragraph, this is not a review, analysis or tutorial about maneuver warfare. For a complete coverage of the ideas you will have to check out any of the literature available. I can recommend two books as a starting point.
Maneuver Warfare Handbook, by William Lind, is the book that I will be using as a premier source for this series of entries.
The Art of Maneuver, by Robert Leonhard, is a discussion of maneuver warfare in the context of the now defunct AirLand Battle doctrine. Leonhard is borderline genius in his explanation of the art of war and this book is no exception.
More books will be added to this list in future entries.
What is maneuver warfare? That's a difficult question.
Let's start with what is not. Maneuver warfare is sometimes confused with "fire and maneuver" (the tactical moving and positioning of weapon systems in order to deliver fires onto the enemy). Although maneuver warfare involves "fire and maneuver", the former is a more encompassing way of fighting.
In Maneuver Warfare Handbook, Lind comes a bit short of defining it in a formal sentence or paragraph. One gets the impression that Lind is not very fond of summing up a way of fighting in a single grammatical salvo. Waging wars shouldn't be about applying fixed recipes and drills, and his reluctance to deliver a single definition is replaced by thought provoking tactical narrative.
However, there is a common theme to all the scenarios that Lind explains and that is the focus in incapacitating the enemy's command decision process. That is not to say that destroying the enemy is the ultimate focus. After all, we want to kill the enemy, not just annoy him. But it is easier to defeat a foe whose decision process has been targeted early on.
Lind recognizes three major guidelines (he calls them "filters") to shape a battle plan:
- Mission type orders: you can't defeat the enemy's tactical decision process if yours is very slow. Let your subordinates accomplish their mission or exploit opportunities as the see fit instead of waiting for your orders at every speedbump.
- Main effort or schwerpunkt: even when you don't want a battle-group of robots that wait for every detailed instruction, you don't want a circus where every captain thinks is an army group commander either. Your battle plan should have a point of main effort to glue all your subordinates' tactical actions
- Surfaces and gaps: this one is very simple, put your strength onto the enemy's weaknesses.
Cheers,
Friday, November 19, 2010
DCS: A-10C Warthog - Three Betas Down, Many More to Go
 |
| Beta 3 for DCS A-10C has been released. Better framerates here and there, avionics/weapons fixes and fog, lots of fog. |
The first beta version you download makes you feel you are living the dream. A game you like ... And you are playing it before the crowd. You get that shiny avatar with the words "beta tester" on it and you use it in discussion forums like a badge vested for your savviness, awesomeness, luck or whatever. Your forum posts are read and dissected to the last word in search for new bits and pieces about the game .You are admired, popular, even needed. And if you are the quiet type who don't post anything in any forum, you feel like you got your efforts compensated by a free copy of the game, even when is far from finished.
 |
| The office looks as good as always, the view out of the window ... very foggy |
By the ninth beta download, you have completely gave up and left everything up to those other guys who apparently don't have a life other that this game and report more than ten bugs per beta. - I played ... It didn't crash ... Good job guys fixing that stability problem that I reported before! Yup, those two crashes you got while running at the same time the beta and that other game you bought.
By the time of release, the very sight of the splash screen of the game gives you a headache and carpal tunnel syndrome symptoms. - Send my free copy to this address ... and let me have my life in peace!
 |
| Flying around Russia, weaponless. |
In the case of DCS A-10C, we are not required to report bugs. But I am wondering how spent we are going to be when the sim is officially released.
 |
| Tactical signaling with smoke or there is always somebody grilling something in these Caucasus towns? |
Cheers,
Tuesday, November 16, 2010
War Over the Mideast - Jamming Down the Valley
War Over the Mideast is an air operations war game by John Tiller. Instead of a virtual cockpit, this war game puts you in virtual command of one or more air forces. Yours is the task of coordinating air operations, in this case over the unfriendly skies of the Middle East during wars from the 50s to the present day.

Today's operation is a tricky one. From the game's briefing (bold is mine):
This is not a turkey shoot. Yes, you have air superiority but boy, this scenario will make you miss the sensors and stand-off ordnance of the modern F/A18s. Flying off the USS Independence (CV/CVA-62), some 50 miles off the Lebanese coastline, we have F14As in the air superiority and reconnaissance roles. Strike missions are available from flights of A7Es armed with free fall bombs.

Today's operation is a tricky one. From the game's briefing (bold is mine):
The Multinational Force in Lebanon (also MNF) was an international peacekeeping force created in 1982 and sent to Lebanon to oversee the withdrawal of the Palestine Liberation Organization. The MNF included US Navy and Marines, French Navy, Italian, and British soldiers and supporting aircraft. The destabilized Lebanese government was unable to prevent massacres in the Shabra and Shatilla refugee camps.
French aircraft flew airstrikes against PLO positions in the Bekaa Valley in November, hitting Iranian Revolutionary Guard positions. Tensions flared between Syria and the US as SAMs were fired at US Navy aircraft patrolling over Lebanon. These provocations triggered the first direct US air attacks into Lebanon on December 4, depicted in this scenario.
After firings by Syrian SAMs, US Navy fighters and attack jets targeted Syrian missile batteries in the Shouf mountains east of Beirut. In response to the US attacks Syrian SAMs shot down an A-6 Intruder and an A-7 Corsair. The pilot of the A-7 was rescued, but the A-6 pilot was killed and his bombardier-navigator was captured by the Syrians, to be later released.
This scenario is designed to be played solitaire as the UN MNF. Launch aircraft from the carriers offshore and search out enemy bunkers and bases for air attacks. Avoid Syrian SAM launches and stay out of Syrian airspace (No Fly Zone.)
Fighter, fighter-bomber, CSAR, and resupply aircraft are stationed on Cyprus shown on the northwest corner of the map. Fly in supply pallets to Beirut to help offset damage and increase your game score.This war game is engrossing and you get really busy tendering to every mission being flown. In this blog entry I'm going to focus only in one mission of reconnaissance-strike against enemy bunkers in the valley neighboring the Syrian border.
This is not a turkey shoot. Yes, you have air superiority but boy, this scenario will make you miss the sensors and stand-off ordnance of the modern F/A18s. Flying off the USS Independence (CV/CVA-62), some 50 miles off the Lebanese coastline, we have F14As in the air superiority and reconnaissance roles. Strike missions are available from flights of A7Es armed with free fall bombs.
 |
| Click the image for a better view. East-bound from the Mediterranean, our pilots are about to enter Lebanese territory. The white lines are the flight plans for the US aircraft: they will turn northeast for a thorough search of enemy bases in the valley between Beirut and Syria. Shaded in grey, the two mountain ranges that define the valley of trouble. The blue area is the Syrian territory (no-fly zone). |
Courtesy of the overzealous Syrian air defenses, we had to make use of stand-off jammers (SOJ) mounted on EA-6Bs. Tactical reconnaissance brought to us by F14s equipped with tactical airborne reconnaissance pods (TARP). Based on mission, I sorted my flights in two packages: a flight with a reconnaissance mission (flight 1) and a flight with a strike mission (flight 2). To avoid being hit by the Syrian SAMs coming from the blue area, each flight has its own pair of jamming aircraft.
 |
| Click the image for a better view. This looks a lot like a hunter (flight 1) killer (flight 2) team. |
One may question the wisdom in putting all the above assets in the valley at the same time. One excuse is the lack of tactical marking in the game engine: if no aircraft is seeing (visually or by other sensor) a land target, the target will not be displayed or marked. With the abysmal amount of targets in this mission and my lack of memory, I need eyes on target at all times. I'm running some sort of "detect, acquire and strike" mission-tasking here. This should put bombs on target on short order. That's my story and I'm sticking to it.
 |
| Click the image for a better view. The Syrians light up the electronic warning receivers of the US pilots. The green areas are areas effectively jammed by the pods. Note the red circles indicating the range of the Syrian SAMs. |
 |
| Click the image for a better view. And they fire ... I counted up to 12 missiles in the span of 5 minutes of simulated mission time. Dont' get fooled by the size of the tiny dot in the center of the screenshot. This represents a SAM, and it bites hard. Luckily, the jammers work great and both flights continue without being hit. |
 |
| Click the image for a better view. The selected aircraft are the F14As of flight 1. Note the red pie-slice representing the reach of the TARPs. Flight 2 is immediately ordered to strike one of the rebel camps (white line in the northeast direction). |
 |
| Click the image for a better view. The reconnaissance flight has turned back, but now the target is within visual range (blue circle) of the strike flight. The Lebanese have a SAM battery north of the target. |
 |
| Click the image for a better view. The free fall bombs barely scratch the enemy forces. This is going to be a damn long day ... |
Cheers,
Sunday, November 14, 2010
The Red Pill is Getting Serious Media Attention
Just when everybody is scratching their heads about why the world needs another re-re-re-release of Harpoon with no new content and no significant bugs fixed, The Red Pill's Dimitris Dranidis got interviewed by the very Armchair General.
I'm both ecstatic and anxious about The Red Pill. Here is to the Red Pill Team, wishing them a great success with their naval war game.
Cheers,
I'm both ecstatic and anxious about The Red Pill. Here is to the Red Pill Team, wishing them a great success with their naval war game.
Cheers,
Flashpoint Germany - Revisiting Wargames
Does it happen to you that sometimes you try a wargame/simulator and go "meh!" and then some time later you re-try them and go "whoa!".
Flashpoint Germany, by Simulations Canada and published by Matrix Games: I bought this one in January 2005, played it quite a bit and moved to something else. Yesterday I was pondering what game to fire up for some grand-tactical NATO vs Warsaw Pact action and remembered about this one.
From the game's manual:
FLASHPOINT GERMANY (FPG) is a fast paced, command-orientated game of modern grand tactical combat. You are the officer commanding a Soviet, American, British or West German unit ranging from battalion to regiment / brigade. You will achieve victory by taking or holding a defined geographic local within the combat area while minimizing casualties to your forces and maximizing those of the enemy. Air strikes, helicopters, off-map artillery and even nuclear attacks may be on call.
This is a command-oriented game! This is not a simulator where you must perform every individual soldier’s job. As the commander you will observe and evaluate the tactical situation as it is revealed to you, plan your response in light of the victory conditions set out in the mission briefing, and issue the orders necessary to get the results you want. From there your subordinates will take over and do their best in the circumstances to make your intentions happen. This being the military, there will be areas of ambiguity, time lags and setbacks. You must adjust your plans accordingly and allow time for your intentions to be disseminated down the chain of command. This is represented by giving you the opportunity to issue orders only every 30 game minutes during a stop-time orders phase. When issuance is complete the game clock is started and the turn is resolved for both sides together. The planning process is then repeated. The game ends when one side achieves victory, or drops below 20% of its starting line strength (“sudden death”), or after 4-14 hours (depending on scenario settings) if victory has not been otherwise obtained.
Don’t panic! Modern combat can be a complex affair but you can assume that you have an able staff officer at your elbow to make your orders a reality - a trusted subordinate to take care of the actual implementation details. Relax, concentrate on the big picture, and learn by doing. If you make a mistake then start over and try a different approach - there is no one right way to any given situation. Experiment, think out of the box, and learn from the lessons that you receive. Start with some of the easier scenarios to develop a feel for the game. Finally, enjoy!
Cheers,
 |
| A German Panzer Brigade (grey counters) finds the first Soviet mechanized units. |
 |
| Plotting the first waypoints for the reconnaissance units. |
FLASHPOINT GERMANY (FPG) is a fast paced, command-orientated game of modern grand tactical combat. You are the officer commanding a Soviet, American, British or West German unit ranging from battalion to regiment / brigade. You will achieve victory by taking or holding a defined geographic local within the combat area while minimizing casualties to your forces and maximizing those of the enemy. Air strikes, helicopters, off-map artillery and even nuclear attacks may be on call.
This is a command-oriented game! This is not a simulator where you must perform every individual soldier’s job. As the commander you will observe and evaluate the tactical situation as it is revealed to you, plan your response in light of the victory conditions set out in the mission briefing, and issue the orders necessary to get the results you want. From there your subordinates will take over and do their best in the circumstances to make your intentions happen. This being the military, there will be areas of ambiguity, time lags and setbacks. You must adjust your plans accordingly and allow time for your intentions to be disseminated down the chain of command. This is represented by giving you the opportunity to issue orders only every 30 game minutes during a stop-time orders phase. When issuance is complete the game clock is started and the turn is resolved for both sides together. The planning process is then repeated. The game ends when one side achieves victory, or drops below 20% of its starting line strength (“sudden death”), or after 4-14 hours (depending on scenario settings) if victory has not been otherwise obtained.
Don’t panic! Modern combat can be a complex affair but you can assume that you have an able staff officer at your elbow to make your orders a reality - a trusted subordinate to take care of the actual implementation details. Relax, concentrate on the big picture, and learn by doing. If you make a mistake then start over and try a different approach - there is no one right way to any given situation. Experiment, think out of the box, and learn from the lessons that you receive. Start with some of the easier scenarios to develop a feel for the game. Finally, enjoy!
 |
| The British are to hold this town at all costs! |
Thursday, November 11, 2010
Ironclads: Chincha Islands - Naval Misadventures in the Age of Ironclads
The game: Ironclads - Chincha Islands
The purpose: Washing off a Harpoon post-game frustration. Naval combat in the 19th century is supposed to be easier. Ain't it?
Ironclads Chincha Islands is a game about an appealing war fought over bird shit-covered islands.
The Spanish Queen needed money and, oh well, she decided to try some luck in South America ... Again.
Argentina was a no go: even when the country was at war with Paraguay and shooting the last shots of an almost eternal civil war, the only shit available was from cows. And if there is one thing you don't mess with an Argentine is with his cows or anything that comes out of them. A sour memory about an Argentine bad-ass general that steamrolled the Spanish forces from half the continent some fifty years before may have played a role too.
So the Spanish crossed to the Pacific and found the perfect casus belli in a bar-brawl in Peru. In a genius strategic move, the Spanish blocked the Peruvians from the sea. It worked for the Argentine general fifty years back, didn't it? To the Spanish astonishment, the Peruvian's felt little inclination for bargaining because the sea was one very important mean of trade and communication. Slash that. The sea was the only mean of trade and communication for the Peruvians. With the Andes at their back, the Peruvians must have felt between the gun and a very tall rock
Wars start for the most strange reasons. But this one beats all records. To my readers from Spain: please don't take offense on my comments. They are all made with a tongue in cheek tone. I am from Argentina and ... ahem ... we have an illustrious record of starting wars for the most stupid of reasons.
Fortunately, Ironclads is a game that puts the war so much in the background that the inglorious cause of (literally) getting your shit back is easily forgotten. So here I am, in command of a Spanish flotilla composed of two corvettes and two gunboats, outnumbered and out-gunned in high seas.
Cheers,
The purpose: Washing off a Harpoon post-game frustration. Naval combat in the 19th century is supposed to be easier. Ain't it?
Ironclads Chincha Islands is a game about an appealing war fought over bird shit-covered islands.
The Spanish Queen needed money and, oh well, she decided to try some luck in South America ... Again.
Argentina was a no go: even when the country was at war with Paraguay and shooting the last shots of an almost eternal civil war, the only shit available was from cows. And if there is one thing you don't mess with an Argentine is with his cows or anything that comes out of them. A sour memory about an Argentine bad-ass general that steamrolled the Spanish forces from half the continent some fifty years before may have played a role too.
So the Spanish crossed to the Pacific and found the perfect casus belli in a bar-brawl in Peru. In a genius strategic move, the Spanish blocked the Peruvians from the sea. It worked for the Argentine general fifty years back, didn't it? To the Spanish astonishment, the Peruvian's felt little inclination for bargaining because the sea was one very important mean of trade and communication. Slash that. The sea was the only mean of trade and communication for the Peruvians. With the Andes at their back, the Peruvians must have felt between the gun and a very tall rock
Wars start for the most strange reasons. But this one beats all records. To my readers from Spain: please don't take offense on my comments. They are all made with a tongue in cheek tone. I am from Argentina and ... ahem ... we have an illustrious record of starting wars for the most stupid of reasons.
Fortunately, Ironclads is a game that puts the war so much in the background that the inglorious cause of (literally) getting your shit back is easily forgotten. So here I am, in command of a Spanish flotilla composed of two corvettes and two gunboats, outnumbered and out-gunned in high seas.
 |
| Taking advantage of the high speed of the Sirena and Ligera gunboats (right) I lured the entire Peruvian flotilla (left) to turn back and shadow my nimble ships. My two corvettes (Africa and Vencedora), in the far background are starting to maneuver towards the Peruvian column. |
 |
| My two corvettes steaming at full speed towards the Peruvian column (right column in the background). My gunboats (left column in the background) are starting to get some serious punishment from the Peruvian column. |
 |
| The Sirena and the Ligera gunboats managed to inflict some damage on the Peruvian flotilla. But in naval combat all is about the amount of guns and my two gunboats are in the wrong side of the attrition calculus. Note my two corvettes in the background approaching the Peruvian column. |
 |
| After some nail-bitting twenty minutes, the Africa and the Vencedora reach the Peruvian column. They double onto the helpless gunboat in the Peruvian van. As much as I would have liked to keep pouring shells onto the Peruvian gunboat, my own Ligera and Sirena needed some serious help and I had to move my corvettes towards the Peruvian column's center. |
 |
| Keeping the Africa and Vencedora on both sides of the Peruvian column proved to be a task too hard for my Captains. A collision between the Vencedora and the Peruvian corvette Callao disorganized my attack. All went bad from there. In this screenshot, a nightmarish situation with the Vencedora (center) almost surrounded and receiving fire from at least four Peruvian ships. |
 |
| Defeated, the Africa (foreground) follows the Vencedora (not shown here) back to port. My two gunboats can be seen in the background (right) getting away from the Peruvian flotilla (background, left). |
Tuesday, November 9, 2010
The A-10 Warthog, the USAF's unwanted child that everybody else loved
The A-10 was designed around the GAU-8 Avenger, a heavy automatic cannon which forms the aircraft's primary armament.
From Wikipedia
In our fun-driven and picture-perfect world of combat flight simulators, aircrafts are measured with a single stick that can measure only two parameters: firepower and speed. When speed is not an aircraft's forte, we tend to ignore it as an anomaly and focus on the other feature that we love, firepower. The quote above is taken from Wikipedia and is a "fun fact" that is ubiquitous in flight sims forum discussions. That "fact" is actually a half-truth.
What is the measure of great combat aircraft?
Continuing with the measuring stick analogy mentioned above, in the real world there are as many types of sticks as types of missions doctrine can conceive. Furthermore, these many sticks may measure the same parameters in completely different scales. High speed may be great for a fighter flying an interception mission but will be a a handicap for a close air support pilot trying to drop bombs on the enemy who, according to the tactical air controller, is located in "the field north of the house with a red roof". The real measure of a combat aircraft is how well it can accomplish the mission for which it was designed.
It is rather odd that a great aircraft like the A-10 was conceived in times where the existence of its intended mission (close air support) was being debated in the USAF.
 I've just finished a re-read of The Warthog and the Close Air Support Debate by Douglas N. Campbell, and I wanted to put this book on your radar.
For all practical purposes, this is the best history of the conception of the A-10 available to the general public. I can't find any other book that comes close to the level of detail and quality of presentation offered by Douglas Campbell. This is not a book that I can recommend to people who are interested in combat stories or aeronautical design. This book is rather a close-up at how the A-10 came to existence despite ferocious inter-service rivalry, the US Congress and the bipolar attitude that the USAF historically had for close air support. Great weapons and their delivery means follow a rather tortuous path and Campbell's book is a rare glimpse into a world that most people haven't heard of.
As for the opening quote above, the original "concept formulation package" (CFP, dated around 1968) for the competition that the A-10 eventually won, specified a requirement for a to-be-developed 30 mm tank-killing gun. This CFP assumed very short development times and forced competitors to a schedule where both the cannon and the aircraft had to be worked simultaneously (instead of sequentially). When the time for the competition fly-offs arrived, the GAU-8 was not even ready to be mounted in the aircraft. On the meantime, the A-10 was sporting the M61A1 “Vulcan” 20mm cannon. I reckon this issue has "chicken or the egg" written all over it, but certainly nobody took a GAU-8 and built an aircraft around it.
Cheers,
From Wikipedia
In our fun-driven and picture-perfect world of combat flight simulators, aircrafts are measured with a single stick that can measure only two parameters: firepower and speed. When speed is not an aircraft's forte, we tend to ignore it as an anomaly and focus on the other feature that we love, firepower. The quote above is taken from Wikipedia and is a "fun fact" that is ubiquitous in flight sims forum discussions. That "fact" is actually a half-truth.
What is the measure of great combat aircraft?
Continuing with the measuring stick analogy mentioned above, in the real world there are as many types of sticks as types of missions doctrine can conceive. Furthermore, these many sticks may measure the same parameters in completely different scales. High speed may be great for a fighter flying an interception mission but will be a a handicap for a close air support pilot trying to drop bombs on the enemy who, according to the tactical air controller, is located in "the field north of the house with a red roof". The real measure of a combat aircraft is how well it can accomplish the mission for which it was designed.
It is rather odd that a great aircraft like the A-10 was conceived in times where the existence of its intended mission (close air support) was being debated in the USAF.
For all practical purposes, this is the best history of the conception of the A-10 available to the general public. I can't find any other book that comes close to the level of detail and quality of presentation offered by Douglas Campbell. This is not a book that I can recommend to people who are interested in combat stories or aeronautical design. This book is rather a close-up at how the A-10 came to existence despite ferocious inter-service rivalry, the US Congress and the bipolar attitude that the USAF historically had for close air support. Great weapons and their delivery means follow a rather tortuous path and Campbell's book is a rare glimpse into a world that most people haven't heard of.
As for the opening quote above, the original "concept formulation package" (CFP, dated around 1968) for the competition that the A-10 eventually won, specified a requirement for a to-be-developed 30 mm tank-killing gun. This CFP assumed very short development times and forced competitors to a schedule where both the cannon and the aircraft had to be worked simultaneously (instead of sequentially). When the time for the competition fly-offs arrived, the GAU-8 was not even ready to be mounted in the aircraft. On the meantime, the A-10 was sporting the M61A1 “Vulcan” 20mm cannon. I reckon this issue has "chicken or the egg" written all over it, but certainly nobody took a GAU-8 and built an aircraft around it.
Cheers,
Sunday, November 7, 2010
Normandy AAR - Guess the game (blast from the past)
I wrote this AAR years ago .


“The damndest country I’ve ever saw”
Many of you guys know that the hedgerow countryside of France imposed a formidable tactical challenge to the American troops after the Normandy landings. The title of this AAR is a phrase presumably said by Gen. Bradley, referring to the difficulties this kind of terrain presented to the advance of the liberation forces.
This AAR is inspired in recent readings. The book “Closing with the Enemy” by Michael Doubler has an entire chapter describing both the problems and the solutions the American GIs came out with for hedgerow fighting.
The challenge of taking out an enemy defensive position in the hedgerow countryside is obvious. You have to drive your forces in an open field, offering an easy target to defensive positions located in the hedges in front of you. You have to be aware that in [this unknown game], the hedgerows are not modeled accurately. The real-life hedges were taller and harder to cross. Regular tanks were not able to cross them until later times (more on this in the next installment). So, during the first days after the Normandy landings, company commanders had to advance in across this type of terrain without tank support. In this AAR, I describe the outcome of a scenario I made to re-create and analyze the early tactics in hedgerow fighting.
The map used is shown in the figure, the hedgerow in the foreground is the point from which the Americans will attack a German defensive position located in the hedges of the background.
If you take a look to the map, there is a road in the left flank. For this AAR, we are going to ignore this inviting tactical alternative. I am only interested in portraying the terrible thing that should have been to advance in the hedgerow country without tank support.
As described in Doubler’s book, I will use the “early” infantry tactics, this is the tactics used before a device was attached to the tanks to allow hedgerow crossing. The plan is as follows: 1st Squad and 2nd Squad will assault the enemy defenses across the open field. A weapons team (mortar and heavy MG) will provide fire support and smoke. Just before the 1st and 2nd Squads reach the hedges, the 3rd Squad will follow alongside with the weapons team.
In this figure, you see the 1st and 2nd Squads (foreground). The weapons team is deployed in the hedges, awaiting orders.
After the weapons team start their jobs (support fire and smoke), the 1st and 2nd Sqds. run across the open field. I was surprised to see how effective the smoke screen resulted: the two squads advanced untouched by bullets all the way.
But when the two squads cross the smoke screen, hell breaks loose. My fault, now I realize that the smoke screen should have been targeted just over the enemy defense line.
The 1st and 2nd Squads reach the hedgerows in bad shape (5 KIAs, 2 wounded in the 1st Squad; 2 KIA, 1 wounded and 1 incapacitated in the 2nd Squad). They manage, though, to spread destruction and confusion in the enemy defense line. Note the German AT gun in the background, they don’t know that the Americans have crossed the defense line.
It is time to bring the 3rd Squad and the weapons team to the gap created by the 1st and 2nd Squads. In the next figure, they are seen advancing towards the enemy.
As happened just minutes ago, they cross the smoke screen to meet a horrible welcome party.
At the time the last picture was taken, the 1st Squad was routed and the 2nd Squad was broken. The 3rd Squad will have the job to clean up this mess until the rest of the company is called upon.
Luckily, the German defensive line started to loose morale and several MG42s cannot be heard firing. They must have routed. In this picture, two German soldiers debate where to rally (the Americans are advancing from the left, perpendicular to the road). Look at those tracers!
By the time the 3rd Squad has cleared this road, the Americans have suffered horrible losses (only one survivor from 1st, 2nd and weapons team). The 3rd Squad itself has 2 wounded.
In this other picture, a German soldier has decided to live another day and runs away from the destruction.
Just when the 3rd Squad has consolidated itself in the hedges, a counter attack from the left flank is mounting. The MGs that I thought have routed have intentions of reorganizing a counter attack.
However, they cower as soon the 3rd Squad fires the first shoots. Mission accomplished at last!
Conclusion: this was a horrible slaughter. 23 Americans have been killed. This is too much compared to the German losses (12 KIAs). Without any doubt, this “early” type of tactic had to be changed to preserve lives and material.
Do you remember this game?
Cheers,
Subscribe to:
Posts (Atom)