Wednesday, February 16, 2011

Barbarossa Derailed - The New Book Series by David Glantz

Pop quiz!

Do you know the orders Timoshenko gave to the 20th Army at 1800 hours on 17 August 1941?

I do, because I'm reading Barbarossa Derailed: The Battle for Smolensk, 10th July-10 September 1941, Volume 1, by David Glantz.

What a book, dear friends. It is the most detailed account of the Battle for Smolensk from the grand-tactical and the operational level point of view. The book leans heavily towards the Soviet point of view, but it doesn't fall too short on the German one. It is a book where you will find a lot of information in each of the 600+ pages, so take it slowly. The writing is very clear but (at least on what I have read since I got it) it is focused in formations of the size of divisions and above. If you are looking for a narrative or stories of individual divisions, regiments or soldiers, this book will not fit the bill. This is not a book for the casual reader and it's big physical size doesn't make it a good bed reading.

Volume 1 (already released) and volume 2 (to be released in March) will be a chronological narrative of the operations. Volume 3 will be a collection of orders and reports translated from Russian archives. Volume 4 will be an atlas with color maps made from scratch.

I continue to read this book but I will add a big side dish of war gaming. Following the narrative with the help of maps found in war games is a lot of fun. War gaming the situations described in the book will be fantastic.

John Tiller's Panzer Campaigns Smolensk 41 (published by HPSSims), here shown with MapMod (mapmod.hist-sdc.com/index.htm), is one of the best to get your war gaming fix of what you read in the book.

SSGs Across the Dnepr Second Edition (published by Matrix Games), also a very good war gaming match for the contents of the book.
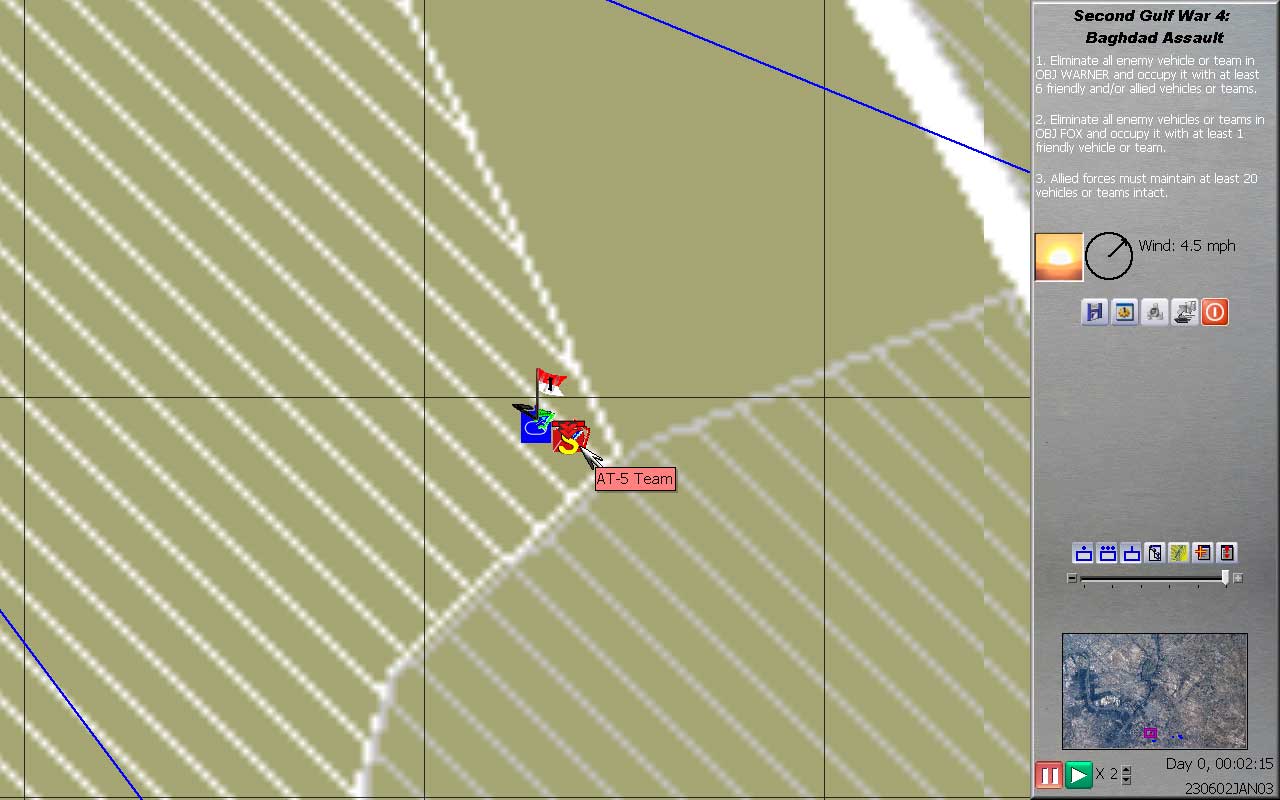
Gary Grigsby's War in the East (published by Matrix Games) offers another great war gaming fix for the readers of Barbarossa Derailed.  The lower level of detail of the terrain (less terrain features due to the increased size of terrain represented by each hex) and the lack of a scenario focused exclusively in the Battle for Smolensk may be an issue, though.  
And before I forget, Timoshenko's orders to 20th Army were:

To Comrade Lukin:
-Commit 161st RD in the Sopshino, the railroad bridge over the Dnepr River, and Dobromino sector
-Commit 129th RD in the Dobromino and Klokova sector, after leaving one regiment at the boundary with 24th Army to protect the Novyi Iakovlevichi and Glinka axis.
-Have 153rd, 229th and 73rd RD begin their attack west of the Dnepr River when 161st and 129th RD reach the El'nia-Smolensk railroad.

Above text from page 444 of Barbarossa Derailed, Volume 1.

Cheers,

Tuesday, February 15, 2011

The Red Pill Looking for a New Name

A naming contest is up at the Armchair General's website. There are prizes, but what better than bragging rights to coming up with a great name for a great game.

Please submit your entries here.

This screenshot from a batch of new ones recently posted at Warfaresims.com.

I don't want to read too much into this contest, but the developers are looking for a name ... Is the release date close?

Cheers,

Monday, February 14, 2011

DCS: A-10C Warthog - Dropping Bombs


I'm feeling particularly courageous these days and decided that I should start a serious and methodical learning regime on the A-10's ordnance usage.


The DCS series pilot's manuals have not worked out very well for me. They are very detailed, but I just can't learn from them.


So I am reading forums checking YouTube videos and cross-referencing with the manual. Not so methodical, but well at least to figure out what I don't know. Wait! That is an easy one: I know nothing! :)

 I'm totally hooked with this simulator. I love flying it, I love the avionics, the targeting system ... I feel all geeked up with all the systems and button presses.


Yesterday I erased my old controllers profile. I'm using a CH Products HOTAS/Rudder Pedals combo and I mapped these controllers more or less in line with the real A-10 HOTAS. The stick was easy as it is very similar to the real one, at least button-wise. The CH Throttle not so charming, but oh well ... The idea is that if the realA-10  HOTAS is mapped that way, it must be very close to the optimal.

So, let me post here a video from a guy nicknamed ExcessiveHeadSpace. Absolutely great videos on DCS A-10. Make sure to visit his videos at YouTube and leave some feedback. He deserves a big thank you!


Cheers,

Sunday, February 13, 2011

DCS Black Shark - Tunnel Vision

The game: DCS Black Shark
The tactical situation: a flight of two Ka-50 is prepping by fire the route that land forces will use to advance  through insurgent-controlled territory.
The topic: sensors are good, but watching out of the cockpit is what keeps you alive.

We stop well ahead every built up area to scan ahead.
Found a truck-mounted ZU-23-2 near the road. We fired at it, but the range was too high (3.4 km).


In search for a better angle of fire and a better range, we fly parallel to the road with the threat at our left.

At the new firing position, the range is still high. But the field of fire is extremely clear.

The new firing position and my sustained staring at the SHKVAL got us too close to a new built up are. Another AAA position fired at us and hit me.
The shark is bleeding smoke as I pull it out of trouble. The enemy AAA keeps shooting at us: see the tracer just below the rocket pods in my left pylon.
With all this damage, I'm surprised I could fly the shark out of the enemy fire.
Emergency landing. This is not going to look good in my pilot's file.
The enemy system that hit me was another ZU-23-2. I was a fool letting my flight so close to the built up area. But while reviewing the mission track I could see a first burst of AAA not hitting me. If I would be watching out through the window instead of the Shkval screen, I could have avoided the enemy fire.

Cheers,

My TrackIR 4 is Dead! Long Live my TrackIR 5!

What a week, folks!

Work was insufferable. My old Windows XP machine stopped booting up after I tried to install something. My TrackIR 4 died. When it rains, it pours.

The show must go on, though. I finally pulled out that mega order at work, I re-installed XP at the missbehaved machine (still have to un-license and reinstall some games) and got myself a TrackIR 5.

TrackIR 5 is noticeable better than TrackIR 4 in terms of response and accuracy. Yet I don't recommend upgrading if your TrackIR 4 is still working fine.

What went wrong with my TrackIR 4? I will never now. I noticed it not responding very well two weeks ago. Maybe I should have un-plugged it while I was not using it (sometimes I stay for hours in the computer and I wonder if these things overheat).

Wanna hear something good about a games company?

GoGamer.com! I ordered my TrackIR5 early on Monday 7th. Their website said it was available and that would ship withing 24 hours. I payed for a FedEx 2 day shipping. During the afternoon of Tuesday 8th, I write an e-mail to them asking why my order has not shipped (order status in their website was "processing") and they answered something like "yeah, yeah, it will ship today". Late Tuesday 8th, the order is still listed "processing" and I have no hopes of this thing getting in a long time. Wednesday 9th in the afternoon I get an e-mail telling me that the order has shipped. I track the package at FedEx and I found out the package was already delivered that morning! Meh! These GoGamer guys are men of action and not paper-pushers. They charged my credit card just today, almost a week later. Odd. But my TrackIR 5 was here just in the promised time span.

Cheers,

Monday, February 7, 2011

ArmA 2 Operation Arrowhead British Armed Forces - Checkpoint Repels Insurgent Attack With .50 Cals

The game: ArmA 2 Operation Arrowhead British Armed Forces
The situation: a patrol section (+) manning an unfinished checkpoint is caught by surprise by insurgent forces.
The topic: in open terrain the .50 cal is king. Hone your HMG techniques of fire, lads!

The engineers came, built a half-assed checkpoint and left with the promise of finishing it up the following day. Checkpoint North was born out of wire, earthen parapets, small sandbagged bunkers and the willingness of the British soldier to do whatever it takes to accomplish a mission. Our command post/living quarters was a nice change, though. We have been sleeping near our Jackals for quite a while and having a roof over our heads was a welcomed change in the routine.

The entrance to checkpoint North.
Rush hour at checkpoint North. The line is a whooping 10 cars long.

The search area of checkpoint North. We didn't even have the proper search tools. 

Panoramic view of the checkpoint. In the distance, cars wait to enter towards the search area. The whole checkpoint is surrounded by a perimeter of concertina of approximately 500 meters. More visible in the image, the wire was also laid out at each side of the road.


On the right side of the road, we placed a Jackal in a firing position overlooking the main approach to the checkpoint. The command post/living quarters can be seen on the left.

Same thing on the left side of the road.
The reasons why we ended manning checkpoint North with so few assets are hard to justify. Our patrols platoon was conducting presence patrols in the area when the order to set up a checkpoint came in. Our CO decided not to interrupt such patrols because he got HUMINT about "something out of place with the insurgents cell phone traffic". We ended up at checkpoint North with just three Jackals (three teams or a reinforced section). A platoon should not be split when the enemy is in the bushes ... This is true since the time of the Boer Wars.

It was while following a HUMINT tip at a village south of the checkpoint when the distant sound of an IED and the ensuing frantic radio calls reached my 5 men team. We jumped in our Jackal and rushed towards the checkpoint trying to sort out what was going on.

The smoke and fire in the distant checkpoint ... Nothing good is coming out of this thing.
As we approached the chekcpoint, we could see the smoking trails of SPG-9 recoilless guns fired at the two Jackals that were already in position. There was only two vehicle fighting pits at the checkpoint and we needed a hull down position immediately. The Jackal is moderately tall, and hard to "hull down". Out of desperation I drove our vehicle behind the cover of the command post.

Hull down, but with an exposed gunner. Such is the life of the lightly armored vehicle crews.
The view from our vehicle. In the distance, insurgents pour out of an assortment of vehicles.

The AI does a moderately good job shooting the L111A1, but I eventually I had to man the thing. Note the sandbags of the roof of the command post.
Mayhem. In the crosshairs, a vehicle mounted SPG-9 I just engaged with the .50 cal. In real life, any soldier worth of his profession would have the ranges already figured out. He would even planted stakes to mark those ranges. In this scenario, I just fired in a Z pattern until I hit the bloody insurgents. The optics of the L111A1 really paid off.
We have been lucky. The insurgents approached over open terrain and our fields of fire were wide and deep. We lost two men and a Jackal to the enemy's SPG-9s. The checkpoint held without using a single AT weapon.

We eventually abandoned the relative safety of the checkpoint and moved up the road to clear it. In this image, the Jackal covers us with the .50 cal. 

Never underestimate the power of the .50 cal.

Cheers,

Wednesday, February 2, 2011

Maneuver Warfare: A Wargamer's Notebook - OODA Cycles - In the Air: Sabres vs Migs

This series of blog entries are about the so-called "maneuver warfare" as explained by William Lind. The writings of Robert Leonhard will also be included. I claim neither expertise in the subject nor devotion to this way of waging wars and thus I am not trying to convert you into anything. This series is not an analysis or a review of all ideas about maneuver warfare but rather some explorations about the topic based on computer war games and simulations. Future entries will be delivered based in readership.


In the previous entry, I mentioned how John Boyd got the idea of the OODA cycles from the air combat realities of the Korean War. Apparently, the F-86 Sabre had no advantage over the Mig-15 in thrust, turn or climb rates. It was the ability of the F-86 Sabre to quickly transition between maneuvers what made the difference against the Mig-15.


In this entry, I fly through the virtual skies of North Korea looking for some edu-fun-meint.


The choice of flight simulator was easy: Rowan's Mig Alley. I don't think any mod out there for more modern combat flight simulators can replicate the dogfight experience of the good ole Mig Alley. A thing I never got over with fan-made mods to flight simulators is the lack of information about their flight models. Since flight models are really very important for this entry, I just sticked with Mig Alley. BTW, this flight simulator (ugly as it looks by today's standards) has a lot of personality. Maybe I should write a few more entries about it.


So, I went on and flew the Sabre and the Mig in empty skies. On the issue of maneuver transitions: yes, I can invert, roll and shake the stick with an almost immediate response in the Sabre. Not so fast with the Mig-15. Check, issue is closed.


Can the fast transitions of the Sabre translate in faster observation-orientation-decision-action  cycles that can be used to gain an advantage? Seoul, we have a problem ... Of the OODA cycle, 3 out of 4 steps (observation, orientation and decision) depend exclusively on the man and just one (action) step partially depends on the machine. Yours truly is a terrible combat pilot ... 


Even when the Mig-15 was mentioned above in having the advantage in sustained performance, this advantage is not gigantic. For air-combat purposes, the Sabre and the Mig can be considered as "similar aircraft". I experienced this in the flight simulator: flying the Sabre in turn-and-burn dogfights (angles fights would be the academic term), and in particular at the very end of flat scissors maneuvers, I frequently ended up in a head to head zoom ins. In other words, both aircraft can turn almost at the same rate and with the same radius.


Head to head zoom in. Scary stuff ...


I still have to work my flying skills to take advantage of the supposedly faster transitions of the Sabre. All I can report today is how I took advantage of a bad OODA cycle of a Mig-15's pilot.


So here it goes: a mano a mano with a Mig-15 (computer opponent set to "hero", the maximum skill available).


A Mig-15 in my tail ... Just another day in the office.


The Mig-15 is turning with me.


He tries hard to saddle. Here is to hope that the Mig-15 overshoots.
The turns into me, I turn into him ... A tad late but that's what the books say I am supposed to do.

Another opening of the scissors. The Mig is shown turning into me. Note that this maneuvers are not actually textbook rolling scissors, as the Mig-15 has still  positional and angles advantages over me.
BAM! The Mig-15 pilot, now spooked by the multi-story buildings, is short in airspeed and altitude and abandons the turn in order to regain both. I can see him struggle to regain control of the aircraft without stalling. I turn into him immediately.
The Mig-15 is trying to get away. I struggle to regulate my airspeed to a perfect closure rate that avoids an overshoot. 
The Mig-15 is in the background, it gained some airspeed but it is still low and flying away in a gentle turn. My inability to regulate airspeed forces me into a lag pursuit roll, here shown in its initial stage.
In a surprising move, the Mig-15 reverses his turn into me and climbs to meet me. Fortunately, he started to climb at a relatively low airspeed and to add insult to injury he turns into me. He made an awful decision and is flying really slow. That's why I got a chance for a couple of on-target snapshots. Shown here, a few seconds after my two cannon bursts (smoke can be seen from the Mig's tail).


I let him to pass by my aircraft. He goes down in a gentle spiral turn. It's a confirmed kill.


Cheers,

Sunday, January 30, 2011

Air Assault Task Force - Mini Thunder Run

The game: Air Assault Task Force
The scenario: a US Cavalry company reinforced with engineer assets is pushing into Baghdad and trying to spoil an ongoing Iraqi Army withdrawal.
What I want to share: fire and maneuver while on the run with a platoon of M1A2 Abrams tanks.

Click the image for an expanded view. The graphics are a bit dated (this scenario is quite old), but you have to give it to me that ProSimCo games rock when it comes to immersive military command decision making. The white slashed areas are urban terrain of different densities. Our axis of attack (Warrior) is a nightmare: obstacles (not depicted since I don't know where they are) and AT missile ambushes along the roads (white lines) leading to the bridge south of objective Fox.
Click the image for a better view. Black grids on the map are squares of 1 km.  Our order of battle is shown in the right pane of the user interface. I'm going to advance towards phase line Falaise with the First Platoon (4 M1A2 Abrams) up front and the Second Platoon (4 M2A2 Bradleys) in a follow and assume posture/mission. I'm going to avoid the main road on axis Warrior because it is likely that the AT missiles are aimed directly to them. The edge of the urban terrain south-west of the main road is particularly good for AT positions and I plan to clean it up with the tank platoon.

I know, I know ... urban terrain and tanks do not mix well. But I'm claiming extreme time constrains. An infantry platoon with a "clear" order would take no less than two hours to clear that amount of terrain.

Click the image for an expanded view. First Platoon is in the center of the map, just a few hundred meters before entering the hot zone. The First Platoon will move northeast but keeping itself southwest of the axis Warrior. Selecting a "staggered column" formation for this platoon would result in each individual tank too separated from each other and this would generate mutual support issues.
Click the image for an expanded view. To make sure each tank can support by fire the rest of the platoon I select "none" as the formation and drag the tanks very close to each other.
Click the image for an expanded view. The First Platoon is selected (note the green squares/outlines on each icon in the map) and ready to move (the little green arrows are the waypoints for the Platoon). Most important: the "suppress" order (blue cross with a surrounding green circle): whatever hostile unit is detected within that circle will be fired upon by the tanks. 
Suppression is the name of this game, folks!

Click the image for an expanded view. We made contact right away. The range is close and murderous. In the screen above, the Platoon fires and suppress the enemy position. Note the "S" marker, for suppressed. 
Click the image for an expanded view. I had to move the Platoon really close to identify the enemy position. Now with the unit identified, I can issue a "TRP" order to the platoon so they use their fires to destroy the enemy unit. This AT-5 team, if un-suppressed, would kick our asses from 3 kilometers away. So watch it.

The first AT-5 team is destroyed and I move my units right away. Very important: re-issue a "suppress" order in front of the First Platoon, so they fire away against any hostiles they find on their way.

Click the image for a better view. We are moving and kicking butt. The red "X"s are enemy AT-5 positions destroyed. In the screen shot above, the First Platoon has just encountered another one and I'm issuing a TRP order. It's quite a pleasure to hear the sound of the main guns blasting the enemy position at point blank range.

Click the image for an expanded view. The First Platoon (red and white flag with a number 1) has cleared 3 km worth of AT ambushes (7 of them, marked as red "X"s in the map) and stops short of phase line Falaise. Unfortunately, we lost a tank right at the end (blue "X" in the map) of the run. 
Cheers,

Saturday, January 29, 2011

Maneuver Warfare: A Wargamer's Notebook - OODA Cycles - A Brief Intro

This series of blog entries are about the so-called "maneuver warfare" as explained by William Lind. The writings of Robert Leonhard will also be included. I claim neither expertise in the subject nor devotion to this way of waging wars and thus I am not trying to convert you into anything. This series is not an analysis or a review of all ideas about maneuver warfare but rather some explorations about the topic based on computer war games and simulations. Future entries will be delivered based in readership.


Veni, vidi, vici.
Shortest OODA cycle ever.
As the theories of other influential military thinkers, the thoughts of John Boyd are commonly summed up in a short catch word or phrase. In this case, the OODA loop. Not much of a loop but rather a cycle, OODA cycles are the central piece of Boyd's theory and the very foundation stone of the maneuver warfare school of thought.


OODA is an acronym for:

  • Observation
  • Orientation
  • Decision
  • Action
These are the steps any entity in a competitive environment has to go through in order to gain an advantage over a rival. The OODA cycles of competing entities affect each other, as each entity will be starting a cycle based in the actions of the other. In general the entity with the fastest cycle will win, but not all is about speed. The maneuverist seeks not only to speed up his OODA cycles but to frustrate the efficiency and the output of his opponent's cycle. In an ideal situation, one could eventually force the opponent into OODA cycles that generate actions more and more inadequate. Think of the judo martial art, where the energy of every punch thrown at you is used   against the other guy, but with the addition of forcing the other guy to throw certain punches at a certain sequence that you know you can use to complete his defeat.


The OODA cycle is a deep and far reaching concept. In the present day is used in almost every competitive environment, including business. Unfortunately is often trivialized and misinterpreted. I already mentioned the popular interpretation of it as a "loop" rather than a cycle. For a complete discussion please check Science, Strategy and War by Frans Osinga (the most complete study of Boyd's military theories). A link to this book is provided below.


No less important than the ideas themselves are the ways these come to life. John Boyd's life and the origin of his ideas are described in Robert Coram's biography (link provided below). Boyd's intellectual pursuit on land warfare originated from the following observation about the kill ratios during the air war over Korea: the Mig-15's specifications (ceiling, max speed, thrust, climb rate, etc) toped the ones of the F-86 Sabre, yet the Sabres shot down more Migs.


The quest for the answer to this question is really fascinating. By this time, Boyd was perfecting his energy maneuverability theory (a theory about air combat that is another outstanding contribution) but the numbers from that theory favored the Migs. It had to be the men flying those aircrafts. Training? Nah, the North-Koreans were not bad fighter pilots and their training was almost identical to the one of the Soviets. Boyd's interpretation of the kill ratios was that the F-86 pilots could see better (the F-86 canopy had a better field of view) and change maneuvers faster because of the hydraulic controls of the aircraft (the Mig-15 had sluggish controls that resulted in a delayed aircraft response). In short, the F-86 pilots could see better (observe, orient, decide) and have their aircraft to respond faster to their decisions (action). A shorter OODA cycle.


These ideas are so deep that a whole dedicated blog would just scratch the surface. For the sake of brevity, I will just leave to you the task of exploring them. But please comment for inaccuracies above, ideas that you want to add just plain fun of discussion.


And now, let's go for some fun themed along the lines of the paragraphs above. Stay tuned.


Cheers,


Thursday, January 27, 2011

SITREP: Pinned Down by Day Job!

I'm itching to write more. So many ideas, so many games!

Unfortunately, my day job has been crazy these last two weeks. It's easing up, though.

Still in the fight. Thanks for reading my mumblings!

Cheers,