I didn't know that the Serpent Multipurpose Assault Weapon (SMAW II) was so close to being fielded (around 2012).
Video by the Defense News guys, from the AUSA 2010 Annual Meeting and Exposition held in Washington DC just last month.
Cheers,

Thursday, November 4, 2010
Tuesday, November 2, 2010
HistWar Les Grognards - Battle at Reick - Part 3
The battle takes shape and luck appears to be on our side.
Cheers,
Cheers,
Sunday, October 31, 2010
Saturday, October 30, 2010
HistWar Les Grognards - Battle at Reick - Part 1
It's a dreadful morning to go into battle, but we are still looking forward to confront the Allies.
Cheers,
Cheers,
Sunday, October 24, 2010
DCS: A-10C Warthog - Angle of attack: watch it, is not just a stall indicator - Part 2
Back when I was teaching biochemistry to medical students in Argentina, there was a veteran professor who used to say: "when you are young you teach what you don't know, when you mature you teach what you know, when you are about to retire you teach what the students really need". After a week long struggle to come out with a nice way to explain this angle of attack thing in the blog, I have thrown the towel. I can fly straight and level without the autopilot. I can trim my A-10 really pretty to fly as I want it to fly. But, I just can't explain how it works to somebody else. Worryingly, they say you don't really know what you can't explain and that's exactly the spot where this angle of attack got me. Maybe I don't know it that well ... Maybe I'm too young of a virtual pilot ... Who knows? :(
So, instead of boring you with lame attempts to explain the importance of angle of attack, I will just point you to where I got this viral idea. My only hope is to raise awareness of this way of flying and how it will affect your virtual missions, from cruising to the objective through the final gun run.
The book "Stick and Rudder" by Wolfgang Langewiesche is the premier source for all this angle of attack mambo-jambo. Ed Kolano has a nice article about the basics of angle of attack here.
The basics are as follows:
So, let's fly the Hog above the Nevada desert and let's see what it can do without touching the stick. The airplane will point its nose down or up depending on your throttle setting. At a certain throttle setting, the aircraft achieves steady flight. In this case is around 270 knots, but that varies depending on loading and altitude.
So, let's now increase our angle of attack a little bit. That's done by pushing the stick backwards. For long periods of time, it's kind of difficult (and exhausting) to keep your stick input consistent and even. That's why we have the trim! Yeah! Let's trim the nose up one or two notches. I know that as I do this, the aircraft will be trimmed for a larger angle of attack and a lower airspeed, so I don't need that much power now to keep flying straight and level and thereby reduce my throttle a bit.
Let's go loco and trim the nose up one or two notches more. I have the Hog now trimmed for a higher angle of attack and thus a lower airspeed, so I ease the throttle a bit until I get into level flight again.
The moral of this blog entry: watch for your tim/angle of attack! After a long commute to the kill zone, you may be arriving with a Hog trimmed for something else than a gun run. This may not kill you but the aircraft will be heavy to maneuver. In case of doubt, neutralize trim before the bomb/gun run.
Some useful values (please remember that the Hog's AoA indicator has values in arbitrary units, not real/physical angles):
This blog was never in the tutorial business, but my inability to properly explain this angle of attack-based form of flying has me very frustrated. I can only wish that this blog entry will spark some interest in the topic among you virtual pilots.
Cheers,
So, instead of boring you with lame attempts to explain the importance of angle of attack, I will just point you to where I got this viral idea. My only hope is to raise awareness of this way of flying and how it will affect your virtual missions, from cruising to the objective through the final gun run.
The book "Stick and Rudder" by Wolfgang Langewiesche is the premier source for all this angle of attack mambo-jambo. Ed Kolano has a nice article about the basics of angle of attack here.
The basics are as follows:
- You select an angle of attack to fly by using the horizontal stabilizer
- The angle of attack determines your airspeed
- From a selected angle of attack (and thereby airspeed) you can climb, descend or fly level by adjusting power
So, let's fly the Hog above the Nevada desert and let's see what it can do without touching the stick. The airplane will point its nose down or up depending on your throttle setting. At a certain throttle setting, the aircraft achieves steady flight. In this case is around 270 knots, but that varies depending on loading and altitude.
 |
| Without touching the stick and the throttle fairly open, the |
 |
| The angle of attack (AoA) indicator reads 14. This is an indication of the angle of attack that the aircraft reaches without any input from the stick. |
 |
| A quick glance at the instruments reveals that each engine of the Hog is consuming around 2,200 pounds of fuel per hour. Assuming a total fuel load of 9,600 pounds, we have around 2 hours of flight left. |
So, let's now increase our angle of attack a little bit. That's done by pushing the stick backwards. For long periods of time, it's kind of difficult (and exhausting) to keep your stick input consistent and even. That's why we have the trim! Yeah! Let's trim the nose up one or two notches. I know that as I do this, the aircraft will be trimmed for a larger angle of attack and a lower airspeed, so I don't need that much power now to keep flying straight and level and thereby reduce my throttle a bit.
 |
| I have trimmed the aircraft's nose one or two notches up and reduced throttle until achieving level flight. I am now flying at around 200 knots. Nose up -> more angle of attack -> less airspeed. |
 |
| The angle of attack (AoA) indicator now reads 16. Angles of attack between 15 and 16 are used to do some cruising in the Hog. |
 |
| Just with two notches of nose up trim, we decreased the fuel consumption and increased our flying time by one hour. Calculation above assumes a total of 9600 pounds of fuel available. |
Let's go loco and trim the nose up one or two notches more. I have the Hog now trimmed for a higher angle of attack and thus a lower airspeed, so I ease the throttle a bit until I get into level flight again.
 |
| More nose up trimming. My aircraft is now trimmed for an airspeed around the 170's. |
 |
| The angle of attack of indicator (AoA) now reads 18. Angles of attack of 17 and 18 are used for endurance or maximum loitering time. See next screenshot. |
 |
| We may be flying slower now, but look at our endurance! |
The moral of this blog entry: watch for your tim/angle of attack! After a long commute to the kill zone, you may be arriving with a Hog trimmed for something else than a gun run. This may not kill you but the aircraft will be heavy to maneuver. In case of doubt, neutralize trim before the bomb/gun run.
Some useful values (please remember that the Hog's AoA indicator has values in arbitrary units, not real/physical angles):
- AoA for cruising: 15-16
- AoA for maximum endurance: 17-18 (may come in handy for loitering)
- AoA for landing approaches: 19-20-21
This blog was never in the tutorial business, but my inability to properly explain this angle of attack-based form of flying has me very frustrated. I can only wish that this blog entry will spark some interest in the topic among you virtual pilots.
Cheers,
Thursday, October 21, 2010
How Much Difference a Good Looking Map Can Make?
I am the king of vanilla gameplay and visuals. Not that I'm proud of it, but I just don't mod my games. There are a few exceptions, though. The map mods for HPS Simulations games made by Philippe Divine are an example of mods that I follow and download regularly.
Recently, he added map mods for the "Total War in Europe" series. Please see below an example for the "War in the Southern Front". BTW great game at the operational level of war.
Recently, he added map mods for the "Total War in Europe" series. Please see below an example for the "War in the Southern Front". BTW great game at the operational level of war.
 |
| Before the mod. El Alamein to Tobruk scenario. Click the image for a detailed view. |
 |
| After the mod. El Alamein to Tobruk scenario. Click the image for a detailed view. |
The scenario description, taken from the game:
El Alamein, October 23rd 1942: Two years had passed in the struggle for control of the Western Desert. Each side had won, and each side had lost, neither side had managed to inflict a decisive defeat on the other. The two sides had frequently been compared to two boxers, each tied with the elastic rope of their supply line, as one moved further from the supply source, the stronger the pull his rope exerted to get him back to his corner. The balance had now passed back to the 8th Army, close to its supply and getting stronger each day, while the Afrika Korps was at the end of its rope and getting weaker. Montgomery had planned a deliberate bleeding of Rommel's daunted troops, attacking here and there to cause them to react and burn precious fuel in constant movement. The time was now ripe to finish the Afrika Korps once and for all. Monty's plan was for XIII Corps to mount holding attacks, while XXX Corps delivered the main blow in the north. Two corridors were to be secured so that the armor of X Corps could move through the extensive minefields and destroy the Axis armor. British Prime Minister Winston Churchill called the Allied victory at Alamein "The End of the Beginning!"
Cheers,
Monday, October 18, 2010
The Breach - A Custom Edited Short Made with Medal of Honor - by BO
This one from BO (AKA DevilDog), Iraq War veteran and badass video editor. Thanks for your service and for the video, BO! Salute!
DCS: A-10C Warthog - Angle of attack: watch it, is not just a stall indicator - Part 1

You like to get to the target as fast as you can, push the buttons, drop the bombs, fire the missiles, strafe the tanks ... The fun things. All cool, dude. Same here. But have you checked your flight gaits lately?
If you are one of those flight simmers who think that the throttle controls airspeed and that the stick controls climb or descent rate, you need to go back to flight school.
Believe me, back when I started flight simming I wish somebody would have been as blunt as I am being with you right now. My flying was a continuous phugoid, an unruly struggle of chasing the vertical speed indicator without knowing what the f**k I was doing.
A while ago I posted an entry about the infamous "angle of attack" flight parameter and the epiphany I got learning about it from the venerable book "Stick and Rudder". From the book introduction (this excerpt is also in my previous blog entry):
At this very moment, thousands of men, trying to learn to fly, are wasting tens of thousands of air hours simply because they don't understand how an airplane flies; because they don't see the one fact that explains just about every single thing they are doing; because they lack the one key that with one click unlocks most of the secrets of the art of flying.
In the textbooks, this thing is discussed under the name of Angle of Attack. The story of the Angle of Attack is in a way the theory of flight: if you had only two hours in which to explain the airplane to a student pilot, this is what you would have to explain. It is almost literally all there is to flight. It explains all about the climb, the glide, and level flight; much about the turn; practically all about the ordinary stall, the power stall, the spin. It takes the puzzlement out of such maneuvers as the nose-high power approach; it isthe theory of landing. No maneuver can be fully understood unless you understand this one thing. You may then still not be able to fly well; you may still be clumsy at moving the stick and rudder perfectly together. Your eyes and ears and feet may still be a little dull; but you will understand flying and not be puzzled; you will be able to figure out what you ought to do; you will be able to analyze your own mistakes; and you will get by.
At the risk of repeating myself, I'm going to explore different flight conditions for the A-10C viewed from the angle of attack point of view.
 |
| My Hog is not climbing, neither stalling. It's flying straight and level at 143 kts IAS! |
Cheers,
Sunday, October 17, 2010
DCS: A-10C Warthog - Thrustmaster MFDs Work Out of the Box!
 |
| I need a new desk ... or a cockpit! |
These MFDs are not a "must have" toy for the flight simmer. They just provide some relief to all that mouse clicking to have to go through in the virtual cockpit. I'm looking forward to put these two MFD button gadgets on top of a monitor displaying the actual MFD graphics.
Cheers,
Saturday, October 16, 2010
Scourge of War Gettysburg - The 1st US Cavalry Division at McPherson's Ridge
If ordering the first shots of a meeting engagement that turned the tides of a war marred by indecisive battles doesn't move your inner generalissimo, nothing will.
Much has been written about the battle of Gettysburg and about the delaying action that the 1st US Cavalry Division fought during July 1st of 1863 under the command of the iconic General Buford. As usual, you are better off reading elsewhere about the American Civil War and the Battle of Gettysburg. If you are really into it, let me recommend you David Pfanz's trilogy on Gettysburg. These books are the best tactical accounts of the battle.
Scourge of War is currently the only and best serious 3D tactical wargame about the Battle of Gettysburg. The past weekend I started playing the game's canned scenarios and I thought of sharing some of my misadventures here.
This scenario starts at 9:45 a.m. on July 1st 1863. In real life, after a couple of days of taunting between Confederate and Federal cavalry patrols, actions were just starting to shape into a battle. The Confederates started pushing towards Gettysburg with Maj. Gen. Heth's Division. The US Cav. Gen. Buford understood that the high ground around the McPherson's farm was crucial real estate to be held until the federal infantry arrived. In the game scenario, I'm playing as Gen. Buford and I am in command of the 1st US Cav. Division. My troopers are spread thin and for this battle I have only one brigade and a tiny 6-gun artillery battery.
A quick glance at the battlefield above makes you wish you any other force than cavalry for this battle. The enemy will come to us walking down a slope, crossing the Willoughby run and then climbing up towards the McPherson's ridge. Is there a better kill zone than this? Tactical advantage is in the muzzle of the gun holder, though, and with the forces available, this is not going to be pretty.
For starters, there is the issue of weapons range. Back in the American Civil War, the troopers were armed with carbines that, despite being able to deliver higher firing rates than the infantry muskets, had shorter ranges and less stopping power. Second, there is the issue of limited numbers: cavalry formations were in the receiving end of the attrition equation. If there is an advantage that the US troopers have in this scenario, that is mobility.
Deviating my tactics from the ones used in the historical battle, and eager to catch the enemy infantry with their pants down while they cross the Willoughby run, I deploy my line of defense between the McPherson ridge and the run. I count on my troopers mobility to disengage and rapidly fall back towards the ridge. I even move my artillery battery forward.
I will go through my line of defense from left to right flank. Please refer to the above birds eye view of the battlefield to follow.
The enemy advanced in a wide front. For some strange reason, the Confederates pushing towards the center of my line made contact first.
Some five minutes later, the culminating point of battle: the Confederates on my right flank start moving towards the railroad cut. Right into the junction of my center (8th New York) and right flank (3rd Indiana)! I have no forces there!
Fortunately for my forces, the Confederates deploy in front of the 6th New York and 3rd Indiana Cav. Regts. instead of pushing through the railroad cut.
I knew it would happen, but I didn't know it was going to happen so fast. Cavalry skirmishers will skirmish, not defend to the last man. I thought the 3rd Indiana was going to hold for longer, but just after 5 minutes of shooting, they retreated.
While all this was happening, I had the 12th Illinois Cav. Regt. pulling out from the McPherson's woods (they haven't seen any action yet) and rushing towards the trouble spot at the railroad cut.
The retreat of the 3rd Indiana Regt. had more devastating effect than what I anticipated, the center of my line (6th New York and Calef's battery) are now outflanked and under heavy pressure from the Confederates.
And boy, if there was a well spirited unit in my command that was the 12th Illinois ... Not happy with shooting, they mounted up and charged the Confederates!
In case you haven't noticed, the enemy is within shooting range of the McPherson's barn. They have reached the ridge and while they haven't secured it, we are officially not in control of the objective.
My center falls back, we are even thrown back to the reverse slope of the McPherson's ridge. The only option is to conduct some dis-functional counter-attacks to disrupt the enemy's deployment.
Most of my units are disrupted and I try to pull any trooper available back into the fight.
After some excruciating minutes, our infantry arrives. We are still enthralled in the fight, sabers waving slashes of Confederate blood up in the air, when the infantry men show up.
And this is how the scenario ended. I was awarded a major victory by the scoring system of the game, but we clearly failed the mission. We suffered 1042 casualties (out of 2805 men) and inflicted 1102 casualties to the enemy. We couldn't hold the ridge for our infantry and the poor souls will have to drive the enemy out of the objective.
My mistake was to push my troopers to fight as infantrymen ...
Cheers,
Much has been written about the battle of Gettysburg and about the delaying action that the 1st US Cavalry Division fought during July 1st of 1863 under the command of the iconic General Buford. As usual, you are better off reading elsewhere about the American Civil War and the Battle of Gettysburg. If you are really into it, let me recommend you David Pfanz's trilogy on Gettysburg. These books are the best tactical accounts of the battle.
Scourge of War is currently the only and best serious 3D tactical wargame about the Battle of Gettysburg. The past weekend I started playing the game's canned scenarios and I thought of sharing some of my misadventures here.
This scenario starts at 9:45 a.m. on July 1st 1863. In real life, after a couple of days of taunting between Confederate and Federal cavalry patrols, actions were just starting to shape into a battle. The Confederates started pushing towards Gettysburg with Maj. Gen. Heth's Division. The US Cav. Gen. Buford understood that the high ground around the McPherson's farm was crucial real estate to be held until the federal infantry arrived. In the game scenario, I'm playing as Gen. Buford and I am in command of the 1st US Cav. Division. My troopers are spread thin and for this battle I have only one brigade and a tiny 6-gun artillery battery.
 |
| Our mission: block the enemy forces attempting to seize McPherson's ridge until friendly infantry arrives. |
For starters, there is the issue of weapons range. Back in the American Civil War, the troopers were armed with carbines that, despite being able to deliver higher firing rates than the infantry muskets, had shorter ranges and less stopping power. Second, there is the issue of limited numbers: cavalry formations were in the receiving end of the attrition equation. If there is an advantage that the US troopers have in this scenario, that is mobility.
Deviating my tactics from the ones used in the historical battle, and eager to catch the enemy infantry with their pants down while they cross the Willoughby run, I deploy my line of defense between the McPherson ridge and the run. I count on my troopers mobility to disengage and rapidly fall back towards the ridge. I even move my artillery battery forward.
I will go through my line of defense from left to right flank. Please refer to the above birds eye view of the battlefield to follow.
 |
| In the extreme left flank the 12th Illinois Cav. Regt. deployed within the McPherson's woods. This terrain is ideal for a cavalry-based defense as the woods provide cover to fire and concealment to withdraw. Note that the "8th New York Cavalry" text in the info panel actually refers to another unit I have clicked but moved away from to take this screenshot. |
 |
| The 8th Illinois and the 8th New York Cav. Regts.are deployed in the center along a worm fence, overwatching the Willoughby run. In a thin skirmish line, they cover from the Mc Pherson's woods to the right of the Chambersburg pike. |
 |
| In the center, the only artillery available, deployed right in the Chambersburg pike. In the real battle, Gen. Buford ordered the commander of this battery (2nd Lt. Calef) to deploy his guns in a wide front so to deceive the enemy into thinking the federals have fielded a stronger force. The game shows this very well, and I had to scramble to gather 4 of the actual six guns available. |
 |
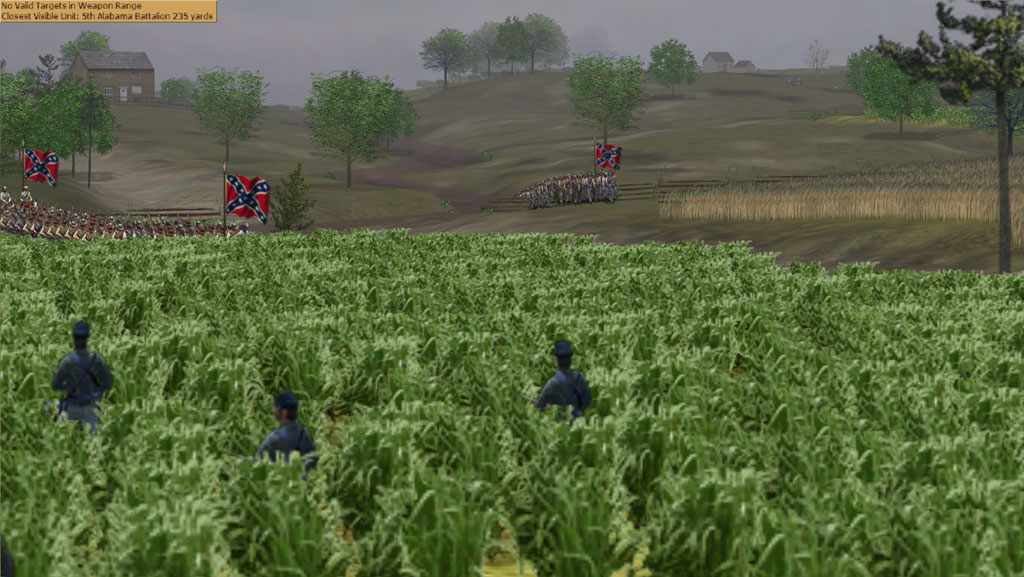
| To the right of the railroad cut, the 3rd Indiana Cav. Regt.covers a wheat field. |
 |
| The 6th New York Cav. Regt. is the unit located at the right extreme of the federal line and also the one deployed closest to the enemy. The wheat field on this unit's left is the same wheat filed that the 3rd Indiana Cav. Regt. is covering (previous image). |
 |
| The Confederates pushing towards the center of my defense line come under fire from the 8th New Yorkers. Despite the good shooting, the New Yorkers will have to show more than this to repel the enemy. |
 |
| Confederate forces advance towards the railroad cut (between the green corn field and the brown wheat field in the background). The men on the foreground are troopers from the 8th New York. |
 |
| A bird's eye view of the Confederate Brigade's move towards our weakest spot. |
 |
| The Confederates deploy slightly in the right flank of the 6th New York. Although we are outnumbered, the deployment of the Confederates will buy us some time. |
 |
| Confederates (background) deploy in front of the 3rd Indiana. |
 |
| The 3rd Indiana Cav. Regt. bugs out in all haste. |
 |
| The 12th Illinois Cav. Regt. mounts up and move towards where they are needed best. The men on the right are dismounted troopers from the 6th New York, still standing in a skirmish line after all the fighting. |
 |
| Our center has become our flank. Note the Confderates in the far background, now relieved by the retreat of the 3rd Indiana, moving to join the onslaught. |
 |
| The 12th Illinois arrives and tries to recover a semblance of a protected flank. |
 |
| The 12th Illinois charges the enemy. |
My center falls back, we are even thrown back to the reverse slope of the McPherson's ridge. The only option is to conduct some dis-functional counter-attacks to disrupt the enemy's deployment.
 |
| Friendly infantry is within sight. Note the routed troopers in the background. |
 |
| Troopers from the 8th Illinois fighting their way back to the McPherson's barn. |
 |
| A terrible price to pay for the McPherson ridge ... But it needs to be done. |
 |
| Friendly infantry (background) arrives and joins the fight. |
 |
| The arrival of our infantry shows up the real status of the enemy's morale. A Confederate regiment retreats from the McPherson's farm after a short fire exchange with Federal infantry troops. |
My mistake was to push my troopers to fight as infantrymen ...
Cheers,
Subscribe to:
Posts (Atom)