Another 200 gallons of tough love from a
Squad Battles' tutorial/boot camp scenario. :)
The game:
Squad Battles Red Victory (WWII, tactical level, turn based)
The scenario: Bootcamp 1, Assault on a Fortified Position. Training scenario. Topic: fire and maneuver, use of combat engineers
 |
| Mission for today is to take a German fortified position (A) manned by a German infantry squad. Specific objectives (blue squares with a number 50) are two MG42 bunkers on a hill. I am commanding a company of Russian infantry (B). By the time of this screenshot was taken, I already advanced/infiltrated my men to their assault jump off positions. Note how I am leaning my forces on the right flank. The vegetation offered concealment for a covert approach, but all my command is in a depression crossed by a gully. I feel like I'm putting fish for a barrel shootout. |
When calculated by counting men, the odds were in our favor. The firepower/terrain calculus was a totally different story ...
Russian maneuver, fire and combat support forces for this scenario:
- 2 x Infantry platoons (each squad sporting a DPM light machine gun)
- 1 x Sapper platoon (each squad equipped with wire cutters and satchel charges)
- 1 x Flamethrower team
- 10 x 120 mm Heavy mortars (two fire missions)
- 10 x 155 mm Howitzers (two fire missions)
Bean counting has always the same effect on people. It fools them into a sense of safety by the numbers that is completely abstract and distant from the problem that needs to be solved. If given the opportunity, I would have traded one whole infantry platoon for just one heavy machine gun team.
For the tactical task presented in this scenario, Soviet tactical doctrine of the day emphasized a thorough reconnaissance, boldness in the attack and a vigorous exploitation after the breach. Unfortunately, the scenario starts in daylight, with no chances for the sappers to infiltrate, reconnoiter and even cut lanes through obstacles (gah! Who would volunteer for that?) under the cover of darkness as they did in real life. Indeed, if you look at the screenshot above, we don't know crap about the enemy position (fog of war in effect).
To attack a fortified position, the Soviet combat regulations of 1942 suggest organizing the forces into the following groups:
- Clearing group (obstacle clearing, assault of bunkers - sappers supported by an infantry squad)
- Assault group (close combat, bunker clearing - at least 2 infantry squads, one heavy machine gun, a sapper squad with explosives)
- Fire group (fire support- infantry guns, mortars and heavy machine guns)
- Platoons in skirmish line (fire support and exploitation - infantry squads)
I've got all of that (just a bit short of mortar and artillery missions) but the infantry guns and the heavy machine guns. Why am I so fixated with the machine guns? Because they have the firepower to at least suppress the bunkers, they are relatively mobile and more accurate than artillery or mortar fire.
 |
| A sapper squad (first rectangle from the left, note the wire cutters) and flame thrower team. |
 |
| Extreme luck! The mortar fire fell in a way that blocks the line of sight from the A bunker and also some of the line of sight from the B bunker (indirect fire munition falls always very dispersed in Squad Battles). |
 |
| Reaching the breach point was not terribly difficult. Two artillery missions on the positions near the west bunker and whatever fires were available from infantry squads somewhat succeeded in keeping those MG42s firing at a low rate. A breach in the obstacles was cut by the sappers. However, at the time that this screenshot was taken the MG42s have waken up and many Soviet squads are pinned. |
 |
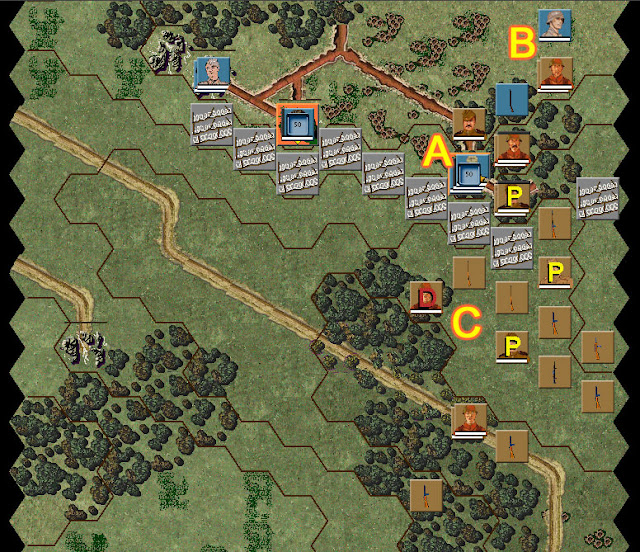
| Despite the moderate success in breaching and brushing out some of the German troops in the main trench line (A), at least four Soviet squads are caught in the open and pinned (B). Even the flame thrower team (C) is not moving forward. Suppressive fires from pinned squads are notoriously weak and ineffective :). |
 |
| The assault of the east bunker (A) was unsuccessful even after using satchel charges and the flame thrower. The German squad that we evicted from the trench line kept coming back for more (B). Down in the kill zone (C), casualties mounted to the dozens. |
Complete failure to achieve fire superiority resulted in a massacre in front of the German fortification. Tough scenario. Looking forward for more.
Cheers,


2 comments:
Bloody battle indeed. Good to learn from your experience.
Thanks, Al. More coming soon.
Post a Comment